
 資料結構
資料結構 網路
網路 關係型資料庫管理系統
 作業系統
作業系統 Java
Java iOS
iOS HTML
HTML CSS
CSS Android
 Python
 C 程式設計
 C++
C++ C#
C# MongoDB
 MySQL
MySQL Javascript
 PHP
PHP如何在 Ubuntu 上配置和設定 Postfix 郵件傳輸代理
在本文中,我們將學習如何配置和安裝最流行的開源 MTA(郵件傳輸代理)Postfix,它可以用於路由 Linux 系統的電子郵件傳遞。根據行業使用情況和估計,目前大多數公共郵件伺服器都在執行 Postfix。
在 Linux 上安裝軟體
由於 Postfix 是 Ubuntu 儲存庫中的預設軟體包,因此我們可以使用“apt-get”命令輕鬆安裝它。在安裝軟體包之前,我們需要更新系統。我們可以使用以下命令來執行此操作。
這是一個示例演示,我使用了 hanuman.com 作為域名。
$ sudo apt-get update
$ sudo apt-get install postfix
sudo apt-get install postfix
Reading package lists... Done
Building dependency tree
Reading state information... Done
The following packages were automatically installed and are no longer required:
libntdb1 python-ntdb
Use 'apt-get autoremove' to remove them.
Suggested packages:
procmail postfix-mysql postfix-pgsql postfix-ldap postfix-pcre sasl2-bin
dovecot-common postfix-cdb postfix-doc
The following NEW packages will be installed:
postfix0 upgraded, 1 newly installed, 0 to remove and 41 not upgraded.
Need to get 1,084 kB of archives.
After this operation, 3,609 kB of additional disk space will be used.
Get:1 http://us.archive.ubuntu.com/ubuntu/ trusty-updates/main postfix amd64 2.11.0-1ubuntu1 [1,084 kB]
Fetched 1,084 kB in 5s (196 kB/s)
Preconfiguring packages ...
Selecting previously unselected package postfix.
(Reading database ... 201768 files and directories currently installed.)
Preparing to unpack .../postfix_2.11.0-1ubuntu1_amd64.deb ...
Unpacking postfix (2.11.0-1ubuntu1) ...
Processing triggers for ufw (0.34~rc-0ubuntu2) ...
Processing triggers for ureadahead (0.100.0-16) ...
ureadahead will be reprofiled on next reboot
Processing triggers for man-db (2.6.7.1-1ubuntu1) ...
Setting up postfix (2.11.0-1ubuntu1) ...
Adding group `postfix' (GID 126) ...
Done.
Adding system user `postfix' (UID 118) ...
Adding new user `postfix' (UID 118) with group `postfix' ...
Not creating home directory `/var/spool/postfix'.
Creating /etc/postfix/dynamicmaps.cf
Adding tcp map entry to /etc/postfix/dynamicmaps.cf
Adding sqlite map entry to /etc/postfix/dynamicmaps.cf
Adding group `postdrop' (GID 127) ...
Done.
在這裡,它會要求您輸入要在伺服器上配置的郵件配置型別。在此演示中,我們將選擇適合環境的“internet site”。
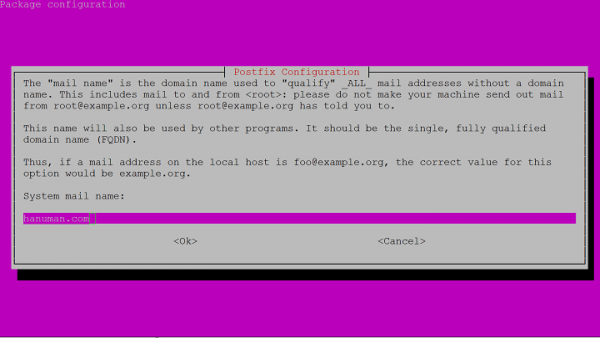
接下來,我們將提供 FQDN(完全限定域名)。在此示例中,我們使用“hanuman.com”作為伺服器 FQDN 名稱,但實際上我們通常會將其用作 domain.com。我們需要以點結尾 FQDN,但在 Postfix 中我們可以省略。

setting myhostname: hanuman.com
setting alias maps
setting alias database
mailname is not a fully qualified domain name. Not changing /etc/mailname.
setting destinations: mailserver, hanuman.com, localhost.localdomain, localhost
setting relayhost:
setting mynetworks: 127.0.0.0/8 [::ffff:127.0.0.0]/104 [::1]/128
setting mailbox_size_limit: 0
setting recipient_delimiter: +
setting inet_interfaces: all
setting inet_protocols: all
/etc/aliases does not exist, creating it.
WARNING: /etc/aliases exists, but does not have a root alias.
Postfix is now set up with a default configuration. If you need to make changes, edit
/etc/postfix/main.cf (and others) as needed. To view Postfix configuration values, see postconf(1).
After modifying main.cf, be sure to run '/etc/init.d/postfix reload'.
Running newaliases
* Stopping Postfix Mail Transport Agent postfix [ OK ]
* Starting Postfix Mail Transport Agent postfix [ OK ]
Processing triggers for ufw (0.34~rc-0ubuntu2) ...
Processing triggers for ureadahead (0.100.0-16) ...
Processing triggers for libc-bin (2.19-0ubuntu6.8) ...
配置 Postfix
現在,我們需要在 Postifx 主配置檔案中更改一些基本設定。
$ sudo nano /etc/postfix/main.cf
在檔案中搜索字串“myhostname”。預設情況下,“myhostname”設定為 localhost,我們需要將其新增到 FQDN 名稱中。
Myhostname = hanuman.com
如果我們想要配置需要轉發到另一個域的特定電子郵件,或者我們希望傳遞到我們沒有與系統帳戶一對一對映的地址,那麼我們可以刪除 alias_maps 並將其替換為 virtual_alias_maps。
Virtual_alias_maps = has:/etc/postfix/virtual
正如我們在上面討論的,“mydestination”引數已使用我們在安裝過程中輸入的 FQDN 進行修改。這包含 Postfix 安裝負責的任何域。
我們需要指定“mynetworks”引數,該引數定義能夠使用此郵件伺服器的計算機。通常,我們將其設定為僅限本地 (127.0.0.0/8),我們可以透過允許其他主機使用和傳送來修改它,但這可能是一個漏洞。
mynetworks = 127.0.0.0/8 [::ffff:127.0.0.0]/104 [::1]/128
我們還可以指定我們希望建立的電子郵件,以及左側要將電子郵件傳遞到的使用者名稱,您可以在下面的示例中看到這一點。
info@hanuman.com admin
info@hanuman.com 是要使用的電子郵件 ID,admin 是允許您在此伺服器上傳送電子郵件的使用者名稱。
為了檢查電子郵件並在演示中,我們正在建立一個電子郵件地址並將它們路由到同一帳戶以進行測試。我們可以將此地址設定為使用逗號分隔的列表轉發多個使用者帳戶。
info@hanuman.com adminuser
support@hanuman.com adminuser
root@hanuman.com root
contact@hanuman.com adminuser,root
儲存檔案並使用以下命令實現我們的對映 -
$ sudo postmap /etc/postfix/virtual
測試 Postfix 配置
我們可以測試伺服器是否可以接收和路由電子郵件。我們可以透過將電子郵件傳送到我們在虛擬帳戶中提到的一個電子郵件地址來測試這一點。
我們將獲得傳遞到與使用者名稱匹配的檔案的郵件,該檔案位於 /var/mail 資料夾中。
預設情況下,郵件程式未安裝在 Ubuntu 上,我們可以使用以下命令安裝它
$ sudo apt-get install mailutils
我們可以使用命令提示符中的“mail”命令檢查電子郵件
$ echo "Test email " | mail -s "Test email " info@hanuman.com
透過使用上述配置和設定,我們將在 Ubuntu 伺服器上擁有基本電子郵件功能。確保伺服器安全並確保 Postfix 未配置為開放中繼郵件伺服器也很重要,因為它是攻擊者最常攻擊的目標。

591 次瀏覽
