
 資料結構
資料結構 網路
網路 關係資料庫管理系統 (RDBMS)
 作業系統
作業系統 Java
Java iOS
iOS HTML
HTML CSS
CSS Android
 Python
 C語言程式設計
 C++
C++ C#
C# MongoDB
 MySQL
MySQL Javascript
 PHP
PHP如何在 ReactJS 渲染後將焦點設定到輸入欄位?
在使用React中的表單時,有時可能需要將焦點設定到任何輸入欄位。例如,我們希望僅當用戶在輸入欄位中輸入一些文字時才啟用提交按鈕。在這種情況下,我們可以將焦點設定到輸入欄位,以便使用者知道他們必須在輸入欄位中輸入一些文字才能啟用按鈕。
在本教程中,我們將學習在 ReactJS 渲染後將焦點設定到輸入欄位的多種方法。
使用 autoFocus 屬性與輸入欄位
我們可以在 HTML 中使用autoFocus屬性來將焦點設定到輸入欄位,但是我們需要使用駝峰式命名法,例如 autoFocus。
當我們將autoFocus屬性傳遞到任何輸入欄位時,它會在 ReactJS 中渲染後自動獲得焦點。
語法
使用者可以按照以下語法使用autoFocus屬性在 ReactJS 渲染後將焦點設定到輸入欄位。
<input id = "name" autoFocus />
在上面的語法中,我們建立了一個簡單的輸入欄位並使用了autoFocus屬性。
示例
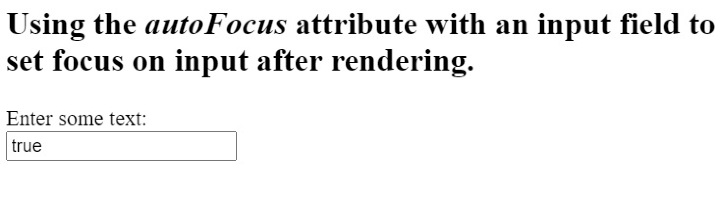
在下面的示例中,我們建立了一個輸入欄位。此外,我們還將focusText變數繫結為輸入欄位的值。我們還使用 handleInput() 函式處理輸入值。
由於我們在輸入欄位中添加了 autoFocus 屬性,因此每當我們重新整理網頁時,它都會自動將焦點設定到輸入欄位。
#App.js
import React, { useState } from "react";

export default function App() {
   const [foucsText, setFocusText] = useState(true);
   function handleInput(event) {
      let value = event.target.value;
      setFocusText(value);
   }
   return (
      <div className = "App">
         <h2>
            {" "}
            Using the <i> autoFocus </i> attribute with an input field to set focus on
            input after rendering. {" "}
         </h2>
         <label for = "name"> Enter some text: </label>
         <br></br>
         <input id = "name" autoFocus onInput = {handleInput} value = {foucsText} />
      </div>
   );
}
輸出
使用 ref 和 componentDidMount() 方法
ref 允許我們將任何 HTML 元素的引用儲存在變數中。因此,我們可以使用 ref 將輸入元素儲存在任何變數中。之後,我們可以使用 focus() 方法與變數一起將焦點設定到輸入欄位。
componentDidMount()方法是 ReactJS 中的生命週期方法。它會在元件渲染完成後自動執行。因此,我們可以使用輸入變數中的 focus() 方法在componentDidMount()方法內設定渲染後的輸入焦點。
語法
使用者可以按照以下語法使用帶有輸入元素的 ref 將焦點設定到輸入元素。
<input
   ref = {(inp) => {
      inp.focus();
   }}
/>
在上面的語法中,我們使用了 ref,它將回調函式作為值,在回撥函式中,我們使用了 focus() 方法來將焦點設定到輸入元素。
示例
在下面的示例中,我們建立了兩個輸入元素。我們在第二個輸入中使用了 ref,而第一個輸入是普通的,沒有 ref 屬性。
ref 屬性將回調函式作為值。回撥函式接受一個引數,該引數引用使用了“ref”的輸入。之後,我們可以使用該輸入的 focus() 方法並將焦點設定到輸入元素。
import React from "react";

class App extends React.Component {
   render() {
      return (
         <div>
            <h2>
               {" "}
               Using the <i> refs </i> with an input field to set focus on
               input after rendering.{" "}
            </h2>
            <input defaultValue = "This input is not focused!" />
            <br></br>
            <br></br>
            <input
               ref = {(inp) => {
                  inp.focus();
               }}
               defaultValue = "This is focused input!"
            />
         </div>
      );
   }
}
export default App;
輸出
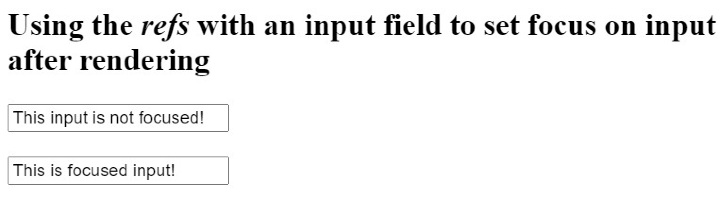
在上面的輸出中,使用者可以看到第一個輸入未聚焦,第二個輸入已聚焦。
示例
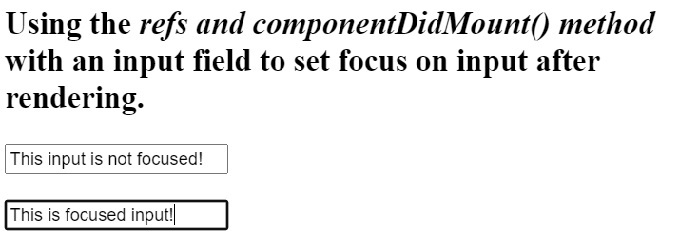
在下面的示例中,我們使用“ref”屬性獲取輸入引用。之後,我們在類元件中使用了 componentDidMount() 方法,並在該方法中訪問了輸入並使用了 focus() 方法將焦點設定到該元素。
import React from "react";

class App extends React.Component {
   componentDidMount() {
      this.secondInput.focus();
   }
   render() {
      return (
         <div>
            <h2>
               {" "}
               Using the <i> refs and componentDidMount() method </i> with an input
               field to set focus on input after rendering.{" "}
            </h2>
            <input
               defaultValue = "This input is not focused!"
               ref = {(firstInp) => {
                  this.firstInput = firstInp;
               }}
            />
            <br></br>
            <br></br>
            <input
               ref = {(secondInput) => {
                  this.secondInput = secondInput;
               }}
               defaultValue = "This is focused input!"
            />
         </div>
      );
   }
}

export default App;
輸出
使用 ref 和 useRef() hook
如上所述,我們可以使用“ref”屬性來獲取元素的引用。useRef() 是函式元件中的一個 hook,它替代了類元件的生命週期方法。
我們可以使用 useEffect() hook 在渲染完成後將焦點設定到輸入欄位。
語法
使用者可以按照以下語法使用 useRef() 和 useEffect() hook 在渲染後將焦點設定到輸入欄位。
useEffect(() => {
   input.current.focus();
}, []);
在上面的語法中,我們將回調函式作為第一個引數傳遞,它將焦點設定到輸入欄位,並將 [] 作為第二個引數,這意味著僅在渲染元件後設置一次焦點。
示例
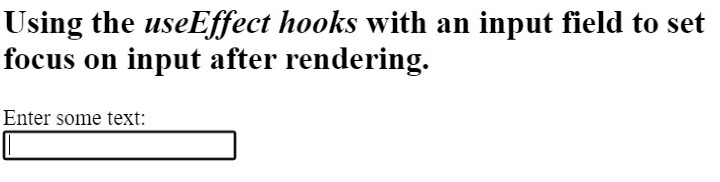
在下面的示例中,首先,我們使用 useRef() 建立一個 ref 並將其儲存在 testRef 變數中。之後,我們使用“ref”屬性將輸入的引用分配給 testRef 變數。
接下來,我們在 useEffect() hook 中使用 testRef 輸入變數在渲染後將焦點設定到輸入欄位。
import React, { useState, useRef, useEffect } from "react";

export default function App() {
   const testRef = useRef();
   useEffect(() => {
      testRef.current.focus();
   }, []);

   const [foucsText, setFocusText] = useState("");
   function handleInput(event) {
      let value = event.target.value;
      setFocusText(value);
   }
   return (
      <div className = "App">
         <h2>
            {" "}
            Using the <i> useEffect hooks </i> with an input field to set focus on
            input after rendering.{" "}
         </h2>
         <label for = "name">Enter some text: </label>
         <br></br>
         <input id = "name" ref = {testRef} onInput = {handleInput} value = {foucsText} />
      </div>
   );
}
輸出

瀏覽量 10K+
