
 資料結構
資料結構 網路
網路 關係資料庫管理系統
 作業系統
作業系統 Java
Java iOS
iOS HTML
HTML CSS
CSS Android
 Python
 C 程式設計
 C++
C++ C#
C# MongoDB
 MySQL
MySQL Javascript
 PHP
PHP如何使用 tkinter 將按鈕移到其父容器外部?
雖然 Tkinter 在建立動態應用程式方面表現出色,但在嘗試操作小部件的位置時會出現一些挑戰。在本教程中,我們將解釋一種高階的 Tkinter 技術,並展示如何將按鈕移動到其父容器的外部。
瞭解 Tkinter 層次結構
Tkinter 遵循一種層次結構,其中小部件巢狀在其父小部件中。小部件的位置和可見性受其父容器邊界的限制。當嘗試將小部件移動到其父容器區域外部時,此限制可能是一個障礙。但是,透過利用頂級視窗,我們可以建立一個解決方法來克服此限制。
建立簡單的 Tkinter 應用程式
讓我們從建立一個基本 Tkinter 應用程式開始,該應用程式包含一個用作我們起點的按鈕。然後,我們將探討如何將此按鈕移動到其父容器的邊界之外。
示例
import tkinter as tk

# Defining the move_button_outside function
def move_button_outside():
   # Create a new Toplevel window
   toplevel = tk.Toplevel(root)
   toplevel.title("Outside Button")

   # Create a button in the Toplevel window
   outside_button = tk.Button(toplevel, text="Outside Button")
   outside_button.pack()

   # Move the Toplevel window to a specific position
   toplevel.geometry("+400+300")

# Create the main Tkinter window
root = tk.Tk()
root.title("Main Window")
root.geometry("720x250")

# Create a button in the main window
inside_button = tk.Button(root, text="Inside Button")
inside_button.pack()

# Create a button to move the outside button
move_button = tk.Button(root, text="Move Outside Button", command=move_button_outside)
move_button.pack()

# Run the Tkinter event loop
root.mainloop()
在上面的示例中,我們執行了以下操作:
我們匯入 Tkinter 模組並將其簡稱為“tk”。
定義了 move_button_outside 函式來建立一個新的頂級視窗並在其中放置一個按鈕。
主 Tkinter 視窗 (root) 包含一個“內部按鈕”和一個“移到外部按鈕”,後者觸發 move_button_outside 函式。
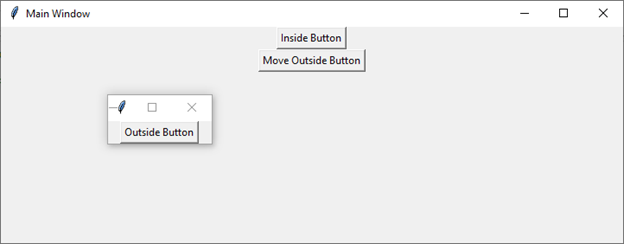
輸出
執行此程式碼後,您將獲得以下輸出視窗:
使用頂級視窗
將小部件移動到其父容器外部的關鍵是使用頂級視窗。這些視窗充當獨立的容器,允許其中的小部件存在於主視窗的限制之外。在我們的示例中,單擊“移到外部按鈕”將建立一個包含“外部按鈕”的頂級視窗。
def move_button_outside():
   # Create a new Toplevel window
   toplevel = tk.Toplevel(root)
   toplevel.title("Outside Button")

   # Create a button in the Toplevel window
   outside_button = tk.Button(toplevel, text="Outside Button")
   outside_button.pack()

   # Move the Toplevel window to a specific position
   toplevel.geometry("+400+100")  # Adjust the coordinates as needed
在 move_button_outside 函式中,建立一個新的頂級視窗,並在其中放置一個按鈕。geometry 方法用於設定頂級視窗的位置,有效地將其放置在主視窗外部。geometry 方法中指定的座標可以調整以達到所需的位置。
結論
Tkinter 中的頂級視窗為將小部件移動到其父容器邊界之外提供了一種強大的解決方法。這種高階技術能夠建立動態且視覺上引人注目的使用者介面。透過將小部件策略性地放置在獨立的容器(如頂級視窗)中,開發人員可以增強整體使用者體驗。

115 次檢視
