如何使用BeautifulSoup修改HTML?
HTML(超文字標記語言)是網際網路的基礎。網站使用HTML以結構化的方式建立和顯示內容。在許多情況下,需要修改HTML程式碼以新增新元素、刪除不需要的元素或進行其他更改。這就是BeautifulSoup的用武之地。
BeautifulSoup是一個Python庫,允許您解析HTML和XML文件。它提供了一個簡單的介面來導航和搜尋文件樹,以及修改HTML程式碼。在本文中,我們將學習如何使用BeautifulSoup修改HTML。我們將學習使用BeautifulSoup修改HTML的步驟。
使用Beautifulsoup修改HTML的步驟
以下是使用Beautifulsoup修改HTML的完整步驟:
步驟1:安裝和匯入模組
使用Beautifulsoup修改HTML的第一步是安裝Beautifulsoup模組並在之後匯入它。我們可以使用pip(Python包管理器)安裝該模組。開啟終端視窗並執行以下命令:
pip install beautifulsoup4
安裝BeautifulSoup後,我們需要將其匯入到我們的Python指令碼中。我們還將匯入requests庫,我們將使用它從網頁獲取HTML程式碼。
from bs4 import BeautifulSoup
import requests
步驟2:獲取HTML程式碼
下一步是獲取HTML程式碼,我們將使用requests庫從網頁獲取HTML程式碼。在下面的語法中,我們將從tutorialspoint主頁獲取HTML程式碼。
url = "https://tutorialspoint.tw"
response = requests.get(url)
html_code = response.content
步驟3:建立BeautifulSoup物件
現在我們有了HTML程式碼,我們可以建立一個BeautifulSoup物件。這將允許我們導航和修改HTML程式碼。
soup = BeautifulSoup(html_code, "html.parser")
步驟4:修改HTML
使用BeautifulSoup物件,我們現在可以修改HTML程式碼。有幾種方法可以做到這一點,但我們將介紹一些常見的場景。
新增新元素的語法
# create a new div element
new_div = soup.new_tag("div")
# set the text of the div element
new_div.string = "This is a new div element"
# add the div element to the body tag
soup.body.append(new_div)
刪除元素的語法
# find all div elements with class="remove-me"
divs_to_remove = soup.find_all("div", class_="remove-me")
# remove each div element from the soup
for div in divs_to_remove:
   div.decompose()
修改屬性的語法
# find the first a element with href="https://example.com"
a_tag = soup.find("a", href="https://example.com")
# change the href attribute to "https://new-example.com"
a_tag["href"] = "https://new-example.com"
步驟5:儲存HTML
完成修改後,我們將希望將修改後的HTML程式碼儲存到檔案中或將其傳送回網頁。
# write the modified HTML code to a file
with open("modified.html", "w") as f:
   f.write(str(soup))
示例1:向網頁新增新元素
在下面的示例中,我們將使用BeautifulSoup向網頁新增新元素。我們將從網頁獲取HTML程式碼,建立一個新的div元素,並將其新增到body標籤的末尾。
from bs4 import BeautifulSoup
import requests

# Read the HTML file
with open("myfile.html", "r") as f:
   html_code = f.read()

# Creating a BeautifulSoup object
soup = BeautifulSoup(html_code, "html.parser")

# Creating a new div element
mynew_div = soup.new_tag("div")
mynew_div.string = "Welcome to new div element page using BeautifulSoup"

# Adding the new div element to the body tag
soup.body.append(mynew_div)

# Saving the modified HTML code to a file
with open("modifiedfile.html", "w") as f:
   f.write(str(soup))
輸出

在這個例子中,我們使用new_tag方法建立一個新的div元素。我們使用字串屬性設定div元素的文字。然後,我們使用append方法將新的div元素新增到body標籤的末尾。
示例2:從網頁刪除元素
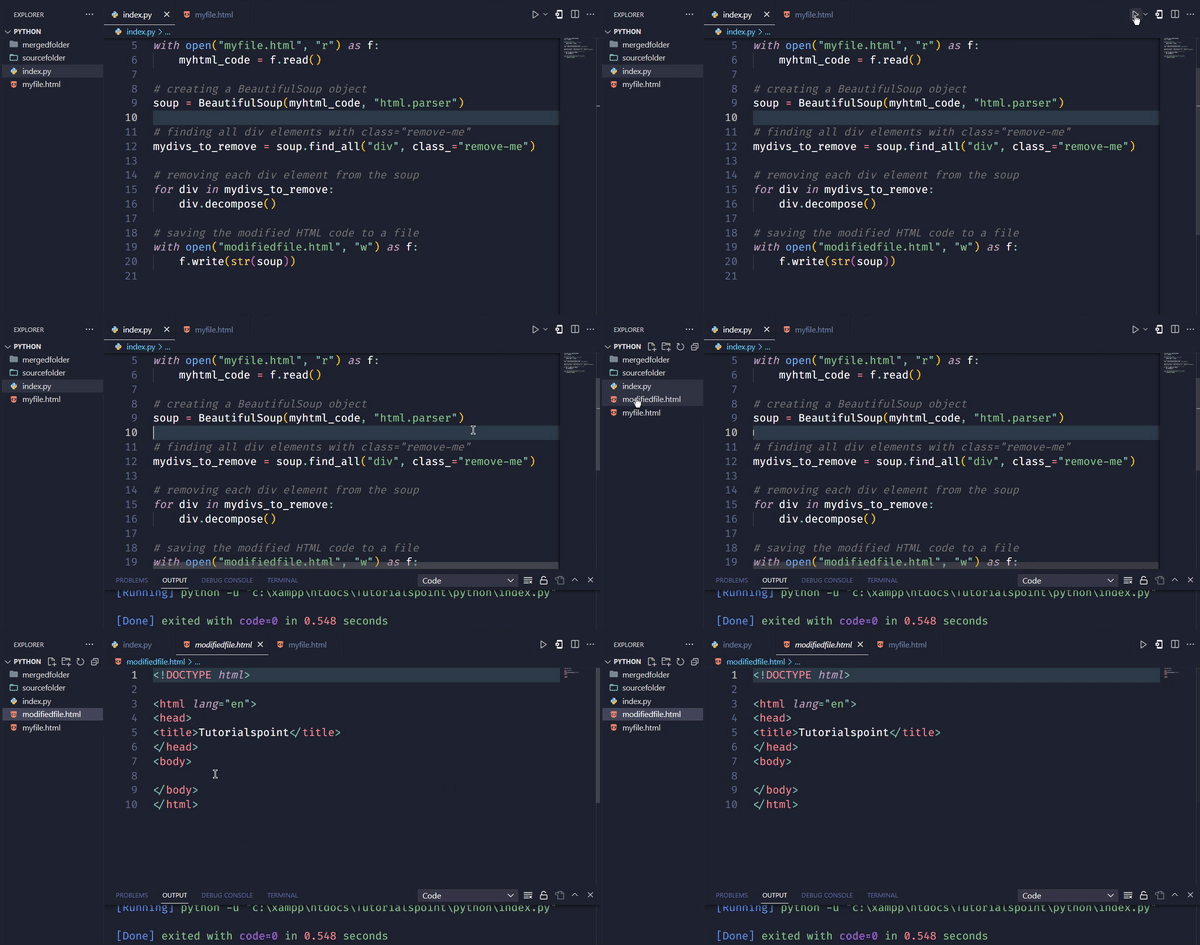
在下面的示例中,我們將使用BeautifulSoup從網頁刪除元素。我們將從網頁獲取HTML程式碼,找到所有class為“remove-me”的div元素,並將它們從HTML程式碼中刪除。
#imports
from bs4 import BeautifulSoup
import requests

# Read the HTML file
with open("myfile.html", "r") as f:
   myhtml_code = f.read()


# creating a BeautifulSoup object
soup = BeautifulSoup(myhtml_code, "html.parser")

# finding all div elements with class="remove-me"
mydivs_to_remove = soup.find_all("div", class_="remove-me")

# removing each div element from the soup
for div in mydivs_to_remove:
   div.decompose()

# saving the modified HTML code to a file
with open("yourmodifiedfile.html", "w") as f:
   f.write(str(soup))
輸出

在這個例子中,我們使用find_all方法查詢所有class為“remove-me”的div元素。我們將它們儲存在一個名為divs_to_remove的列表中。然後,我們使用for迴圈遍歷列表,並使用decompose方法從soup中刪除每個div元素。最後,我們將修改後的HTML程式碼儲存到檔案中。
示例3:修改特定HTML標籤的文字
在下面的示例中,我們將修改網頁上特定HTML標籤的文字。
# Imports
import requests
from bs4 import BeautifulSoup

# Defining the URL of the webpage to fetch
myurl = 'https://tutorialspoint.tw'

# Sending a GET request to fetch the HTML code of the webpage
myresponse = requests.get(myurl)

# Read the HTML file
with open("myfile.html", "r") as f:
   myhtml_code = f.read()

# Parse the HTML code using BeautifulSoup
soup = BeautifulSoup(response.content, 'html.parser')

# Finding the first h1 tag on the page and modifying its text using BeautifulSoup
myfirst_modified_h1 = soup.find('h1')
myfirst_modified_h1.string = 'Welcome to tutorialspoint'

# Saving the modified HTML code to a file
with open('yourmodifiedfile.html', 'w') as f:
   f.write(str(soup))
輸出

在上面的例子中,我們首先匯入必要的庫requests和BeautifulSoup。然後,我們定義要修改的網頁的URL,併發送GET請求來獲取網頁的HTML程式碼。獲取程式碼後,我們建立一個BeautifulSoup物件來解析它,並使用find()方法查詢頁面上的第一個h1標籤,並使用字串屬性修改其文字。
最後,我們使用open()函式和w模式將修改後的HTML程式碼儲存到名為modified.html的檔案中。我們將修改後的BeautifulSoup物件傳遞給write()方法,以將修改後的HTML程式碼寫入檔案。
結論
總而言之,修改HTML是Web開發中的常見需求,而BeautifulSoup這個Python庫提供了一種簡單的方法來解析和修改HTML程式碼。在本文中,我們學習瞭如何使用BeautifulSoup修改HTML。我們已經瞭解了使用Beautifulsoup修改HTML的步驟,包括安裝和匯入模組、獲取HTML程式碼、建立BeautifulSoup物件、修改HTML程式碼以及將修改後的HTML程式碼儲存到檔案。我們還看到了使用BeautifulSoup修改HTML程式碼的兩個完整的示例——向網頁新增新元素和從網頁刪除元素。使用這些工具和技術,開發人員可以輕鬆修改HTML程式碼以滿足他們的需求。


 資料結構
資料結構 網路
網路 關係資料庫管理系統(RDBMS)
 作業系統
作業系統 Java
Java iOS
iOS HTML
HTML CSS
CSS Android
 Python
 C語言程式設計
 C++
C++ C#
C# MongoDB
 MySQL
MySQL Javascript
 PHP
PHP