
 資料結構
資料結構 網路
網路 關係資料庫管理系統
 作業系統
作業系統 Java
Java iOS
iOS HTML
HTML CSS
CSS Android
 Python
 C 程式設計
 C++
C++ C#
C# MongoDB
 MySQL
MySQL Javascript
 PHP
PHP如何在 Android 中實現文件掃描功能?
簡介
在許多 Android 應用中,我們可以看到其中存在文件掃描功能,該功能允許應用拍攝文件照片,並根據需要從四邊裁剪文件影像,然後以影像形式顯示該文件。我們還可以向該影像新增過濾器,例如黑白和其他過濾器。在本文中,我們將探討如何在 Android 中實現文件掃描功能?
實現
我們將建立一個簡單的應用,其中將顯示一個 TextView 用於顯示應用標題。之後,我們將建立一個 ImageView 用於顯示掃描後裁剪的影像。應用啟動時將顯示一個文件掃描器。此掃描器將掃描文件,能夠裁剪它並顯示文件的裁剪影像到我們的 ImageView 中。現在讓我們轉到 Android Studio 建立一個新的專案。
步驟 1:在 Android Studio 中建立一個新專案
導航到 Android Studio,如下面的螢幕截圖所示。在下面的螢幕截圖中,點選“新建專案”以建立一個新的 Android Studio 專案。

點選“新建專案”後,您將看到下面的螢幕。

在此螢幕中,我們只需選擇“空活動”並點選“下一步”。點選“下一步”後,您將看到下面的螢幕。
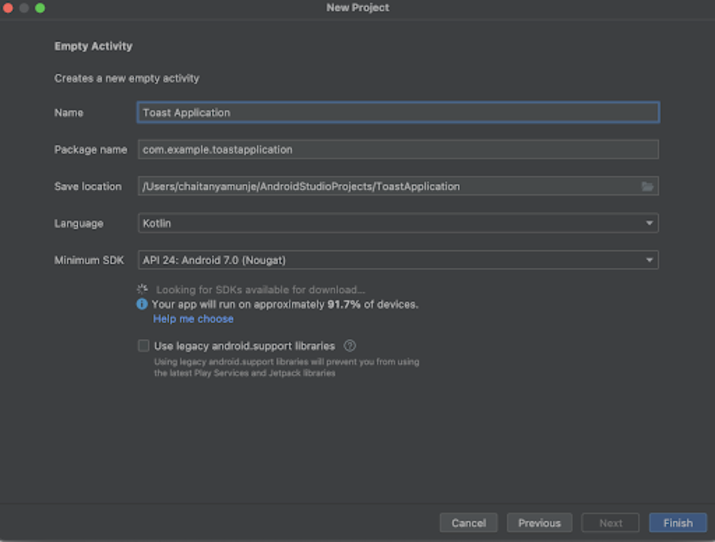
在此螢幕中,我們只需指定專案名稱。然後包名將自動生成。
注意 - 確保選擇 Kotlin 作為語言。
指定所有詳細資訊後,點選“完成”以建立一個新的 Android Studio 專案。
專案建立完成後,我們將看到兩個開啟的檔案,即 activity_main.xml 和 MainActivity.kt 檔案。
步驟 2:在 build.gradle 檔案中新增文件掃描器依賴項。
導航到 app>build.gradle 檔案(專案級)並在 dependencies 部分新增以下依賴項。
implementation 'com.websitebeaver:documentscanner:1.0.0'
新增上述依賴項後,只需點選“同步現在”選項即可安裝它。
步驟 3:使用 activity_main.xml
導航到 activity_main.xml。如果此檔案不可見,要開啟此檔案,在左側窗格中導航到 app>res>layout>activity_main.xml 以開啟此檔案。開啟此檔案後,向其中新增以下程式碼。程式碼中添加了註釋以便詳細瞭解。
<?xml version="1.0" encoding="utf-8"?>
<RelativeLayout xmlns:android="http://schemas.android.com/apk/res/android"
   xmlns:tools="http://schemas.android.com/tools"
   android:layout_width="match_parent"
   android:layout_height="match_parent"
   tools:context=".MainActivity">
   <!-- creating a text view for displaying the heading of the application -->
   <TextView
       android:layout_width="match_parent"
       android:layout_height="wrap_content"
       android:layout_above="@id/idIVImage"
       android:layout_centerHorizontal="true"
       android:layout_margin="10dp"
       android:padding="4dp"
       android:text="Document Scanner Application"
       android:textAlignment="center"
       android:textColor="@color/black"
       android:textSize="20sp"
       android:textStyle="bold" />
   <!-- creating an image view for displaying the scanned document -->
   <ImageView
       android:id="@+id/idIVImage"
       android:layout_width="match_parent"
       android:layout_height="400dp"
       android:layout_centerInParent="true"
       android:layout_margin="10dp"
       android:padding="4dp" />
</RelativeLayout>
說明:在上面的程式碼中,我們建立了一個根佈局作為 RelativeLayout。在此佈局內,我們建立了一個 TextView 用於顯示應用標題。之後,我們建立了一個 ImageView,我們將在其中顯示文件的影像,一旦我們完成文件的掃描,我們將能夠看到該影像。
步驟 4:使用 MainActivity.kt 檔案
導航到 MainActivity.kt。如果此檔案不可見,要開啟此檔案,在左側窗格中導航到 app>res>layout>MainActivity.kt 以開啟此檔案。開啟此檔案後,向其中新增以下程式碼。程式碼中添加了註釋以便詳細瞭解。
package com.example.kotlintestapplication
import android.graphics.BitmapFactory
import androidx.appcompat.app.AppCompatActivity
import android.os.Bundle
import android.util.Log
import android.view.animation.AnimationUtils
import android.widget.ImageView
import android.widget.Toast
import com.websitebeaver.documentscanner.DocumentScanner
class MainActivity : AppCompatActivity() {
   // on below line creating a variable for image view.
   private lateinit var docImageView: ImageView
   // on below line creating a variable for document scanner and initializing it.
   private val documentScanner = DocumentScanner(
       this,
       // on below line calling a method to display the cropped image results.
       { croppedImageResults ->
           // on below line getting the cropped image and displaying that image in our image view.
           // on below line setting image bitmap for our image view.
           docImageView.setImageBitmap(
               // on below line calling decode file to decode the file from cropped image results and display it in image view.
               BitmapFactory.decodeFile(croppedImageResults.first())
           )
       },
       {
           // on below line displaying an error message.
               errorMessage ->
           // displaying a toast message for error.
           Toast.makeText(this,"Fail to get document : "+ errorMessage,Toast.LENGTH_SHORT).show()
       },
       {
           // below method is called when the user cancelled the document scan.
           Toast.makeText(this,"Document Scanning has been cancelled by the user. ",Toast.LENGTH_SHORT).show()
       }
   )
   // on below line calling the default on create method to initialize our variables.
   override fun onCreate(savedInstanceState: Bundle?) {
       super.onCreate(savedInstanceState)
       setContentView(R.layout.activity_main)
       // on below line initializing the variable for image view.
       docImageView = findViewById(R.id.idIVImage)
       // on below line calling start scan method to start the document scan.
       documentScanner.startScan()
   }
}
說明:在上面的程式碼中,首先我們為我們的 ImageView 建立變數。之後,我們為文件掃描器建立一個變數並對其進行初始化。在此 Document Scanner 變數內部,我們呼叫了三種不同的方法。
當我們從文件掃描器獲得一些結果時,將呼叫第一種方法。在此方法中,我們將從文件掃描器獲得的結果設定到我們建立的 ImageView 中。
當我們從文件掃描器獲得一些錯誤時,將呼叫第二種方法。在此方法中,我們只是顯示一個 Toast 訊息以顯示錯誤訊息。
當用戶取消文件掃描時,將呼叫第三種方法。在這種情況下,我們也顯示 Toast 訊息“使用者已取消掃描”。
現在我們將看到 onCreate 方法。這是每個 Android 應用的預設方法。當應用檢視建立時,將呼叫此方法。在此方法中,我們設定內容檢視,即名為 activity_main.xml 的佈局檔案,以從該檔案中設定 UI。在 onCreate 方法中,我們使用我們在 activity_main.xml 檔案中提供的 id 初始化 ImageView 變數。之後,我們呼叫 startScan 方法以啟動我們的文件掃描器,以便我們可以掃描文件。
新增上述程式碼後,我們只需點選頂部的綠色圖示即可在移動裝置上執行我們的應用。
注意 - 確保您已連線到您的真實裝置或模擬器。
輸出

結論
在本文中,我們探討了如何在 Android 應用中實現文件掃描功能。

1K+ 閱讀量
