
 資料結構
資料結構 網路
網路 關係資料庫管理系統
 作業系統
作業系統 Java
Java iOS
iOS HTML
HTML CSS
CSS Android
 Python
 C 程式設計
 C++
C++ C#
C# MongoDB
 MySQL
MySQL Javascript
 PHP
PHP如何在 iOS 應用中建立 CollectionView 佈局?
CollectionView 和 TableView 是 iOS 開發中眾多基本概念中的兩個,每個開發者都應該掌握兩者才能成為一名優秀的開發者。
在這篇文章中,我們將主要關注 CollectionView,CollectionView 與表格檢視類似,但也有一些區別,CollectionView 支援橫向和縱向滾動,看起來像一個網格。iOS 中的 CollectionView 在 Android 中也稱為網格檢視。
要了解更多資訊,您可以參考 https://developer.apple.com/documentation/uikit/uicollectionview
如您所見,CollectionView 由補充檢視和單元格組成,CollectionView 使用單元格在螢幕上顯示專案,單元格是 UICollectionViewCell 類的一個例項,您的資料來源會配置並提供該例項。
您的資料來源配置並提供。
除了單元格之外,補充檢視還可以是節標題和節腳註等內容,這些內容獨立於各個單元格,但仍然傳達某種資訊。對補充檢視的支援是可選的,並由集合檢視的佈局物件定義,該物件還負責定義這些檢視的位置。
因此,在這篇文章中,我們將瞭解如何建立 Collection View。
讓我們開始吧!
步驟 1 - 開啟 Xcode 並建立一個單檢視應用程式,將其命名為 SampleCollectionView。
步驟 2 - 在 Main.storyboard 中新增 UICollectionView,如下所示:

步驟 3 - 選擇集合檢視單元格,並將重用識別符號命名為“cell”,如下所示:

步驟 4 - 建立一個新的 Cocoa touch 檔案,將其命名為 CollectionViewCell,型別為 UICollectionViewCell,並將類新增到與單元格相同的名稱,如下所示:

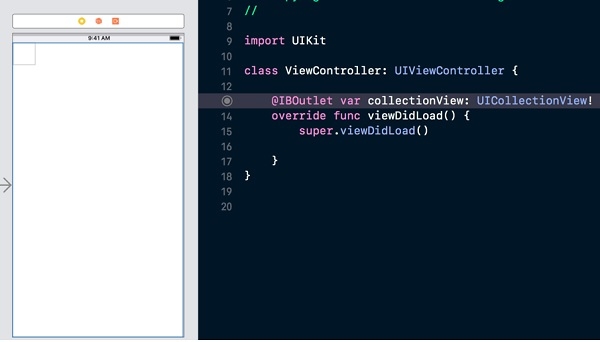
步驟 5 - 在 ViewController.swift 中建立 collection view 的 @IBOutlet。
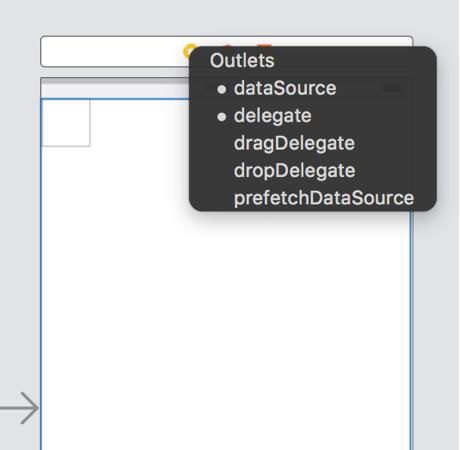
步驟 6 - 現在將委託和資料來源新增到 collection view。
步驟 7 - 開啟 ViewController.swift 並確認 UICollectionViewDelegate 和 UICollectionViewDataSource。
class ViewController: UIViewController, UICollectionViewDelegate, UICollectionViewDataSource
步驟 8 - 實現強制委託方法,如下所示:
func collectionView(_ collectionView: UICollectionView, numberOfItemsInSection section: Int) -> Int {
   return 500
}
func collectionView(_ collectionView: UICollectionView, cellForItemAt indexPath: IndexPath) -> UICollectionViewCell {
   let cell: UICollectionViewCell = collectionView.dequeueReusableCell(withReuseIdentifier: "cell", for: indexPath) as! CollectionViewCell
   cell.backgroundColor = UIColor.gray
   return cell
}
步驟 9 - 執行應用程式,您可以垂直滾動,要使 collection view 水平滾動,
將滾動方向屬性更改為水平。

完整程式碼
import UIKit
class ViewController: UIViewController, UICollectionViewDelegate, UICollectionViewDataSource {
   @IBOutlet var collectionView: UICollectionView!
   override func viewDidLoad() {
      super.viewDidLoad()
   }
   func collectionView(_ collectionView: UICollectionView, numberOfItemsInSection section: Int) -> Int {
   return 500
   }
   func collectionView(_ collectionView: UICollectionView, cellForItemAt indexPath: IndexPath) -> UICollectionViewCell {
      let cell: UICollectionViewCell = collectionView.dequeueReusableCell(withReuseIdentifier: "cell", for: indexPath) as! CollectionViewCell
      cell.backgroundColor = UIColor.gray
      return cell
   }
}

392 次檢視
