
 資料結構
資料結構 網路
網路 關係型資料庫管理系統
 作業系統
作業系統 Java
Java iOS
iOS HTML
HTML CSS
CSS Android
 Python
 C語言程式設計
 C++
C++ C#
C# MongoDB
 MySQL
MySQL Javascript
 PHP
PHP如何使用Android地圖API建立自定義形狀的點陣圖標記?
簡介
如今,許多Android應用程式在其內部使用Google Maps來向用戶顯示地圖。例如,我們使用許多食品配送應用程式,在這些應用程式中,我們可以看到我們的訂單狀態以及配送員在Google Maps上的位置。根據其用例,我們可以在每個應用程式上看到不同型別的標記。在本文中,我們將瞭解如何使用Android地圖API建立自定義形狀的點陣圖標記?
實現
我們將建立一個簡單的應用程式,在該應用程式中,我們將顯示一個簡單的Google地圖,並在該地圖上向德里位置新增一個自定義形狀的標記。我們將遵循分步指南來構建此應用程式。現在讓我們轉向Android Studio來建立一個新專案。
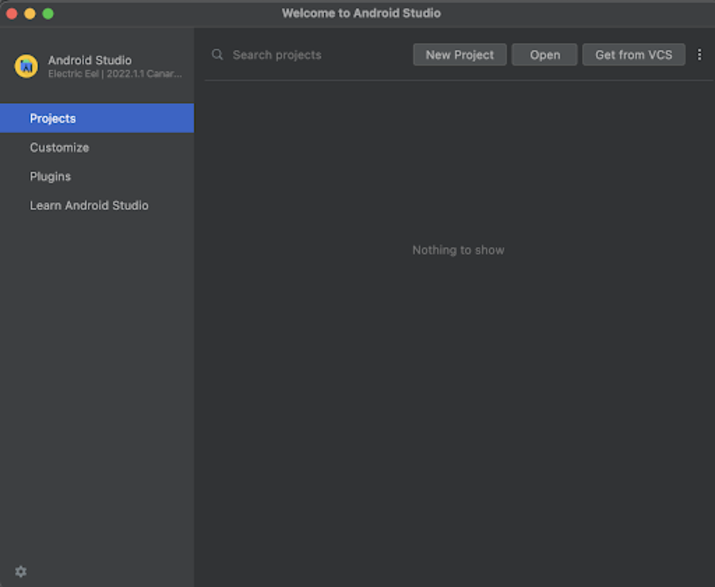
步驟1:在Android Studio中建立一個新專案
導航到Android Studio,如下面的螢幕所示。在下面的螢幕中,點選“新建專案”以建立一個新的Android Studio專案。
點選“新建專案”後,您將看到下面的螢幕。
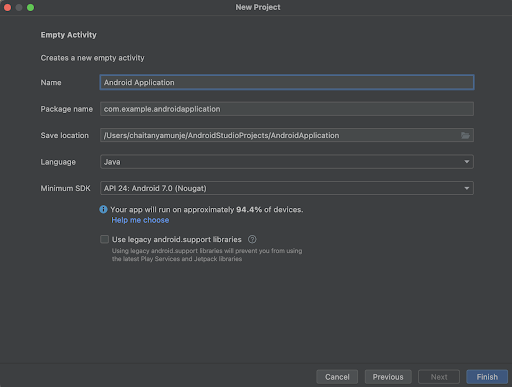
在此螢幕中,我們只需選擇“Google Maps Activity”並點選“下一步”。點選“下一步”後,您將看到下面的螢幕。

在此螢幕中,我們只需指定專案名稱。然後包名將自動生成。
注意:確保選擇Java作為語言。
指定所有詳細資訊後,點選“完成”以建立一個新的Android Studio專案。
專案建立完成後,我們將看到兩個開啟的檔案,即activity_maps.xml和MapsActivity.java檔案。
步驟2:建立API金鑰以顯示Google Maps
訪問下面的URL,其中您將找到有關如何建立Google Maps API金鑰的詳細文件,我們必須將其新增到我們的應用程式中以顯示Google Maps。
步驟3:使用AndroidManifest.xml檔案
現在,我們已經生成了Google Maps API金鑰,我們必須在專案的AndroidManifest.xml檔案中使用此金鑰。導航到app>AndroidManifest.xml檔案,並將以下程式碼新增到其中。程式碼中添加了註釋以詳細瞭解。
 <?xml version="1.0" encoding="utf-8"?>
<manifest xmlns:android="http://schemas.android.com/apk/res/android"
   xmlns:tools="http://schemas.android.com/tools">
   <application
       android:allowBackup="true"
       android:dataExtractionRules="@xml/data_extraction_rules"
       android:fullBackupContent="@xml/backup_rules"
       android:icon="@mipmap/ic_launcher"
       android:label="@string/app_name"
       android:roundIcon="@mipmap/ic_launcher_round"
       android:supportsRtl="true"
       android:theme="@style/Theme.GoogleMapsProject"
       tools:targetApi="31">
       <!--
            TODO: Before you run your application, you need a Google Maps API key.
            To get one, follow the directions here:
               https://developers.google.com/maps/documentation/android-sdk/get-api-key
            Once you have your API key (it starts with "AIza"), define a new property in your
            project's local.properties file (e.g. MAPS_API_KEY=Aiza...), and replace the
            "YOUR_API_KEY" string in this file with "${MAPS_API_KEY}".
       -->
       <meta-data
           android:name="com.google.android.geo.API_KEY"
           android:value="Enter your API key here" />
       <activity
           android:name=".MapsActivity"
           android:exported="true"
           android:label="@string/title_activity_maps">
           <intent-filter>
               <action android:name="android.intent.action.MAIN" />
               <category android:name="android.intent.category.LAUNCHER" />
           </intent-filter>
       </activity>
   </application>
</manifest>
注意 - 確保將您生成的API金鑰新增到“輸入您的API金鑰”標籤的位置。
步驟4:使用activity_main.xml
導航到activity_maps.xml。如果此檔案不可見,要開啟此檔案,在左側窗格中導航到app>res>layout>activity_maps.xml以開啟此檔案。開啟此檔案後,將以下程式碼新增到其中。程式碼中添加了註釋以詳細瞭解。
<?xml version="1.0" encoding="utf-8"?>
<!-- on below line creating a fragment for displaying maps-->
<fragment xmlns:android="http://schemas.android.com/apk/res/android"
   xmlns:map="http://schemas.android.com/apk/res-auto"
   xmlns:tools="http://schemas.android.com/tools"
   android:id="@+id/map"
   android:name="com.google.android.gms.maps.SupportMapFragment"
   android:layout_width="match_parent"
   android:layout_height="match_parent"
   tools:context=".MapsActivity" />
說明 - 在上面的程式碼中,我們正在建立一個片段,我們將在其中顯示應用程式內的Google地圖。我們為該片段指定了一個名稱,即“支援地圖片段”。
步驟4:使用MapsActivity.java檔案
導航到MainActivity.java。如果此檔案不可見,要開啟此檔案,在左側窗格中導航到app>res>layout>MainActivity.java以開啟此檔案。開啟此檔案後,將以下程式碼新增到其中。程式碼中添加了註釋以詳細瞭解。
package com.example.googlemapsproject;

import androidx.core.content.ContextCompat;
import androidx.fragment.app.FragmentActivity;
import android.content.Context;
import android.graphics.Bitmap;
import android.graphics.Canvas;
import android.graphics.drawable.Drawable;
import android.os.Bundle;
import com.google.android.gms.maps.CameraUpdateFactory;
import com.google.android.gms.maps.GoogleMap;
import com.google.android.gms.maps.OnMapReadyCallback;
import com.google.android.gms.maps.SupportMapFragment;
import com.google.android.gms.maps.model.BitmapDescriptor;
import com.google.android.gms.maps.model.BitmapDescriptorFactory;
import com.google.android.gms.maps.model.LatLng;
import com.google.android.gms.maps.model.MarkerOptions;
import com.example.googlemapsproject.databinding.ActivityMapsBinding;
public class MapsActivity extends FragmentActivity implements OnMapReadyCallback {
   // on below line creating a variable for google maps and binding.
   private GoogleMap mMap;
   private ActivityMapsBinding binding;
   @Override
   protected void onCreate(Bundle savedInstanceState) {
       super.onCreate(savedInstanceState);
       binding = ActivityMapsBinding.inflate(getLayoutInflater());
       setContentView(binding.getRoot());
       // Obtain the SupportMapFragment and get notified when the map is ready to be used.
       SupportMapFragment mapFragment = (SupportMapFragment) getSupportFragmentManager()
               .findFragmentById(R.id.map);
       mapFragment.getMapAsync(this);
   }
   /**
    * Manipulates the map once available.
    * This callback is triggered when the map is ready to be used.
    * This is where we can add markers or lines, add listeners or move the camera. In this case,
    * we just add a marker near Sydney, Australia.
    * If Google Play services is not installed on the device, the user will be prompted to install
    * it inside the SupportMapFragment. This method will only be triggered once the user has
    * installed Google Play services and returned to the app.
    */
   @Override
   public void onMapReady(GoogleMap googleMap) {
       mMap = googleMap;
       // on below line creating a lat lng for delhi location
       LatLng delhi = new LatLng(28.7041, 77.1025);
       // on below line adding marker.
       mMap.addMarker(new MarkerOptions()
               // on below line specifying the position where we have to add the marker.
               .position(delhi)
               // on below line specifying the title for our marker.
               .title("Marker in Delhi")
               // on below line specifying the icon for our marker.
               .icon(BitmapFromDrawable(this, R.drawable.ic_plane)));
       // on below line moving camera to our lat lng.
       mMap.moveCamera(CameraUpdateFactory.newLatLng(delhi));
   }
   private BitmapDescriptor BitmapFromDrawable(Context context, int imageID) {
       // on below line we are creating a drawable from its id.
       Drawable imageDrawable = ContextCompat.getDrawable(context, imageID);
       // below line is use to set bounds to our vector drawable.
       imageDrawable.setBounds(0, 0, imageDrawable.getIntrinsicWidth(), imageDrawable.getIntrinsicHeight());
       // on below line is use to create a bitmap for our drawable which we have added.
       Bitmap bitmap = Bitmap.createBitmap(imageDrawable.getIntrinsicWidth(), imageDrawable.getIntrinsicHeight(), Bitmap.Config.ARGB_8888);
       // on below line is use to add bitmap in our canvas.
       Canvas canvas = new Canvas(bitmap);
       // below line is use to draw our
       // vector drawable in canvas.
       imageDrawable.draw(canvas);
       // after generating our bitmap we are returning our bitmap.
       return BitmapDescriptorFactory.fromBitmap(bitmap);
   }
}
說明:在上面的程式碼中,首先我們為Google Maps和活動繫結建立變數。現在我們將看到onCreate方法。這是每個Android應用程式的預設方法。當建立應用程式檢視時,將呼叫此方法。在此方法內部,我們設定內容檢視,即名為activity_maps.xml的佈局檔案,以從該檔案中設定UI。在onCreate方法內部,我們正在初始化繫結變數,然後我們為支援片段建立一個變數,並使用我們在activity_maps.xml檔案中提供的片段ID初始化該變數。然後呼叫getMapSync以同步我們的地圖。之後,我們覆蓋onMapReady方法。在此方法中,我們為將要顯示在德里位置的標記建立緯度和經度。然後,我們在我們的地圖上新增一個自定義形狀的標記。我們正在建立一個名為BitmapFromDrawable的新方法,該方法將從我們指定的drawable檔案中為圖示提供一個位圖。然後,我們使用此點陣圖描述符將其設定到我們的Google Maps上。最後,將我們的相機移動到我們顯示標記的位置。
新增上述程式碼後,我們只需點選頂部的綠色圖示即可在移動裝置上執行應用程式。
注意:確保您已連線到您的真實裝置或模擬器。
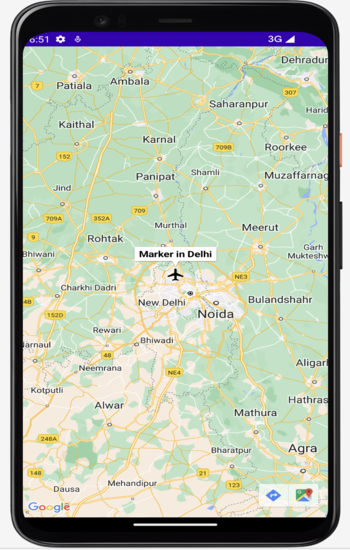
輸出
結論
在本文中,我們瞭解瞭如何使用Android地圖API建立自定義形狀的點陣圖標記。

723次瀏覽
