
 資料結構
資料結構 網路
網路 RDBMS
RDBMS 作業系統
作業系統 Java
Java iOS
iOS HTML
HTML CSS
CSS Android
 Python
 C 程式設計
 C++
C++ C#
C# MongoDB
 MySQL
MySQL Javascript
 PHP
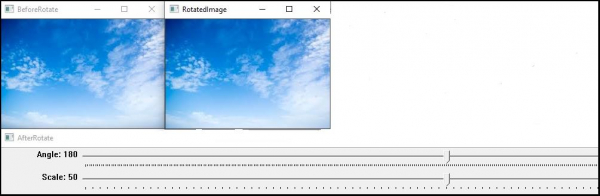
PHP如何在 OpenCV 中使用 C++ 改變影像大小並新增邊框?
在本專題中,我們將瞭解軌跡條的另一個應用。在此,我們將使用軌跡條來更改影像大小、為影像新增邊框以及使用軌跡條更改邊框大小。
使用以下程式,我們可以更改影像大小、新增邊框、更改邊框大小和旋轉影像。這類似於前面的示例。
以下程式演示如何在同一軌跡條中新增多個滑塊。
示例
#include<iostream>
#include<opencv2/highgui/highgui.hpp>
#include<opencv2/imgproc/imgproc.hpp>
using namespace std;
using namespace cv;
   int Rotate = 180;//initializing angle//
   int Scale = 50;//initializing scale//
   int Border = 0;//initial Border//
   Mat before_Rotate;//declaring matrix for before rotation//
   int vertical = 0;//initial vertical value//
   int horizontal = 0;//initial horizontal value//
   void rotator(int, void*){ //function to rotate image//
   Mat Rotation = getRotationMatrix2D(Point(horizontal, vertical),(Rotate - 180), Scale / 50.0);//affine transformation matrix for 2D rotation//
   Mat Rotated;//matrix for rotated image
   warpAffine(before_Rotate, Rotated, Rotation, before_Rotate.size(), INTER_LINEAR, Border, Scalar());//applying affine transformation//
   imshow("RotatedImage", Rotated);//show rotated image//
}
int main(int argc,char**argv) {
   before_Rotate = imread("sky.jpg");//loading image in the matrix//
   vertical = before_Rotate.rows / 2;//getting midpoint of vertical pixels//
   horizontal = before_Rotate.cols / 2;//getting midpoints of horizontal pixels//
   namedWindow("BeforeRotate");//declaring window to show image before rotation//
   imshow("BeforeRotate", before_Rotate);//showing image before rotation//
   namedWindow("AfterRotate");//declaring window to show image after rotation//
   createTrackbar("Angle", "AfterRotate", &Rotate, 360, rotator);//creating trackbar for rotation//
   createTrackbar("Scale", "AfterRotate", &Scale, 100, rotator);//creating trackbar to change size//
   createTrackbar("Border Mode", "After Rotate", &Border, 5, rotator);//creating trackbar to add border//
   int cbfunction = 0;//initiate value of rotator function's argument//
   rotator(cbfunction, &cbfunction);//call back rotator function//
   waitKey(0);//wait till keystroke//
   return 0;
}
輸出

更新於:2021 年 3 月 10 日
217 次瀏覽

廣告