
 資料結構
資料結構 網路
網路 關係資料庫管理系統
 作業系統
作業系統 Java
Java iOS
iOS HTML
HTML CSS
CSS Android
 Python
 C 程式設計
 C++
C++ C#
C# MongoDB
 MySQL
MySQL Javascript
 PHP
PHP如何在 Linux 上為 Oracle Virtual Box 新增磁碟儲存
本文面向那些希望在 Virtual Box 上安裝軟體但遇到磁碟空間不足問題的使用者。同時,您可能也需要透過建立新的、更大的驅動器來擴充套件現有驅動器,從而為 Oracle VirtualBox 新增磁碟儲存。以下是透過為 Virtual Box 新增虛擬驅動器來分配更多空間的步驟,虛擬機器正在執行 Red Hat Linux 6.7。
新增虛擬驅動器
開啟 Oracle VM Virtual Box 管理器,選擇要為其新增新磁碟的 Virtual Box,然後點選**設定**。

點選儲存,選擇硬碟,然後點選新增硬碟。
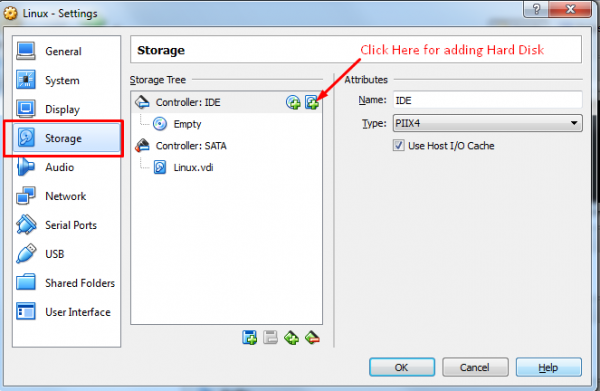
點選**建立新磁碟**。

按照螢幕上的說明建立新的硬碟驅動器。您也可以按照嚮導的提示,輸入新硬碟的名稱以及您希望建立磁碟檔案的位置。在 Windows 上提供您希望建立驅動器的目錄。
當嚮導完成時,點選**確定**關閉設定。
新驅動器的分割槽
通常,系統中的磁碟驅動器會分配以 hd 或 sd 開頭的裝置名稱,後跟一個字母表示裝置號。例如,第一個裝置可能是 /dev/sda,第二個是 /dev/sdb,依此類推。
執行以下命令列出可用的硬碟驅動器
# ls /dev/sd*
/dev/sda /dev/sda1 /dev/sda2 /dev/sdb
從以上輸出可以看到,新硬碟已分配給裝置檔案 /dev/sdb。目前驅動器沒有顯示任何分割槽(因為我們還沒有建立任何分割槽)。
建立 Linux 分割槽
下一步是在新磁碟驅動器上建立一個或多個 Linux 分割槽。這可以透過使用 fdisk 實用程式來實現,該實用程式將要分割槽的裝置作為命令列引數。
# fdisk /dev/sdb
Device contains neither a valid DOS partition table, nor Sun, SGI or OSF disklabel
Building a new DOS disklabel with disk identifier 0xd1082b01.
Changes will remain in memory only, until you decide to write them.
After that, of course, the previous content won't be recoverable.
Warning: invalid flag 0x0000 of partition table 4 will be corrected by w(rite)

WARNING: DOS-compatible mode is deprecated. It's strongly recommended to
   switch off the mode (command 'c') and change display units to
   sectors (command 'u').
Command (m for help):
As instructed, switch off DOS compatible mode and change the units to sectors by entering the c and u commands:
Command (m for help): c
DOS Compatibility flag is not set
Command (m for help): u
Changing display/entry units to sectors
In order to view the current partitions on the disk enter the p command:
Command (m for help): p

Disk /dev/sdb: 34.4 GB, 34359738368 bytes
255 heads, 63 sectors/track, 4177 cylinders
Units = cylinders of 16065 * 512 = 8225280 bytes
Sector size (logical/physical): 512 bytes / 512 bytes
I/O size (minimum/optimal): 512 bytes / 512 bytes
Disk identifier: 0xd1082b01
Device Boot    Start    End    Blocks    Id    System
從以上 fdisk 輸出可以看到,磁碟目前沒有分割槽,因為它之前未使用過。下一步是在磁碟上建立一個新分割槽,此任務透過輸入 n(表示新分割槽)和 p(表示主分割槽)來執行。
Command (m for help): n
Command action
   e    extended
   p    primary partition (1-4)
   p
Partition number (1-4):
我們只能建立一個分割槽,可以命名為**分割槽 1**。接下來,我們需要指定分割槽開始和結束的位置。由於這是第一個分割槽,我們可以從第一個可用扇區開始,並且由於我們希望使用整個磁碟,因此可以將最後一個扇區指定為結束。請注意,如果您希望建立多個分割槽 - 您甚至可以按扇區、位元組、千位元組或兆位元組指定每個分割槽的大小。
Partition number (1-4): 1
First sector (2048-67108863, default 2048):
Using default value 2048
Last sector, +sectors or +size{K,M,G} (2048-67108863, default 67108863):
Using default value 67108863
Now that we have specified the partition we need to write it to the disk using the w command:
Command (m for help): w
The partition table has been altered!
Calling ioctl() to re-read partition table.
Syncing disks.
If we now look at the devices again we will see that the new partition is visible as /dev/sdb1:
# ls /dev/sd*
/dev/sda /dev/sda1 /dev/sda2 /dev/sdb /dev/sdb1
下一步是在我們的新分割槽上建立一個檔案系統。
在 RHEL 6.7 磁碟分割槽上建立檔案系統
我們現在安裝了一個新磁碟,RHEL 6.7/CentOS 可以看到它,並且我們在磁碟上配置了一個 Linux 分割槽。下一步是在分割槽上建立一個 Linux 檔案系統,以便作業系統可以使用它來儲存檔案和資料。在分割槽上建立檔案系統的最簡單方法是使用**mkfs.ext4**實用程式,它將標籤和分割槽裝置作為引數。
# /sbin/mkfs.ext4 -L /backup /dev/sdb1
mke2fs 1.41.12 (17-May-2010)
Filesystem label=/backup
OS type: Linux
Block size=4096 (log=2)
Fragment size=4096 (log=2)
Stride=0 blocks, Stripe width=0 blocks
2097152 inodes, 8388352 blocks
419417 blocks (5.00%) reserved for the super user
First data block=0
Maximum filesystem blocks=4294967296
256 block groups
32768 blocks per group, 32768 fragments per group
8192 inodes per group
Superblock backups stored on blocks:
   32768, 98304, 163840, 229376, 294912, 819200, 884736, 1605632, 2654208,
   4096000, 7962624
Writing inode tables: done
Creating journal (32768 blocks): done
Writing superblocks and filesystem accounting information: done
此檔案系統會在 36 次掛載或 180 天后自動檢查,以先發生者為準。
使用 tune2fs -c 或 -i 覆蓋。
掛載檔案系統
現在我們已經在新磁碟驅動器的 Linux 分割槽上建立了一個新的檔案系統,我們需要掛載它才能訪問它。為此,我們需要建立一個**掛載點**。掛載點只是一個目錄或資料夾,檔案系統將掛載到其中。
在本例中,我們將建立一個** /backup **目錄以匹配我們的檔案系統標籤(儘管這兩個值不必匹配)。
# mkdir /backup
然後可以使用 mount 命令手動掛載檔案系統。
# mount /dev/sdb1 /backup
執行不帶任何引數的 mount 命令將顯示我們所有當前掛載的檔案系統(包括我們的新檔案系統)。
# mount
/dev/mapper/vg_rhel6-lv_root on / type ext4 (rw)
proc on /proc type proc (rw)
sysfs on /sys type sysfs (rw)
devpts on /dev/pts type devpts (rw,gid=5,mode=620)
tmpfs on /dev/shm type tmpfs (rw,rootcontext="system_u:object_r:tmpfs_t:s0")
/dev/sda1 on /boot type ext4 (rw)
none on /proc/sys/fs/binfmt_misc type binfmt_misc (rw)
sunrpc on /var/lib/nfs/rpc_pipefs type rpc_pipefs (rw)
/dev/sr0 on /media/RHEL_6.0 x86_64 Disc 1 type iso9660 (ro,nosuid,nodev,uhelper=udisks,uid=500,gid=500,iocharset=utf8,mode=0400,dmode=0500)
/dev/sdb1 on /backup type ext4 (rw)
配置 RHEL 6.7 自動掛載檔案系統
為了配置系統以便在啟動時自動掛載新磁碟,我們需要在** /etc/fstab 檔案**中新增一個條目。
以下是示例配置檔案,其中顯示了配置為自動掛載我們的 /backup 分割槽的 fstab 檔案。
# Vi /etc/fstab
/dev/mapper/vg_rhel6-lv_root /                   ext4       defaults       1 1
UUID=4a9886f5-9545-406a-a694-04a60b24df84 /boot                ext4       defaults 1 2
/dev/mapper/vg_rhel6-lv_swap swap                swap       defaults          0 0
tmpfs                   /dev/shm             tmpfs    defaults          0 0
devpts                  /dev/pts             devpts   gid=5,mode=620    0 0
sysfs                   /sys                 sysfs    defaults          0 0
proc                    /proc                proc     defaults          0 0
LABEL=/backup           /backup              ext4     defaults          1 2
結論
成功配置和設定後,您的 VirtualBox 現在擁有更多空間。我們可以新增任意數量的硬碟,透過以上步驟,為 Linux 機器增加儲存不同型別儲存的空間。

17K+ 瀏覽量
