
 資料結構
資料結構 網路
網路 RDBMS
RDBMS 作業系統
作業系統 Java
Java iOS
iOS HTML
HTML CSS
CSS Android
 Python
 C 程式設計
 C++
C++ C#
C# MongoDB
 MySQL
MySQL Javascript
 PHP
PHP利用 Android 中的 Timber 提升你的記錄體驗
Timber 庫是 Android Log 的擴充套件庫。在開發 Android 應用程式時,大多數開發者更喜歡使用 Android Log。但問題在於在部署 Android 專案時如何清洗日誌。使用 Timber 庫可以避免此過程。
本例演示如何在 Android 中整合 Timber。
步驟 1 − 在 Android Studio 中建立新專案,轉到檔案 ⇒ 新專案,然後填寫所有必填項以建立新專案。
步驟 2 − 如下所示在 build.gradle 中新增 Timber 庫
apply plugin: 'com.android.application'
android {
   compileSdkVersion 28
   defaultConfig {
      applicationId "com.example.andy.myapplication"
      minSdkVersion 15
      targetSdkVersion 28
      versionCode 1
      versionName "1.0"
      testInstrumentationRunner "android.support.test.runner.AndroidJUnitRunner"
   }
   buildTypes {
      release {
         minifyEnabled false
         proguardFiles getDefaultProguardFile('proguard-android.txt'), 'proguard-rules.pro'
      }
   }
}
dependencies {
   implementation fileTree(dir: 'libs', include: ['*.jar'])
   implementation 'com.android.support:appcompat-v7:28.0.0'
   implementation 'com.android.support.constraint:constraint-layout:1.1.3'
   testImplementation 'junit:junit:4.12'
   implementation 'com.jakewharton.timber:timber:4.7.1'
   androidTestImplementation 'com.android.support.test:runner:1.0.2'
   androidTestImplementation 'com.android.support.test.espresso:espresso-core:3.0.2'
}
步驟 3 − 如下所示必須在 MainActivity 中的 onCreate 方法中初始化 Timber。
import android.os.Bundle;
import android.support.v7.app.AppCompatActivity;
import timber.log.Timber;
public class MainActivity extends AppCompatActivity {
   @Override
   protected void onCreate(Bundle savedInstanceState) {
      super.onCreate(savedInstanceState);
      setContentView(R.layout.activity_main);
      if (BuildConfig.DEBUG) {
         Timber.plant(new Timber.DebugTree());
      }
   }
}
步驟 4 −Timber 有不同的錯誤和警告方法,如下所示。
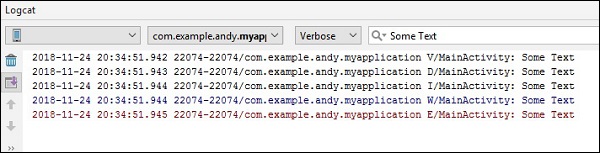
Timber.v("Some Text");- It indicates about verbose error
Timber.d("Some Text ");- It indicates about debug error
Timber.i("Some Text ");- It indicates about information error
Timber.w("Some Text ");- It indicates about warning error
Timber.e("Some Text ");- It indicates about error
步驟 5 − Timber 的一個簡單示例如下所示。
package com.example.andy.myapplication;
import android.os.Bundle;
import android.support.v7.app.AppCompatActivity;
import timber.log.Timber;
public class MainActivity extends AppCompatActivity {
   @Override
   protected void onCreate(Bundle savedInstanceState) {
      super.onCreate(savedInstanceState);
      setContentView(R.layout.activity_main);
      if (BuildConfig.DEBUG) {
         Timber.plant(new Timber.DebugTree());
      } else {
         Timber.plant(new ReleaseTree());
      }
      Timber.v("Some Text");
      Timber.d("Some Text ");
      Timber.i("Some Text ");
      Timber.w("Some Text ");
      Timber.e("Some Text ");
   }
}
步驟 6 − 在上述示例中,我們根本不會更改任何內容以檢視和展示。
上述程式碼的示例輸出如下所示 −
點選此處下載專案程式碼

更新日期:30-07-2019
337 瀏覽

廣告