
 資料結構
資料結構 網路
網路 關係資料庫管理系統 (RDBMS)
 作業系統
作業系統 Java
Java iOS
iOS HTML
HTML CSS
CSS Android
 Python
 C 程式設計
 C++
C++ C#
C# MongoDB
 MySQL
MySQL Javascript
 PHP
PHP基於情感的音樂播放器:一個機器學習的 Python 專案
介紹
音樂是一種世界共通的語言。儘管文化和語言不同,它都能連線情感,並將人們聯絡在一起。如今,您可以根據自己的情緒、情感和偏好個性化您的音樂。
本文將教我們如何構建基於情感的音樂播放器。其理念很簡單,即識別使用者的感情並提供個性化的播放列表。為此,我們需要一些機器學習演算法。這些演算法將識別情感模式和使用者的喜好,以推薦與他們情緒完美匹配的歌曲。
科技與音樂擁有巨大的潛力,能夠透過音樂的力量來治癒情感。
本專案將提供一個基於情感的音樂系統。該系統將篩選出適合您心情的歌曲,您無需再搜尋歌曲。基於情感的音樂播放器將幫助您管理精神壓力,也有助於您管理情緒。
選擇資料集
使用機器學習演算法訓練模型時,資料集至關重要。在本專案中,資料集必不可少。它包含諸如情感狀態和各種歌曲資訊等資料。
建立的資料集包含各種情緒,例如快樂、平靜、憤怒、悲傷、孤獨等。該資料集可以幫助訓練模型理解和預測使用者的情緒狀態。然後,模型將對情緒進行分類並推薦合適的歌曲。
資料集將幫助模型推薦帶有積極歌詞和樂觀、歡快的歌曲。同樣,音調低、平靜且節奏緩慢的歌曲被認為是憂鬱的。這類歌曲描述了悲傷、孤獨或空虛。
在這裡,我們將使用兩個資料集:
用於檢測面部表情的情感識別資料集 (FER 2013)
Spotify歌曲資料集
https://www.kaggle.com/datasets/musicblogger/spotify-music-data-to-identify-themoods
資料預處理
訓練機器學習模型需要音訊和情感資料。您需要一位具備一定音樂理論和訊號處理知識的人員。
在音訊資料中,您需要諸如節奏、音高和韻律等資訊。這將有助於模型理解音樂資料。提取這些資料是一項具有挑戰性的任務。可能需要更準確的資料來保持模型的準確性。
載入資料集
img_shape = 48
batch_size = 64

train_data_path = '/Users/someswarpal/Downloads/archive-2/train/'
test_data_path = '/Users/someswarpal/Downloads/archive-2/test/'
資料預處理
示例
train_preprocessor = ImageDataGenerator(
   rescale = 1 / 255.,
   # Data Augmentation
   rotation_range=10,
   zoom_range=0.2,
   width_shift_range=0.1,
   height_shift_range=0.1,
   horizontal_flip=True,
   fill_mode='nearest',
)
test_preprocessor = ImageDataGenerator(
   rescale = 1 / 255.,
)

train_data = train_preprocessor.flow_from_directory(
   train_data_path,
   class_mode="categorical",
   target_size=(img_shape,img_shape),
   color_mode='rgb',
   shuffle=True,
   batch_size=batch_size,
   subset='training',
)

test_data = test_preprocessor.flow_from_directory(
   test_data_path,
   class_mode="categorical",
   target_size=(img_shape,img_shape),
   color_mode="rgb",
   shuffle=False,
   batch_size=batch_size,
)
輸出
Found 28709 images belonging to 7 classes.
Found 7178 images belonging to 7 classes.
機器學習模型
基於情感的音樂播放器專案的機器學習模型使用監督學習。它涉及使用預先標記的資料訓練模型。標記的資料包括人們的心理狀態以及與這些情緒相符的歌曲。
決策樹方法透過基於某些規則將資訊分解成越來越小的組來對資訊進行分類。分支決策允許模型根據獲得的資訊進行一系列選擇,並猜測使用者的感受。
建立 CNN 模型
def Create_CNN_Model():

   model = Sequential()

   #CNN1
   model.add(Conv2D(32, (3,3), activation='relu', input_shape=(img_shape, img_shape, 3)))
   model.add(BatchNormalization())
   model.add(Conv2D(64,(3,3), activation='relu', padding='same'))
   model.add(BatchNormalization())
   model.add(MaxPooling2D(pool_size=(2,2), padding='same'))
   model.add(Dropout(0.25))

   #CNN2
   model.add(Conv2D(64, (3,3), activation='relu', ))
   model.add(BatchNormalization())
   model.add(Conv2D(128,(3,3), activation='relu', padding='same'))
   model.add(BatchNormalization())
   model.add(MaxPooling2D(pool_size=(2,2), padding='same'))
   model.add(Dropout(0.25))

   #CNN3
   model.add(Conv2D(128, (3,3), activation='relu'))
   model.add(BatchNormalization())
   model.add(Conv2D(256,(3,3), activation='relu', padding='same'))
   model.add(BatchNormalization())
   model.add(MaxPooling2D(pool_size=(2,2), padding='same'))
   model.add(Dropout(0.25))

   #Output
   model.add(Flatten())

   model.add(Dense(1024, activation='relu'))
   model.add(BatchNormalization())
   model.add(Dropout(0.25))

   model.add(Dense(512, activation='relu'))
   model.add(BatchNormalization())
   model.add(Dropout(0.25))

   model.add(Dense(256, activation='relu'))
   model.add(BatchNormalization())
   model.add(Dropout(0.25))

   model.add(Dense(128, activation='relu'))
   model.add(BatchNormalization())
   model.add(Dropout(0.25))

   model.add(Dense(64, activation='relu'))
   model.add(BatchNormalization())
   model.add(Dropout(0.25))

   model.add(Dense(32, activation='relu'))
   model.add(BatchNormalization())
   model.add(Dropout(0.25))

   model.add(Dense(7,activation='softmax'))

return model
編譯 CNN 模型
CNN_Model = Create_CNN_Model()
CNN_Model.compile(optimizer="adam", loss='categorical_crossentropy',
metrics=['accuracy'])
訓練模型
CNN_history = CNN_Model.fit( train_data , validation_data= test_data , epochs=50,
batch_size= batch_size,
callbacks=callbacks, steps_per_epoch= steps_per_epoch,
validation_steps=validation_steps)
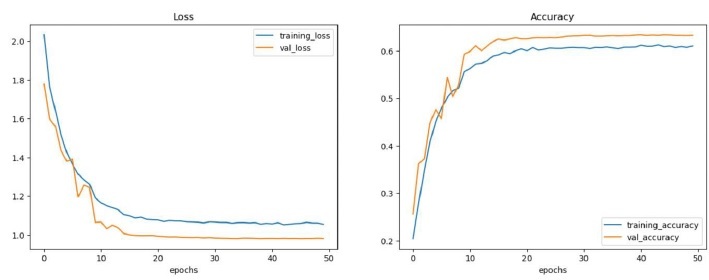
準確性和圖表
示例
CNN_Score = CNN_Model.evaluate(test_data)

print(" Test Loss: {:.5f}".format(CNN_Score[0]))
print("Test Accuracy: {:.2f}%".format(CNN_Score[1] * 100))

def plot_curves(history):

   loss = history.history["loss"]
   val_loss = history.history["val_loss"]

   accuracy = history.history["accuracy"]
   val_accuracy = history.history["val_accuracy"]

   epochs = range(len(history.history["loss"]))

   plt.figure(figsize=(15,5))

   #plot loss
   plt.subplot(1, 2, 1)
   plt.plot(epochs, loss, label = "training_loss")
   plt.plot(epochs, val_loss, label = "val_loss")
   plt.title("Loss")
   plt.xlabel("epochs")
   plt.legend()

   #plot accuracy
   plt.subplot(1, 2, 2)
   plt.plot(epochs, accuracy, label = "training_accuracy")
   plt.plot(epochs, val_accuracy, label = "val_accuracy")
   plt.title("Accuracy")
   plt.xlabel("epochs")
   plt.legend()
   plot_curves(CNN_history)

   #plt.tight_layout()
輸出
訓練測試情緒
CNN_Predictions = CNN_Model.predict(test_data)

# Choosing highest probalbilty class in every prediction
CNN_Predictions = np.argmax(CNN_Predictions, axis=1)
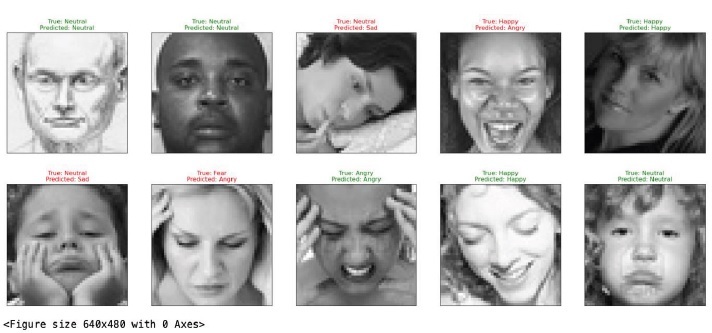
在隨機資料集上測試
示例
test_preprocessor = ImageDataGenerator(
   rescale = 1 / 255.,
)

test_generator = test_preprocessor.flow_from_directory(
   test_data_path,
   class_mode="categorical",
   target_size=(img_shape,img_shape),
   color_mode="rgb",
   shuffle=True,
   batch_size=batch_size,
)

Random_batch = np.random.randint(0, len(test_generator) - 1)

Random_Img_Index = np.random.randint(0, batch_size - 1 , 10)

fig, axes = plt.subplots(
   nrows=2, ncols=5, figsize=(25, 10),
   subplot_kw={'xticks': [], 'yticks': []}
)

for i, ax in enumerate(axes.flat):
   Random_Img = test_generator[Random_batch][0][Random_Img_Index[i]]
   Random_Img_Label = np.argmax(test_generator[Random_batch][1][Random_Img_Index[i]])

   Model_Prediction = np.argmax(CNN_Model.predict( tf.expand_dims(Random_Img,
   axis=0) , verbose=0))
   ax.imshow(Random_Img)
   if Emotion_Classes[Random_Img_Label] == Emotion_Classes[Model_Prediction]:
      color = "green"
   else:
      color = "red"
   ax.set_title(f"True: {Emotion_Classes[Random_Img_Label]}\nPredicted:
   {Emotion_Classes[Model_Prediction]}", color=color)
plt.show()
plt.tight_layout()
輸出
情感檢測
情感檢測是基於情感的音樂播放器系統的主要部分。適當的情感檢測有助於準確預測使用者的情感。
可以使用網路攝像頭或自拍相機捕捉情緒。這將提供使用者的即時情緒。
Python 有一個庫 OpenCV,用於透過圖片或影片處理情緒。OpenCV 有助於分析面部表情的變化。這是透過跟蹤使用者的眉毛、眼睛和嘴巴形狀的運動來實現的。
對映即時面部表情將根據使用者的情緒準確提供個性化推薦。
載入情緒資料集
Music_Player = pd.read_csv("/Users/someswarpal/Downloads/data_moods.csv")
Music_Player = Music_Player[['name','artist','mood','popularity']]
Music_Player.head()
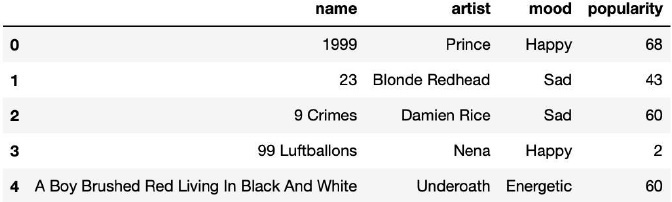
顯示資料集的內容
Play = Music_Player[Music_Player['mood'] == 'Happy' ]
Play = Play.sort_values(by="popularity", ascending=False)
Play = Play[:5].reset_index(drop=True)
display(Play)
流派檢測
流派檢測對於本專案也很重要。它允許模型學習使用者的音樂偏好。透過使用流派檢測,模型可以向用戶推薦類似流派的歌曲。它有助於使用者擴充套件他們的音樂品味。
推薦音樂
ML 模型預測使用者的情緒並根據情緒推薦歌曲。
訓練良好的 ML 模型確保根據使用者的心情和情緒選擇合適的歌曲。它確保推薦的歌曲適合使用者的心情和情緒。
# Making Songs Recommendations Based on Predicted Class
def Recommend_Songs(pred_class):
if( pred_class=='Disgust' ):
Play = Music_Player[Music_Player['mood'] =='Sad' ]
Play = Play.sort_values(by="popularity", ascending=False)
Play = Play[:5].reset_index(drop=True)
display(Play)
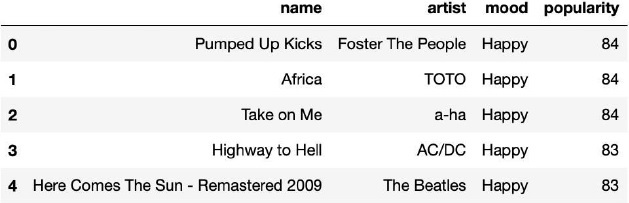
if( pred_class=='Happy' or pred_class=='Sad' ):
Play = Music_Player[Music_Player['mood'] =='Happy' ]
Play = Play.sort_values(by="popularity", ascending=False)
Play = Play[:5].reset_index(drop=True)
display(Play)
if( pred_class=='Fear' or pred_class=='Angry' ):
Play = Music_Player[Music_Player['mood'] =='Calm' ]
Play = Play.sort_values(by="popularity", ascending=False)
Play = Play[:5].reset_index(drop=True)
display(Play)
if( pred_class=='Surprise' or pred_class=='Neutral' ):
Play = Music_Player[Music_Player['mood'] =='Energetic' ]
Play = Play.sort_values(by="popularity", ascending=False)
Play = Play[:5].reset_index(drop=True)
display(Play)
列印情緒列表並要求使用者選擇一個
print("Select a mood by entering a number:\n1. Disgust\n2. Happy/Sad\n3. Fear/Angry\n4.
Surprise/Neutral")
selected_mood = int(input("Enter a number for the mood you want to select: "))

# Display recommended songs based on selected mood
if selected_mood == 1:
   Recommend_Songs('Disgust')
elif selected_mood == 2:
   Recommend_Songs('Happy')
elif selected_mood == 3:
   Recommend_Songs('Fear')
elif selected_mood == 4:
   Recommend_Songs('Surprise')
else:
   print("Invalid input. Please enter a number between 1 and 4.")
發現新歌
歌曲查詢對於基於情感的音樂播放器專案至關重要。它允許使用者發現符合他們品味的歌曲。機器學習模型根據使用者的收聽歷史提供新的或鮮為人知的歌曲。
推薦新歌可以改善使用者的收聽體驗並鼓勵音樂探索。歌曲發現還可以幫助發現具有相同流派和情緒的其他語言的歌曲。
新增附加功能
音樂系統的基本功能包括情緒檢測、流派檢測和歌曲推薦。您可以透過新增其他一些功能來更新您的音樂系統,例如:
根據情緒檢測搜尋歌曲。
根據情緒對歌曲進行評分。
新增建議以更好地訓練模型。
與他人分享您基於情感的播放列表或將其公開。
儲存或下載歌曲以備將來使用。(可以是高階版本)
結論
基於情感的音樂播放器完美地結合了情感、技術和音樂。它根據使用者的感覺和音樂品味提供獨特的音樂體驗。該模型使用 ML 技術來推薦最符合使用者情緒的歌曲。
訓練良好的模型確保其推薦的歌曲與使用者的感覺相符。音樂系統最重要的部分是情感檢測、流派識別和歌曲推薦。
但是,您可以根據自己的感受搜尋歌曲、對其進行評分、分享播放列表以及儲存或下載音樂。基於情感的音樂播放器可以幫助您平靜下來並應對精神焦慮。

1000+ 次瀏覽
