
 資料結構
資料結構 網路
網路 關係資料庫管理系統 (RDBMS)
 作業系統
作業系統 Java
Java iOS
iOS HTML
HTML CSS
CSS Android
 Python
 C語言程式設計
 C++
C++ C#
C# MongoDB
 MySQL
MySQL Javascript
 PHP
PHP使用Python Tkinter建立番茄工作法計時器
什麼是番茄工作法?
番茄工作法是由弗朗切斯科·西里洛(Francesco Cirillo)在上世紀80年代末發明的。當時他還是一名大學生,在學習和完成作業時遇到了困難。感到不知所措的他,給自己設定了只專注學習10分鐘的目標。受到這個挑戰的啟發,他發現了一個番茄形狀的廚房計時器(義大利語為pomodoro),於是番茄工作法誕生了。在本教程中,我們將使用Python和Tkinter建立一個番茄工作法計時器。計時器將使用圖形使用者介面(GUI)建立,我們將使用Tkinter模組來建立GUI。
步驟和流程
步驟1 - 安裝所需的庫
在開始編碼之前,我們需要確保已安裝所有必需的庫。在本教程中,我們將使用`time`和`tkinter`模組。這兩個模組都預裝在Python中,因此我們無需單獨安裝它們。
步驟2 - 建立GUI
現在我們有了所需的庫,就可以開始建立GUI了。首先,我們需要建立一個新的Python檔案並匯入Tkinter模組。
import tkinter as tk
import time
from datetime import datetime, timedelta
接下來,我們需要建立一個Tkinter類的新的例項,並設定視窗標題和尺寸。
# Create a GUI window
root = tk.Tk()
root.title("Pomodoro Timer")

# Set the window size and position
window_width = 300
window_height = 150
screen_width = root.winfo_screenwidth()
screen_height = root.winfo_screenheight()
x_cordinate = int((screen_width / 2) - (window_width / 2))
y_cordinate = int((screen_height / 2) - (window_height / 2))
root.geometry("{}x{}+{}+{}".format(window_width, window_height, x_cordinate, y_cordinate))
這段程式碼建立一個新的視窗,標題為“番茄工作法計時器”,尺寸為300畫素×150畫素。
步驟3 - 新增標籤和按鈕
現在我們需要向我們建立的GUI視窗新增標籤和按鈕。我們將包括一個顯示當前時間的標籤,一個顯示倒計時時間的標籤,以及兩個用於啟動和停止計時器的按鈕。
# Current Time Label
current_time_label = tk.Label(text="", font=("Helvetica", 20))
current_time_label.pack()

# Timer Label
timer_label = tk.Label(text="", font=("Helvetica", 30))
timer_label.pack()

# Start Button
start_button = tk.Button(text="Start", font=("Helvetica", 10))
start_button.pack(side="left")

# Stop Button
stop_button = tk.Button(text="Stop", font=("Helvetica", 10))
stop_button.pack(side="right")
這段程式碼生成標籤和按鈕,並將它們放置在圖形使用者介面視窗中。目前,當前時間標籤和計時器標籤為空;稍後我們將用當前時間和計時器值填充它們。
步驟4 - 為按鈕新增功能
現在我們已經有了標籤和按鈕,我們需要為啟動和停止按鈕新增功能。按下啟動按鈕時,計時器應該開始倒計時,並且當前時間標籤應該反映當前時間。按下停止按鈕時,計時器應該停止倒計時。
# Start Button Functionality
def start_timer():
   current_time_label.config(text=time.strftime("%H:%M:%S"))
   timer_label.config(text="25:00")
   start_button.config(state="disabled")
   stop_button.config(state="normal")

# Stop Button Functionality
def stop_timer():
   timer_label.config(text="")
   start_button.config(state="normal")
   stop_button.config(state="disabled")
`start_timer`方法使用`time`模組的`strftime`函式更新當前時間標籤的當前時間。它還將計時器標籤更改為25分鐘(番茄工作法的時間間隔長度),並停用啟動和停止按鈕。`stop_timer`函式清除計時器標籤,啟用啟動按鈕,並停用停止按鈕。
步驟5 - 新增計時器功能
現在我們已經有了啟動和停止按鈕的功能,我們需要新增計時器功能。我們將使用`time`模組的`sleep`函式在每次倒計時之間暫停程式一秒鐘。我們還將使用`datetime`模組的`timedelta`函式來計算剩餘時間並更新計時器標籤。
# Timer Functionality
def countdown(minutes):
   seconds = minutes * 60
   while seconds > 0:
      minutes, sec = divmod(seconds, 60)
      timer_label.config(text='{:02d}:{:02d}'.format(minutes, sec))
      time.sleep(1)
      seconds -= 1
   timer_label.config(text="Time's up!")
   start_button.config(state="normal")
   stop_button.config(state="disabled")
`countdown`函式將輸入的分鐘數轉換為相應的秒數。如果還有剩餘秒數,它將進入一個無限迴圈。在迴圈過程中,`divmod`函式用於確定剩餘的分鐘和秒數,`format`函式用於在計時器標籤上顯示該資訊。每次執行倒計時時,程式都會休眠一秒鐘。當倒計時接近零時,計時器標籤將更改為“時間到!”,啟動按鈕被啟用,停止按鈕被停用。
步驟6 - 將按鈕連線到函式
最後一步是將啟動和停止按鈕連線到它們各自的函式。我們可以使用按鈕的`command`引數來實現。
start_button.config(command=lambda: (start_timer(), countdown(25)))
stop_button.config(command=stop_timer)
示例
現在我們可以執行程式並測試番茄工作法計時器。要執行程式,請將程式碼儲存在一個以`.py`為副檔名的檔案中,並使用Python直譯器執行它。
# importing the essential libraries for our work
import tkinter as tk
import time
from datetime import datetime, timedelta

# Create a GUI window
root = tk.Tk()
root.title("Pomodoro Timer")
# Set the window size and position
window_width = 300
window_height = 150
screen_width = root.winfo_screenwidth()
screen_height = root.winfo_screenheight()
x_cordinate = int((screen_width / 2) - (window_width / 2))
y_cordinate = int((screen_height / 2) - (window_height / 2))
root.geometry("{}x{}+{}+{}".format(window_width,
   window_height, x_cordinate, y_cordinate))
# Current Time Label
current_time_label = tk.Label(text="", font=("Helvetica", 20))
current_time_label.pack()

# Timer Label
timer_label = tk.Label(text="", font=("Helvetica", 30))
timer_label.pack()

# Start Button
start_button = tk.Button(text="Start", font=("Helvetica", 10))
start_button.pack(side="left")

# Stop Button
stop_button = tk.Button(text="Stop", font=("Helvetica", 10))
stop_button.pack(side="right")

# This code snippet is used to understand the start Button Functionality
def start_timer():
   current_time_label.config(text=time.strftime("%H:%M:%S"))
   timer_label.config(text="25:00")
   start_button.config(state="disabled")
   stop_button.config(state="normal")

# This code snippet is used to understand the stop Button Functionality
def stop_timer():
   timer_label.config(text="")
   start_button.config(state="normal")
   stop_button.config(state="disabled")

# This code snippet is used to understand the timer Functionality
def countdown(minutes):
   seconds = minutes * 60
   while seconds > 0:
      minutes, sec = divmod(seconds, 60)
      timer_label.config(text='{:02d}:{:02d}'.format(minutes, sec))
      time.sleep(1)
      seconds -= 1
   timer_label.config(text="Time's up!")
   start_button.config(state="normal")
   stop_button.config(state="disabled")

# this piece of code is used to connect the start and stop button to make it easier
start_button.config(command=lambda: (start_timer(), countdown(25)))
stop_button.config(command=stop_timer)
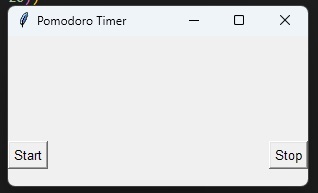
輸出
在上框中,我們可以看到帶有GUI的番茄工作法應用程式的輸出,這可以用來建立一個。
結論
按照本說明,你將能夠使用Python和Tkinter建立你自己的番茄工作法計時器。我們使用Tkinter模組建立了一個圖形使用者介面(GUI)視窗,並用文字和控制元件元素填充它。為了開發一個在計時器標籤上顯示剩餘時間的倒計時計時器,我們使用了`time`和`datetime`模組,並配置了啟動和停止按鈕的功能。最後,我們將按鈕連線到它們預期的操作並運行了程式碼。如果你想在更短的時間內完成更多工作,那麼這個番茄工作法計時器適合你。

687 次瀏覽
