
 資料結構
資料結構 網路
網路 關係型資料庫管理系統
 作業系統
作業系統 Java
Java iOS
iOS HTML
HTML CSS
CSS Android
 Python
 C 程式設計
 C++
C++ C#
C# MongoDB
 MySQL
MySQL Javascript
 PHP
PHPAndroid 中的內容提供程式及示例
什麼是 Android 中的內容提供程式?
Android 中的內容提供程式是 Android 作業系統的一個元件,它使應用程式能夠儲存資料並與其他應用程式共享資料。內容提供程式在應用程式和 Android 資料來源(如資料庫、檔案和 SharedPreferences)之間提供了一個介面。內容提供程式是 Android 應用程式開發的四個基本元件之一,另外三個是活動、服務和廣播接收器。需要訪問其他應用程式資料的應用程式使用內容提供程式。
內容提供程式通常用於儲存和檢索儲存介質中的資料。此儲存介質可以是資料庫、檔案或共享首選項。內容提供程式也可用於與其他應用程式共享資料,從而允許應用程式通訊和傳輸資料。內容提供程式對於從遠端源(例如 Web 伺服器)儲存和檢索資料特別有用。
內容提供程式透過擴充套件 ContentProvider 類並定義標識內容提供程式的 URI(統一資源識別符號)來建立。然後,此 URI 用於訪問內容提供程式中的資料。內容提供程式通常使用 ContentResolver 類訪問。ContentResolver 類提供用於查詢和操作內容提供程式提供的資料的方法。
內容提供程式用於儲存和檢索諸如聯絡人、影像、影片、音樂和其他媒體之類的資料。例如,Android 聯絡人應用程式使用內容提供程式來儲存和檢索聯絡人資料。聯絡人應用程式提供了一個內容提供程式,其他應用程式可以使用該提供程式來訪問聯絡人資料。類似地,Android 媒體儲存應用程式使用內容提供程式來儲存和檢索媒體檔案。
在本文中,我們將構建一個簡單的應用程式,在該應用程式中,我們將從裝置聯絡人應用程式中獲取資料,並以列表檢視的形式在我們的 Android 應用程式中顯示該資料。在此應用程式中,我們使用聯絡人應用程式的內容在我們自己的應用程式中顯示。
Android 中內容提供程式的實現
我們將建立一個簡單的應用程式,在其中我們將顯示一個列表檢視。在這個列表檢視中,我們將顯示不同的程式語言,併為列表檢視中的專案新增點選監聽器。點選列表檢視中的專案時,我們將向用戶顯示一條帶有專案名稱的吐司訊息。我們將遵循分步指南在 Android 中實現兩個數字的加法。
步驟 1 - 在 Android Studio 中建立新專案
導航到 Android Studio,如下面的螢幕截圖所示。在下面的螢幕截圖中,點選“新建專案”以建立一個新的 Android Studio 專案。

點選“新建專案”後,您將看到下面的螢幕。
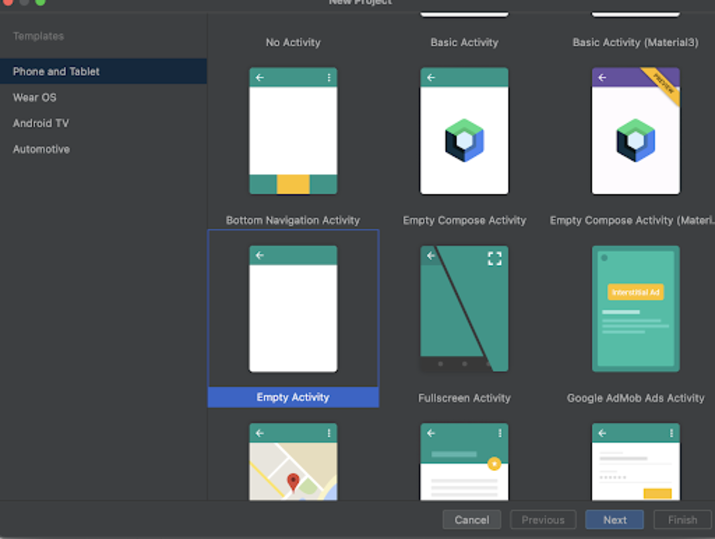
在此螢幕中,我們只需選擇“空活動”並點選“下一步”。點選“下一步”後,您將看到下面的螢幕。
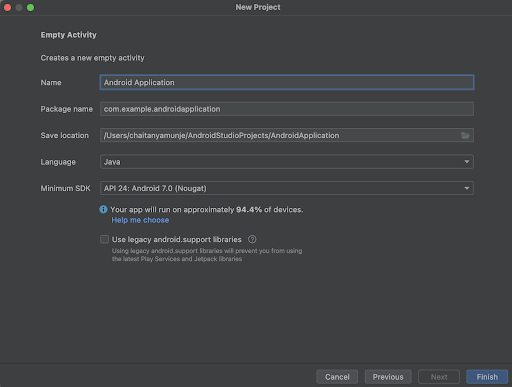
在此螢幕中,我們只需指定專案名稱。然後包名將自動生成。
注意 - 確保選擇 Java 作為語言。
指定所有詳細資訊後,點選“完成”以建立一個新的 Android Studio 專案。
建立專案後,我們將看到 2 個開啟的檔案,即 activity_main.xml 和 MainActivity.java 檔案。
步驟 3 - 使用 activity_main.xml。
導航到 activity_main.xml。如果此檔案不可見,則要開啟此檔案。在左側窗格中導航到 app>res>layout>activity_main.xml 以開啟此檔案。開啟此檔案後,將以下程式碼新增到其中。程式碼中添加了註釋以詳細瞭解。
<?xml version="1.0" encoding="utf-8"?>
<RelativeLayout xmlns:android="http://schemas.android.com/apk/res/android"
   xmlns:app="http://schemas.android.com/apk/res-auto"
   xmlns:tools="http://schemas.android.com/tools"
   android:id="@+id/idRLLayout"
   android:layout_width="match_parent"
   android:layout_height="match_parent"
   android:orientation="vertical"
   tools:context=".MainActivity">
   <!--Creating a list view on below line-->
   <ListView
      android:id="@+id/listView"
      android:layout_width="match_parent"
      android:layout_height="match_parent" />
</RelativeLayout>
說明 - 在上面的程式碼中,我們建立了一個相對佈局作為根佈局,並在其中建立了我們的列表檢視小部件以顯示程式語言列表。對於列表檢視小部件,我們將高度和寬度指定為 match_parent。併為其新增一個唯一的 ID,我們將使用它在列表檢視中設定資料。
步驟 4:為列表檢視的專案建立自定義佈局檔案
導航到 app>res>右鍵點選它>新建>佈局資原始檔,並將其命名為 contacts_list_item,並將以下程式碼新增到其中。程式碼中添加了註釋以詳細瞭解。
<?xml version="1.0" encoding="utf-8"?>
<LinearLayout xmlns:android="http://schemas.android.com/apk/res/android"
   android:layout_width="match_parent"
   android:layout_height="wrap_content"
   android:layout_margin="3dp"
   android:orientation="vertical">

   <!-- on below line creating a text view for contact name-->
   <TextView
      android:id="@+id/idTVContactName"
      android:layout_width="match_parent"
      android:layout_height="wrap_content"
      android:padding="4dp"
      android:text="Contact Name"
      android:textColor="@color/black"
      android:textSize="18sp"
      android:textStyle="bold" />

   <!-- on below line creating a text view for contact number -->
   <TextView
      android:id="@+id/idTVContactNumber"
      android:layout_width="match_parent"
      android:layout_height="wrap_content"
      android:padding="4dp"
      android:text="Number"
      android:textColor="@color/black"
      android:textSize="16sp" /

</LinearLayout>
說明 - 在上面的程式碼中,我們建立了一個相對佈局作為父佈局。在此佈局內,我們建立了兩個文字檢視。一個文字檢視用於顯示聯絡人的姓名,另一個文字檢視用於在列表檢視中顯示該聯絡人的聯絡電話號碼。
步驟 5:使用 MainActivity.java 檔案。
導航到 MainActivity.java。如果此檔案不可見,則要開啟此檔案。在左側窗格中導航到 app>res>layout>MainActivity.java 以開啟此檔案。開啟此檔案後,將以下程式碼新增到其中。程式碼中添加了註釋以詳細瞭解。
package com.example.androidjavaapp;

import android.database.Cursor;
import android.os.Bundle;
import android.provider.ContactsContract;
import android.widget.ListView;
import android.widget.SimpleCursorAdapter;
import androidx.appcompat.app.AppCompatActivity;

public class MainActivity extends AppCompatActivity {

   // on below line creating a variable for list view.
   private ListView contactsLV;

   @Override
   protected void onCreate(Bundle savedInstanceState) {
      super.onCreate(savedInstanceState);
      setContentView(R.layout.activity_main);

      // on below line we are initializing our variables.
      contactsLV = findViewById(R.id.listView);

      // create cursor and querying the data on below line
      Cursor cursor = getContentResolver().query(ContactsContract.CommonDataKinds.Phone.CONTENT_URI, null, null, null, null);

      // on below line calling method to manage the cursor.
      startManagingCursor(cursor);

      // on below line getting the data from contacts
      String[] data = {ContactsContract.CommonDataKinds.Phone.NUMBER, ContactsContract.CommonDataKinds.Phone.DISPLAY_NAME, ContactsContract.CommonDataKinds.Phone._ID};

      // on below line specifying id to which we have to set the data.
      int[] to = {R.id.idTVContactNumber, R.id.idTVContactName};

      // on below line creating and initializing simple cursor adapter and passing the layout file which we have to display.
      SimpleCursorAdapter adapter = new SimpleCursorAdapter(this, R.layout.contacts_list_item, cursor, data, to);

      // on below line setting adapter to our list view.
      contactsLV.setAdapter(adapter);

      // on below line setting choice mode for list view.
      contactsLV.setChoiceMode(ListView.CHOICE_MODE_MULTIPLE);
   }

}
說明 - 在上面的程式碼中,首先我們為列表檢視建立變數。在 onCreate 方法中,我們使用我們在 activity_main.xml 檔案中給出的 ID 初始化列表檢視變數。之後,我們建立並初始化遊標變數,然後透過呼叫 startManagingCursor 方法設定遊標的管理器。之後,我們建立一個字串陣列來獲取聯絡電話號碼和聯絡人姓名。然後,我們建立一個整數陣列,在其中指定我們必須設定資料的文字檢視的 ID。然後我們建立並初始化我們的介面卡,並將資料傳遞給它。最後,我們將介面卡設定為我們的列表檢視。
新增上述程式碼後,我們只需點選頂欄中的綠色圖示即可在移動裝置上執行我們的應用程式。
注意 - 確保您已連線到您的真實裝置或模擬器。
輸出
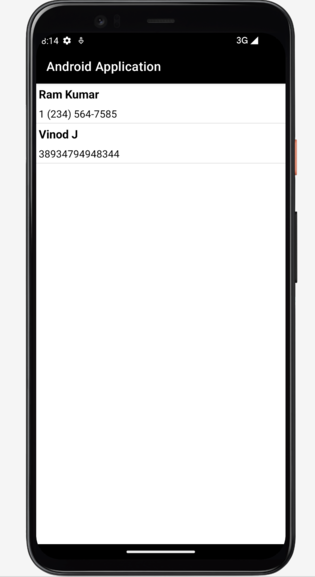
結論
在上面的教程中,我們瞭解了什麼是 Android 中的內容提供程式以及如何以不同的方式使用它們來獲取其他應用程式中的資料。我們還構建了一個聯絡人解析器應用程式,該應用程式將讀取裝置聯絡人應用程式中的所有聯絡人。

3K+ 瀏覽量
