
 資料結構
資料結構 網路
網路 關係資料庫管理系統(RDBMS)
 作業系統
作業系統 Java
Java iOS
iOS HTML
HTML CSS
CSS Android
 Python
 C語言程式設計
 C++
C++ C#
C# MongoDB
 MySQL
MySQL Javascript
 PHP
PHPAndroid中的StackView
簡介
在開發Android應用程式時,我們經常需要以堆疊的形式顯示一組資料。例如,如果我們在應用程式中顯示一堆卡片,我們可以將這些卡片以堆疊的形式顯示在我們的Android應用程式中。在這篇文章中,我們將瞭解如何在Android應用程式中使用Stack View。
實現
我們將建立一個簡單的應用程式,在這個應用程式中,我們將顯示從1到5的數字堆疊,向下滑動每個數字將顯示另一個數字。現在讓我們轉向Android Studio來建立一個新專案。
步驟1:在Android Studio中建立一個新專案
導航到Android Studio,如下面的螢幕所示。在下面的螢幕中,單擊“新建專案”以建立一個新的Android Studio專案。
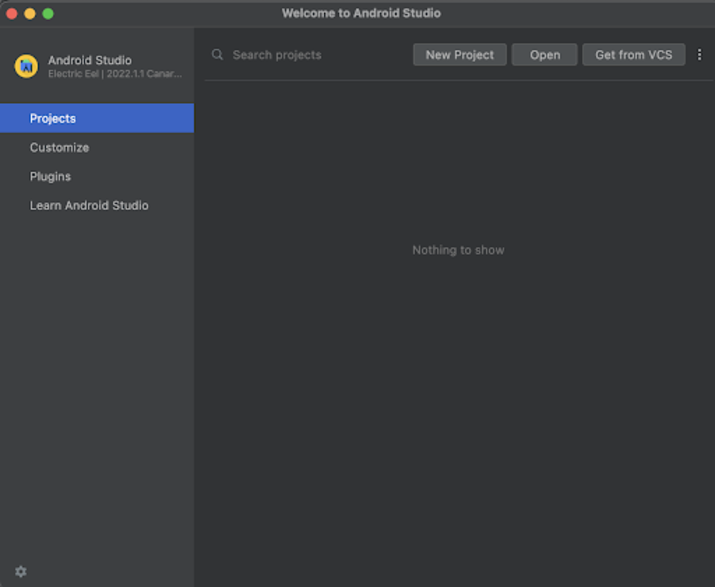
單擊“新建專案”後,您將看到下面的螢幕。
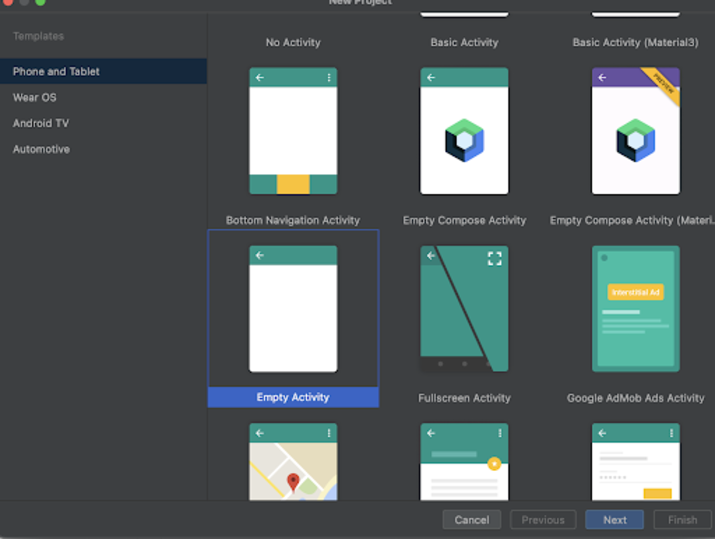
在這個螢幕中,我們只需選擇“空活動”,然後單擊“下一步”。單擊“下一步”後,您將看到下面的螢幕。

在這個螢幕中,我們只需指定專案名稱。然後包名將自動生成。
注意 - 確保選擇Java作為語言。
指定所有詳細資訊後,單擊“完成”以建立一個新的Android Studio專案。
專案建立完成後,我們將看到開啟的兩個檔案:activity_main.xml和MainActivity.java檔案。
步驟2:使用activity_main.xml
導航到activity_main.xml。如果此檔案不可見,則要開啟此檔案。在左側窗格中導航到app>res>layout>activity_main.xml以開啟此檔案。開啟此檔案後,向其中新增以下程式碼。程式碼中添加了註釋以詳細瞭解。
<?xml version="1.0" encoding="utf-8"?>
<RelativeLayout xmlns:android="http://schemas.android.com/apk/res/android"
   xmlns:tools="http://schemas.android.com/tools"
   android:layout_width="match_parent"
   android:layout_height="match_parent"
   android:orientation="vertical"
   tools:context=".MainActivity">
   <!-- on below line creating a text view for displaying the heading of our application -->
   <TextView
       android:id="@+id/idTVHeading"
       android:layout_width="match_parent"
       android:layout_height="wrap_content"
       android:layout_above="@id/idStackView"
       android:layout_margin="5dp"
       android:gravity="center"
       android:padding="4dp"
       android:text="StackView in Android"
       android:textAlignment="center"
       android:textColor="@color/black"
       android:textSize="20sp"
       android:textStyle="bold" />
   <!-- on below line creating a text view for adding a strike through for our text -->
   <StackView
       android:id="@+id/idStackView"
       android:layout_width="match_parent"
       android:layout_height="wrap_content"
       android:layout_centerInParent="true" />
</RelativeLayout>
說明 - 在上面的程式碼中,我們建立一個根佈局作為相對佈局。在這個佈局中,我們建立一個TextView,用於顯示應用程式的標題。之後,我們建立了一個Stack View,我們將在其中顯示數字堆疊。
步驟3:為要在Stack View中顯示的專案建立佈局檔案
導航到app>res>layout>右鍵單擊它>新建佈局資原始檔,並將其命名為stack_item,然後向其中新增以下程式碼。程式碼中添加了註釋以詳細瞭解。
<?xml version="1.0" encoding="utf-8"?>
<RelativeLayout xmlns:android="http://schemas.android.com/apk/res/android"
   android:layout_width="match_parent"
   android:layout_height="match_parent"
   android:gravity="center">
   <!-- on below line creating an image view for displaying an image -->
   <ImageView
       android:id="@+id/image"
       android:layout_width="200dp"
       android:layout_height="200dp"
       android:layout_centerInParent="true"
       android:background="@color/white" />
</RelativeLayout>
說明 - 在上面的程式碼中,我們建立一個根佈局作為相對佈局。在這個佈局中,我們建立了一個ImageView,我們將在應用程式的堆疊中使用它來顯示影像。
步驟4:為Stack View建立介面卡類
導航到app>java>您的應用程式包名>右鍵單擊它>新建Java類,並將其命名為StackViewAdapter,然後向其中新增以下程式碼。程式碼中添加了註釋以詳細瞭解。
package com.example.java_test_application;
import android.content.Context;
import android.view.LayoutInflater;
import android.view.View;
import android.view.ViewGroup;
import android.widget.ArrayAdapter;
import android.widget.ImageView;
import android.widget.TextView;
import androidx.annotation.NonNull;
import androidx.annotation.Nullable;
import java.util.List;
public class StackViewAdapter extends ArrayAdapter {
   // on below line creating a variable for our array list for images.
   List<Integer> numbersList;
   // on below line creating a variable for context.
   Context context;
   // on below line creating a constructor and adding list and context to it.
   public StackViewAdapter(@NonNull Context ctx, int resource, List<Integer> lst) {
       super(ctx, resource);
       numbersList = lst;
       context = ctx;
   }
   // on below line creating a get count method.
   @Override
   public int getCount() {
       // on below line returning the size of number list.
       return numbersList.size();
   }
   // on below line creating a get view method to inflate the layout file.
   @NonNull
   @Override
   public View getView(int position, @Nullable View convertView, @NonNull ViewGroup parent) {
       // on below line checking if the view is empty or not.
       if (convertView == null) {
           // if the view is empty we are inflating the layout file on below line.
           // on below line specifying the layout file name which we have already created.
           convertView = LayoutInflater.from(parent.getContext()).inflate(R.layout.stack_item, parent, false);
       }
       // on below line creating and initializing the variable for our image view.
       ImageView imageView = convertView.findViewById(R.id.image);
       // on below line setting image view from our array list.
       imageView.setImageResource(numbersList.get(position));
       // on below line returning the view.
       return convertView;
   }
}
說明 - 在上面的程式碼中,我們為列表和上下文建立了一個變數。之後,我們建立了一個建構函式來初始化這些變數。建立此建構函式後,我們建立了一個getCount方法,它將返回我們傳遞的ArrayList的大小。最後,我們建立了一個getView方法,它首先將檢查檢視是否為空。如果檢視為空,我們將載入一個佈局檔案並初始化該佈局中存在的檢視,例如,在本例中,我們顯示一個ImageView。因此,我們為ImageView建立變數並使用我們在stack_item.xml檔案中給出的ID對其進行初始化。之後,我們從ArrayList設定ImageView的影像,最後返回我們的檢視。
步驟6:在drawable資料夾中新增影像
複製要新增到Stack View中的影像,然後在Android Studio專案中。導航到app>res>drawable,右鍵單擊它並貼上已複製的影像。
步驟6:使用MainActivity.java檔案
導航到MainActivity.java。如果此檔案不可見,則要開啟此檔案。在左側窗格中導航到app>res>layout>MainActivity.java以開啟此檔案。開啟此檔案後,向其中新增以下程式碼。程式碼中添加了註釋以詳細瞭解。
package com.example.java_test_application;
import android.os.Bundle;
import android.widget.StackView;
import androidx.appcompat.app.AppCompatActivity;
import java.util.ArrayList;
import java.util.List;
public class MainActivity extends AppCompatActivity {
   // creating variables for stack view on below line.
   private StackView stackView;
   @Override
   protected void onCreate(Bundle savedInstanceState) {
       super.onCreate(savedInstanceState);
       setContentView(R.layout.activity_main);
       // initializing variables for stack view on below line.
       stackView = findViewById(R.id.idStackView);
       // creating a variable for list and adding data to it.
       List<Integer> numberList = new ArrayList<>();
       numberList.add(R.drawable.numberone);
       numberList.add(R.drawable.numbertwo);
       numberList.add(R.drawable.numberthree);
       numberList.add(R.drawable.numberfour);
       numberList.add(R.drawable.numberfive);
       // on below line creating and initializing the variable for adapter for stack view.
       StackViewAdapter stackViewAdapter = new StackViewAdapter(this, R.layout.stack_item, numberList);
       stackView.setAdapter(stackViewAdapter);
   }
}
說明 - 在上面的程式碼中,我們首先為Stack View建立變數。現在我們將看到onCreate方法。這是每個Android應用程式的預設方法。建立應用程式檢視時將呼叫此方法。在此方法中,我們設定內容檢視,即名為activity_main.xml的佈局檔案,以從該檔案中設定UI。在onCreate方法中,我們使用我們在activity_main.xml檔案中給出的ID初始化Stack View變數。之後,我們建立整數ArrayList並對其進行初始化。初始化後,我們將資料新增到其中。我們將drawable資料夾中新增的影像新增到ArrayList中。之後,我們建立一個介面卡類並將ArrayList傳遞給它。最後,我們將此介面卡設定為Stack View以顯示堆疊。
新增上述程式碼後,我們只需單擊頂部欄中的綠色圖示即可在移動裝置上執行我們的應用程式。
注意 - 確保已連線到您的真實裝置或模擬器。
輸出

結論
在本文中,我們瞭解瞭如何在Android中建立Stack View。

瀏覽量:1000+
