
 資料結構
資料結構 網路
網路 關係資料庫管理系統
 作業系統
作業系統 Java
Java iOS
iOS HTML
HTML CSS
CSS Android
 Python
 C 程式設計
 C++
C++ C#
C# MongoDB
 MySQL
MySQL Javascript
 PHP
PHPAndroid 中 ActionBar 中的導航檢視
在進入導航檢視示例之前,我們應該瞭解導航檢視。導航檢視就像 HTML 中的滑動選單。導航檢視由導航抽屜擴充套件。導航檢視的大多數用例用於重定向不同的活動或顯示個人資料資訊。
此示例演示瞭如何在 ActionBar 中整合 NavigationView
步驟 1 - 在 Android Studio 中建立一個新專案,轉到檔案 ⇒ 新建專案,並填寫所有必需的詳細資訊以建立新專案。
步驟 2 - 建立專案時,我們應選擇導航抽屜活動,如下所示
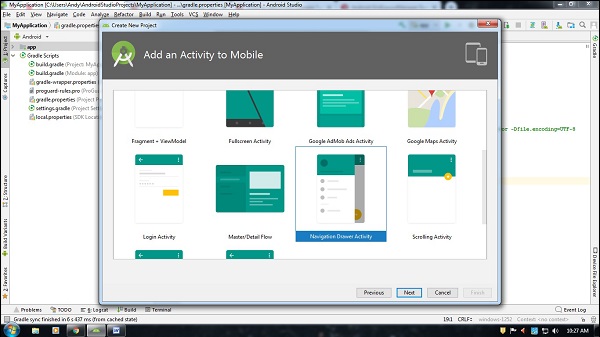
選擇導航抽屜活動後,單擊下一步按鈕完成專案建立。
步驟 3 - 開啟專案結構以查詢佈局資料夾。Android Studio 生成不同的佈局,如下所示
activity_main.xml - 這是一個 MainActivity 佈局。它將建立抽屜佈局作為父佈局,子佈局包含導航檢視,如下所示
<?xml version = "1.0" encoding = "utf-8"?>
<android.support.v4.widget.DrawerLayout xmlns:android = "http://schemas.android.com/apk/res/android"
   xmlns:app = "http://schemas.android.com/apk/res-auto"
   xmlns:tools = "http://schemas.android.com/tools"
   android:id = "@+id/drawer_layout"
   android:layout_width = "match_parent"
   android:layout_height = "match_parent"
   android:fitsSystemWindows = "true"
   tools:openDrawer = "start">
   <include
      layout = "@layout/app_bar_main"
      android:layout_width = "match_parent"
      android:layout_height = "match_parent" />
   <android.support.design.widget.NavigationView
      android:id = "@+id/nav_view"
      android:layout_width = "wrap_content"
      android:layout_height = "match_parent"
      android:layout_gravity = "start"
      android:fitsSystemWindows = "true"
      app:headerLayout = "@layout/nav_header_main"
      app:menu = "@menu/activity_main_drawer" />
</android.support.v4.widget.DrawerLayout>
在導航檢視中,它包含兩個佈局:標題佈局和選單佈局。標題佈局包含有關導航檢視標題的資訊,選單佈局包含有關選單列表的資訊。
app_bar_main.xml - 它是我們看到的普通佈局的佈局檔案。但它包含有關應用欄佈局(操作欄)、中心佈局的資訊。
<?xml version = "1.0" encoding = "utf-8"?>
<android.support.design.widget.CoordinatorLayout xmlns:android = "http://schemas.android.com/apk/res/android"
   xmlns:app = "http://schemas.android.com/apk/res-auto"
   xmlns:tools = "http://schemas.android.com/tools"
   android:layout_width = "match_parent"
   android:layout_height = "match_parent"
   tools:context = ".MainActivity">
   <android.support.design.widget.AppBarLayout
      android:layout_width = "match_parent"
      android:layout_height = "wrap_content"
      android:theme = "@style/AppTheme.AppBarOverlay">
   <android.support.v7.widget.Toolbar
      android:id = "@+id/toolbar"
      android:layout_width = "match_parent"
      android:layout_height = "?attr/actionBarSize"
      android:background = "?attr/colorPrimary"
      app:popupTheme = "@style/AppTheme.PopupOverlay" />
   </android.support.design.widget.AppBarLayout>
   <include layout = "@layout/content_main" />
</android.support.design.widget.CoordinatorLayout>
在上面的佈局中,我們包含了 content_main 佈局。它是使用者可以自定義自己的檢視的主佈局,如下所示
<?xml version = "1.0" encoding = "utf-8"?>
<android.support.constraint.ConstraintLayout xmlns:android = "http://schemas.android.com/apk/res/android"
   xmlns:app = "http://schemas.android.com/apk/res-auto"
   xmlns:tools = "http://schemas.android.com/tools"
   android:layout_width = "match_parent"
   android:layout_height = "match_parent"
   app:layout_behavior = "@string/appbar_scrolling_view_behavior"
   tools:context = ".MainActivity"
   tools:showIn = "@layout/app_bar_main">
   <TextView
      android:layout_width = "wrap_content"
      android:layout_height = "wrap_content"
      android:text = "Hello World!"
      app:layout_constraintBottom_toBottomOf = "parent"
      app:layout_constraintLeft_toLeftOf = "parent"
      app:layout_constraintRight_toRightOf = "parent"
      app:layout_constraintTop_toTopOf = "parent" />
</android.support.constraint.ConstraintLayout>
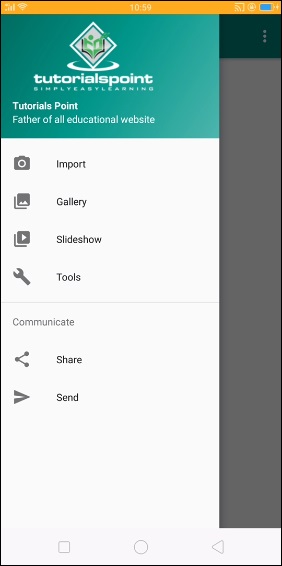
nav_header_main - 這是一個導航標題檢視,它包含有關導航標題的資訊。我們自定義了導航標題,如下所示
<?xml version = "1.0" encoding = "utf-8"?>
<LinearLayout xmlns:android = "http://schemas.android.com/apk/res/android"
   xmlns:app = "http://schemas.android.com/apk/res-auto"
   android:layout_width = "match_parent"
   android:layout_height = "@dimen/nav_header_height"
   android:background = "@drawable/side_nav_bar"
   android:gravity = "bottom"
   android:orientation = "vertical"
   android:paddingLeft = "@dimen/activity_horizontal_margin"
   android:paddingTop = "@dimen/activity_vertical_margin"
   android:paddingRight = "@dimen/activity_horizontal_margin"
   android:paddingBottom = "@dimen/activity_vertical_margin"
   android:theme = "@style/ThemeOverlay.AppCompat.Dark">
   <ImageView
      android:id = "@+id/imageView"
      android:layout_width = "wrap_content"
      android:layout_height = "100dp"
      android:contentDescription = "@string/nav_header_desc"
      android:paddingTop = "@dimen/nav_header_vertical_spacing"
      app:srcCompat = "@drawable/logo" />
   <TextView
      android:layout_width = "match_parent"
      android:layout_height = "wrap_content"
      android:paddingTop = "@dimen/nav_header_vertical_spacing"
      android:textColor = "#FFF"
      android:textStyle = "bold"
      android:text = "Tutorials Point"
      android:textAppearance = "@style/TextAppearance.AppCompat.Body1" />
   <TextView
      android:id = "@+id/textView"
      android:textColor = "#FFF"
      android:layout_width = "wrap_content"
      android:layout_height = "wrap_content"
      android:text = "Father of all educational website" />
</LinearLayout>
注意 - 我們添加了 drawable/logo,在您開發應用程式時,請新增您自己的 logo。
activity_main_drawer - 這是一個選單佈局,位於 menu/activity_main_drawer.xml 中,如下所示
<?xml version = "1.0" encoding = "utf-8"?>
<menu xmlns:android = "http://schemas.android.com/apk/res/android"
   xmlns:tools = "http://schemas.android.com/tools"
   tools:showIn = "navigation_view">
   <group android:checkableBehavior = "single">
      <item
         android:id = "@+id/nav_camera"
         android:icon = "@drawable/ic_menu_camera"
         android:title = "Import" />
      <item
         android:id = "@+id/nav_gallery"
         android:icon = "@drawable/ic_menu_gallery"
         android:title = "Gallery" />
      <item
         android:id = "@+id/nav_slideshow"
         android:icon = "@drawable/ic_menu_slideshow"
         android:title = "Slideshow" />
      <item
         android:id = "@+id/nav_manage"
         android:icon = "@drawable/ic_menu_manage"
         android:title = "Tools" />
   </group>
   <item android:title = "Communicate">
      <menu>
         <item
            android:id = "@+id/nav_share"
            android:icon = "@drawable/ic_menu_share"
            android:title = "Share" />
         <item
            android:id = "@+id/nav_send"
            android:icon = "@drawable/ic_menu_send"
            android:title = "Send" />
      </menu>
   </item>
</menu>
步驟 4 - 將以下程式碼新增到 src/MainActivity.java 中
import android.os.Bundle;
import android.support.design.widget.FloatingActionButton;
import android.support.design.widget.Snackbar;
import android.view.View;
import android.support.design.widget.NavigationView;
import android.support.v4.view.GravityCompat;
import android.support.v4.widget.DrawerLayout;
import android.support.v7.app.ActionBarDrawerToggle;
import android.support.v7.app.AppCompatActivity;
import android.support.v7.widget.Toolbar;
import android.view.Menu;
import android.view.MenuItem;
public class MainActivity extends AppCompatActivity implements NavigationView.OnNavigationItemSelectedListener {
   @Override
   protected void onCreate(Bundle savedInstanceState) {
      super.onCreate(savedInstanceState);
      setContentView(R.layout.activity_main);
      Toolbar toolbar = (Toolbar) findViewById(R.id.toolbar);
      setSupportActionBar(toolbar);
      DrawerLayout drawer = (DrawerLayout) findViewById(R.id.drawer_layout);
      ActionBarDrawerToggle toggle = new ActionBarDrawerToggle(
      this, drawer, toolbar, R.string.navigation_drawer_open, R.string.navigation_drawer_close);
      drawer.addDrawerListener(toggle);
      toggle.syncState();
      NavigationView navigationView = (NavigationView) findViewById(R.id.nav_view);
      navigationView.setNavigationItemSelectedListener(this);
   }
   @Override
   public void onBackPressed() {
      DrawerLayout drawer = (DrawerLayout) findViewById(R.id.drawer_layout);
      if (drawer.isDrawerOpen(GravityCompat.START)) {
         drawer.closeDrawer(GravityCompat.START);
      } else {
         super.onBackPressed();
      }
   }
   @Override
   public boolean onCreateOptionsMenu(Menu menu) {
      // Inflate the menu; this adds items to the action bar if it is present.
      getMenuInflater().inflate(R.menu.main, menu);
      return true;
   }
   @Override
   public boolean onOptionsItemSelected(MenuItem item) {
      // Handle action bar item clicks here. The action bar will
      // automatically handle clicks on the Home/Up button, so long
      // as you specify a parent activity in AndroidManifest.xml.
      int id = item.getItemId();
      //noinspection SimplifiableIfStatement
      if (id == R.id.action_settings) {
         return true;
      }
      return super.onOptionsItemSelected(item);
   }
   @SuppressWarnings("StatementWithEmptyBody")
   @Override
   public boolean onNavigationItemSelected(MenuItem item) {
      // Handle navigation view item clicks here.
      int id = item.getItemId();
      if (id == R.id.nav_camera) {
         // Handle the camera action
      } else if (id == R.id.nav_gallery) {
      } else if (id == R.id.nav_slideshow) {
      } else if (id == R.id.nav_manage) {
      } else if (id == R.id.nav_share) {
      } else if (id == R.id.nav_send) {
      }
      DrawerLayout drawer = (DrawerLayout) findViewById(R.id.drawer_layout);
      drawer.closeDrawer(GravityCompat.START);
      return true;
   }
}
要關閉導航檢視,我們必須關閉抽屜,如下所示
if (drawer.isDrawerOpen(GravityCompat.START)) {
   drawer.closeDrawer(GravityCompat.START);
}
要更改導航檢視的位置,請使用以下程式碼
DrawerLayout drawer = (DrawerLayout) findViewById(R.id.drawer_layout);
drawer.closeDrawer(GravityCompat.END);
讓我們嘗試執行您的應用程式。我假設您已將您的實際 Android 移動裝置連線到您的計算機。要從 Android Studio 執行應用程式,請開啟專案中的一個活動檔案,然後單擊工具欄中的執行 ![]() 圖示。選擇您的移動裝置作為選項,然後檢查您的移動裝置,它將顯示您的預設螢幕
圖示。選擇您的移動裝置作為選項,然後檢查您的移動裝置,它將顯示您的預設螢幕
點選 此處 下載專案程式碼

899 次瀏覽
