
 資料結構
資料結構 網路
網路 關係資料庫管理系統 (RDBMS)
 作業系統
作業系統 Java
Java iOS
iOS HTML
HTML CSS
CSS Android
 Python
 C語言程式設計
 C++
C++ C#
C# MongoDB
 MySQL
MySQL Javascript
 PHP
PHPJava截圖程式
Java AWT(抽象視窗工具包)是一個多功能的包,包含建立使用者介面和繪製圖形影像所需的所有類。按鈕和捲軸之類的實體在AWT術語中稱為元件。Component類是所有AWT元件的根。當用戶與某些元件互動時,會觸發事件。AWTEvent類及其子類表示AWT元件能夠觸發的事件。在AWTEvent中,解釋了AWT事件模型。
容器是一個元件,它也可以包含其他元件和容器。容器的另一種選擇是佈局管理器,它控制組件在容器內的視覺排列方式。AWT包包含許多佈局管理器類以及用於開發您自己的佈局管理器的介面。檢視LayoutManager和Container以獲取更多資訊。
值以整數形式儲存,因此每個元件物件都有最大大小和位置。平臺也可能對最大大小和地理區域施加進一步的限制。平臺決定精確的最大值。這些最大值無法更改,無論是在Java程式碼中還是在原生代碼中。元件佈局也受到這些限制的約束。如果元件的限制超過平臺限制,則無法有效地在容器物件內組織元件物件。特定軸上任何物件的位置和大小共同決定了該物件的限制。
演算法
無需構建GUI即可捕獲螢幕截圖
匯入所有必要的Java包。
建立一個“Robot”物件來捕獲螢幕截圖。
建立一個“Rectangle”物件來指定要捕獲的螢幕尺寸。
將螢幕捕獲為“BufferedImage”物件。
列印正在捕獲螢幕截圖的訊息。
透過構建GUI並儲存到特定路徑來捕獲螢幕截圖
匯入所有必要的庫。
建立一個“JFrame”物件來容納GUI元件。
建立一個“JButton”物件來點選並捕獲螢幕截圖。
建立一個“JFileChooser”物件來容納“JButton”並將其新增到“JFrame”。
向“JButton”新增“ActionListener”,當單擊按鈕時,該偵聽器捕獲螢幕截圖並將其儲存到特定檔案。
使用“Robot”物件將螢幕捕獲為“BufferImage”物件。
顯示“儲存檔案”對話方塊,允許使用者選擇儲存位置和檔名。
使用“ImageIO.write()”方法將“BufferedImage”物件儲存到所選檔案。
列印螢幕截圖已儲存的訊息。
指定“JFrame”的尺寸和可見性。
方法
無需構建GUI即可捕獲螢幕截圖。
透過構建GUI並儲存到特定路徑來捕獲螢幕截圖。
無需建立GUI即可捕獲螢幕截圖
示例
import java.awt.Rectangle;
import java.awt.Robot;
import java.awt.Toolkit;
import java.awt.image.BufferedImage;
import java.io.File;
import javax.imageio.ImageIO;

public class ScreenCapture {
   public static void main(String[] args) throws Exception {
      // Create a Robot object to capture the screen
      Robot robot = new Robot();

      // Create a Rectangle object to define the area of the screen to capture
      Rectangle rectangle = new Rectangle(Toolkit.getDefaultToolkit().getScreenSize());

      // Use the robot.createScreenCapture() method to capture the screen as a BufferedImage object
      BufferedImage image = robot.createScreenCapture(rectangle);

      // Save the BufferedImage object to a file using the ImageIO.write() method
      File file = new File("screenshot.png");
      ImageIO.write(image, "png", file);

      // Print a message indicating that the screenshot has been saved
      System.out.println("Screenshot saved to screenshot.png");
   }
}
輸出
Screenshot saved to screenshot.png
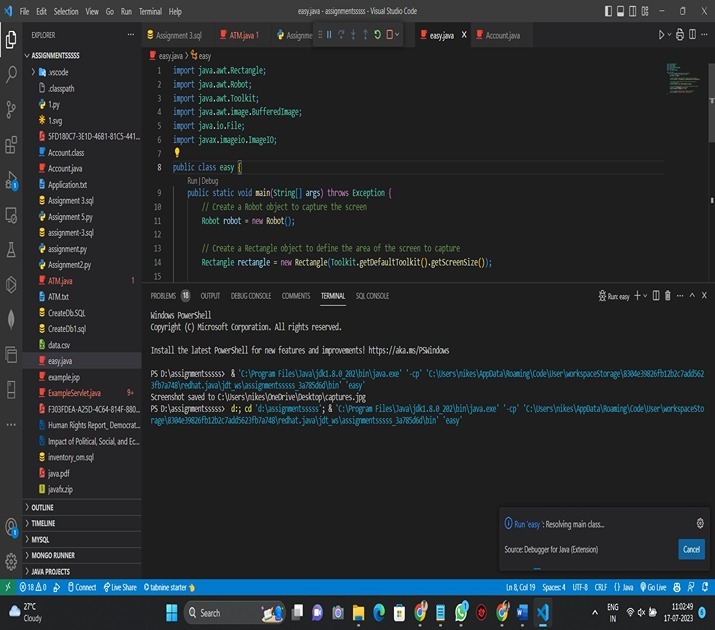
Java.awt和Javax.imageIO包用於捕獲和儲存螢幕快照。它在嘗試將螢幕捕獲為BufferedImage物件之前,首先建立一個Robot物件。要捕獲的螢幕部分在稍後建立的Rectangle物件中定義為整個螢幕,該螢幕是使用Toolkit.getDefaultToolkit()函式的getScreenSize收集的。
然後,程式碼使用robot物件將螢幕捕獲為BufferedImage物件。名為createScreenCapture(rectangle)的函式。此項將替換最新的螢幕截圖。
在該步驟之後,我們透過ImageIO.write來儲存BufferedImage的特定例項——具體使用其引數(“png”和file)。這需要使用兩個不同的物件:第一個是我們稱為“image”的BufferedImage例項,第二個是稱為“file”的物件,它指定了輸出將儲存到的位置。在本例中,我們選擇了PNG格式進行儲存。
程式生成的最終訊息指出螢幕截圖已儲存到screenshot.png檔案。
透過建立GUI並儲存到特定路徑來捕獲螢幕截圖
示例
import java.awt.AWTException;
import java.awt.BorderLayout;
import java.awt.Dimension;
import java.awt.Rectangle;
import java.awt.Robot;
import java.awt.Toolkit;
import java.awt.image.BufferedImage;
import java.awt.event.ActionEvent;
import java.awt.event.ActionListener;
import java.io.File;
import javax.imageio.ImageIO;
import javax.swing.JButton;
import javax.swing.JFileChooser;
import javax.swing.JFrame;
import javax.swing.JPanel;

public class ScreenshotCapture {
   public static void main(String[] args) {
      // Create a JFrame object
      JFrame frame = new JFrame("Screenshot Capture");

      // Create a JButton object
      JButton captureButton = new JButton("Capture");

      // Create a JFileChooser object
      JFileChooser fileChooser = new JFileChooser();

      // Create a JPanel object
      JPanel panel = new JPanel();

      // Add the JButton and JPanel objects to the JFrame
      panel.add(captureButton);
      frame.add(panel, BorderLayout.CENTER);

      // Add an ActionListener to the JButton to capture the screenshot and save it to a file
      captureButton.addActionListener(new ActionListener() {
         @Override
         public void actionPerformed(ActionEvent e) {
            try {
               // Create a Robot object to capture the screen
               Robot robot = new Robot();

               // Create a Rectangle object to define the area of the screen to capture
               Rectangle rectangle = new Rectangle(Toolkit.getDefaultToolkit().getScreenSize());

               // Use the robot.createScreenCapture() method to capture the screen as a BufferedImage object
               BufferedImage image = robot.createScreenCapture(rectangle);

               // Show the save file dialog to allow the user to select the save location and file name
               int result = fileChooser.showSaveDialog(frame);
               if (result == JFileChooser.APPROVE_OPTION) {
                  // Get the selected file and save the BufferedImage object to it using the ImageIO.write() method
                  File file = fileChooser.getSelectedFile();
                  ImageIO.write(image, "png", file);

                  // Print a message indicating that the screenshot has been saved
                  System.out.println("Screenshot saved to " + file.getAbsolutePath());
               }
            } catch (AWTException ex) {
               ex.printStackTrace();
            } catch (Exception ex) {
               ex.printStackTrace();
            }
         }
      });

      // Set the size and visibility of the JFrame
      frame.setSize(new Dimension(300, 100));
      frame.setVisible(true);
   }
}
輸出
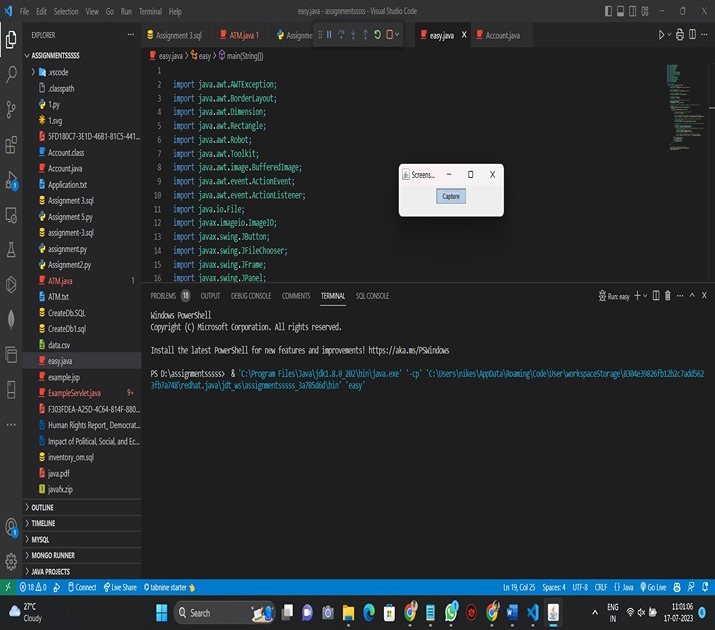
為了記錄螢幕、顯示儲存檔案對話方塊並儲存影像,程式使用了Java.awt、Javax.swing和Javax.imageio包。它首先建立一個名為“Capture”的JButton物件和一個JFrame物件。此外,它還建立一個JFileChooser物件,以允許使用者選擇儲存快照的位置和名稱。
然後,程式將JButton和JPanel物件新增到JFrame。此外,它還向JButton物件添加了一個ActionListener,以便每當單擊按鈕時,都會拍攝當前螢幕的快照並將其儲存到檔案中。為了將螢幕捕獲為BufferedImage物件,ActionListener首先建立一個Robot物件。然後,使用JFileChooser返回的fileChooser.showSaveDialog(frame)函式顯示儲存檔案對話方塊。如果使用者選擇檔案並在對話方塊中單擊“儲存”,則顯示APPROVE_OPTION。
當用戶選擇檔案時,程式使用fileChooser獲取所選檔案。使用ImageIO.write(image, "png", file)函式和getSelectedFile()將BufferedImage物件儲存到檔案。引數“png”指定影像的格式為PNG。
螢幕截圖已儲存到file.getAbsolutePath()提供的檔案路徑,程式以螢幕上的通知結束。
結論
總之,可以使用Robot類捕獲螢幕的BufferedImage物件,並使用ImageIO.write()方法將影像儲存到檔案,從而可以在Java中捕獲螢幕截圖。使用者還可以使用使用Swing元件(例如JFrame、JButton和JFileChooser)構建的GUI應用程式來選擇儲存位置和檔名。透過向JButton附加ActionListener,可以捕獲螢幕截圖並將其儲存到所選檔案。總的來說,Java提供了一種簡單且適應性強的用於捕獲和儲存螢幕截圖的方法,適用於各種用途。

2K+ 瀏覽量
