
 資料結構
資料結構 網路
網路 RDBMS
RDBMS 作業系統
作業系統 Java
Java iOS
iOS HTML
HTML CSS
CSS Android
 Python
 C 程式設計
 C++
C++ C#
C# MongoDB
 MySQL
MySQL Javascript
 PHP
PHPHTML寬度屬性
<input> 元素的寬度屬性僅用於影像,並且允許您設定使用 − 新增的影像的寬度
<input type=”image”>
HTML5 中引入了寬度屬性,並用作提交按鈕。以下是語法 −
<input width="pixels">
以上,寬度表示畫素寬度。
下面我們來看一個示例來說明 <input> 元素的寬度屬性的實現,其中為輸入型別影像設定了寬度 −
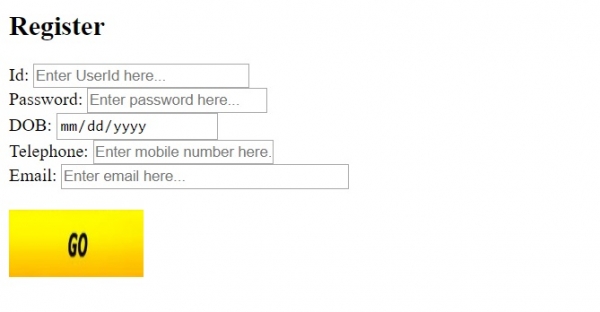
示例
<!DOCTYPE html>
<html>
<body>
<h2>Register</h2>
<form action="" method="get">
   Id − <input type="text" name="id" placeholder="Enter UserId here..." size = "25"><br>
   Password − <input type="password" name="pwd" placeholder="Enter password here..."><br>
   DOB − <input type="date" name="dob"><br>
   Telephone − <input type="tel" name="tel" placeholder="Enter mobile number here..."><br>
   Email − <input type="email" name="email" placeholder="Enter email here..." size = "35"><br><br>
   <input type="image" src="go.jpg" alt="Submit" width="120" height="60">
</form>
</body>
</html>
輸出
在上面的示例中,我們有一個帶有按鈕的表單,用於新增影像 −
<form action="" method="get">
   Id − <input type="text" name="id" placeholder="Enter UserId here..." size = "25"><br>
   Password − <input type="password" name="pwd" placeholder="Enter password here..."><br>
   DOB − <input type="date" name="dob"><br>
   Telephone − <input type="tel" name="tel" placeholder="Enter mobile number here..."><br>
   Email − <input type="email" name="email" placeholder="Enter email here..." size = "35"><br><br>
   <input type="image" src="go.jpg" alt="Submit" width="120" height="60">
</form>
按鈕的影像添加了一個表單控制輸入型別影像 −
<input type="image" src="go.jpg" alt="Submit" width="120" height="60">
<input> 寬度屬性用於設定此影像集的寬度。

更新於: 30-Jul-2019
184 次瀏覽

廣告