
 資料結構
資料結構 網路
網路 關係資料庫管理系統 (RDBMS)
 作業系統
作業系統 Java
Java iOS
iOS HTML
HTML CSS
CSS Android
 Python
 C語言程式設計
 C++
C++ C#
C# MongoDB
 MySQL
MySQL Javascript
 PHP
PHP如何使用Selenium WebDriver進行Web自動化?
我們可以使用Selenium webdriver進行web自動化。為此,我們需要遵循以下步驟:
步驟1 - 建立Webdriver。例如:
WebDriver driver = new ChromeDriver();
以上程式碼用於建立一個webdriver例項並在Chrome瀏覽器中啟動指令碼執行。
步驟2 - 啟動我們要執行UI測試的URL。例如:
driver.get("https://tutorialspoint.tw/index.htm");
以上程式碼將啟動作為引數傳遞給get方法的URL。
步驟3 - 使用任何定位器(如id、class、name、tag name、link text、partial link text、CSS或XPath)來識別web元素。findElement方法用於使用這些定位器來識別元素。例如:
WebElement e = driver.findElement(By.id("txt"));
以上程式碼用於使用id定位器來識別元素。
步驟4 - 在元素被定位後,對其執行操作,例如輸入文字、點選等。例如:
e.sendKeys("Rest Assured");
以上程式碼用於在步驟3中識別的元素上輸入資料。
步驟5 - 驗證在步驟4中執行操作對網頁的影響。例如:
String st = e.getAttribute("value");
Assert.assertEquals(st, "Rest Assured");
以上程式碼用於比較並驗證實際值是否等於預期值-Selenium。
步驟6 - 向測試新增測試框架,如TestNG/JUnit。有關如何設定TestNG的詳細資訊,請訪問以下連結:
https://tutorialspoint.tw/testng/index.htm
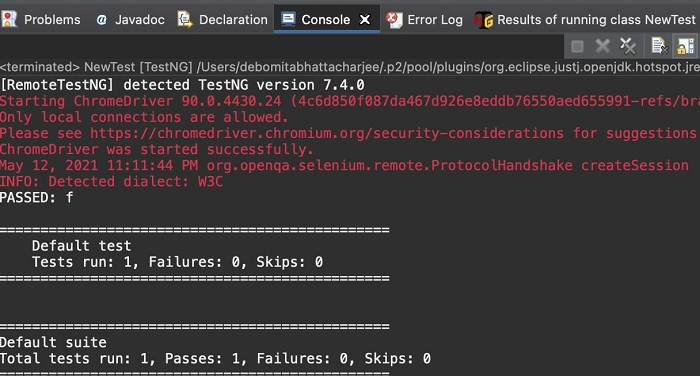
步驟7 - 執行測試並記錄使用測試框架建立的結果。
步驟8 - 透過退出webdriver會話來結束測試。例如:
driver.quit();
示例
程式碼實現
import java.util.concurrent.TimeUnit;
import org.openqa.selenium.By;
import org.openqa.selenium.WebDriver;
import org.openqa.selenium.WebElement;
import org.openqa.selenium.chrome.ChromeDriver;
import org.testng.Assert;
import org.testng.annotations.Test;
public class NewTest {
   @Test
   public void f() {
      System.setProperty("webdriver.chrome.driver", "chromedriver");

      //webdriver instance
      WebDriver driver = new ChromeDriver();

      // implicit wait
      driver.manage().timeouts().implicitlyWait(5, TimeUnit.SECONDS);

      //url launch
      driver.get("https://tutorialspoint.tw/index.htm");

      //element identify
      WebElement elm = driver.findElement(By.tagName("input"));

      //perform action - input text
      elm.sendKeys("Selenium");
      String s = elm.getAttribute("value");

      //validate result with Assertion
      Assert.assertEquals(s, "Selenium");

      //quit browser
      driver.quit();
   }
}
輸出

592 次瀏覽
