
 資料結構
資料結構 網路
網路 關係資料庫管理系統 (RDBMS)
 作業系統
作業系統 Java
Java iOS
iOS HTML
HTML CSS
CSS Android
 Python
 C語言程式設計
 C++
C++ C#
C# MongoDB
 MySQL
MySQL Javascript
 PHP
PHP如何在Android RecyclerView中排序字串?
在開始講解RecyclerView示例中如何排序陣列列表元素之前,我們應該瞭解Android中的RecyclerView是什麼。RecyclerView是ListView的更高階版本,它基於ViewHolder設計模式工作。使用RecyclerView,我們可以顯示網格和專案列表。
此示例演示瞭如何透過建立一個漂亮的學生記錄應用程式來整合排序的RecyclerView,該應用程式顯示學生姓名和年齡。
步驟1 - 在Android Studio中建立一個新專案,轉到檔案 ⇒ 新建專案,並填寫所有必需的詳細資訊以建立新專案。
步驟2 - 開啟build.gradle並新增RecyclerView庫依賴項。
apply plugin: 'com.android.application'
android {
   compileSdkVersion 28
   defaultConfig {
      applicationId "com.example.andy.tutorialspoint"
      minSdkVersion 19
      targetSdkVersion 28
      versionCode 1
      versionName "1.0"
      testInstrumentationRunner "android.support.test.runner.AndroidJUnitRunner"
   }
   buildTypes {
      release {
         minifyEnabled false
         proguardFiles getDefaultProguardFile('proguard-android.txt'), 'proguard-rules.pro'
      }
   }
}
dependencies {
   implementation fileTree(dir: 'libs', include: ['*.jar'])
   implementation 'com.android.support:appcompat-v7:28.0.0'
   implementation 'com.android.support:design:28.0.0'
   implementation 'com.android.support.constraint:constraint-layout:1.1.3'
   implementation 'com.android.support:recyclerview-v7:28.0.0'
   testImplementation 'junit:junit:4.12'
   androidTestImplementation 'com.android.support.test:runner:1.0.2'
   androidTestImplementation 'com.android.support.test.espresso:espresso-core:3.0.2'
}
步驟3 - 將以下程式碼新增到res/layout/activity_main.xml。
<?xml version="1.0" encoding="utf-8"?>
<RelativeLayout
   xmlns:android="http://schemas.android.com/apk/res/android"
   xmlns:tools="http://schemas.android.com/tools"
   xmlns:app="http://schemas.android.com/apk/res-auto"
   android:layout_width="match_parent"
   android:layout_height="match_parent"
   app:layout_behavior="@string/appbar_scrolling_view_behavior"
   tools:showIn="@layout/activity_main"
   tools:context=".MainActivity">
   <android.support.v7.widget.RecyclerView
      android:id="@+id/recycler_view"
      android:layout_width="match_parent"
      android:layout_height="wrap_content"
      android:scrollbars="vertical" />
</RelativeLayout>
在上面的程式碼中,我們將RecyclerView新增到視窗管理器作為相對父佈局。
步驟4 - 將以下程式碼新增到src/MainActivity.java
package com.example.andy.tutorialspoint;
import android.annotation.TargetApi;
import android.os.Build;
import android.os.Bundle;
import android.support.annotation.RequiresApi;
import android.support.design.widget.TabLayout;
import android.support.v4.view.ViewPager;
import android.support.v7.app.AppCompatActivity;
import android.support.v7.widget.DividerItemDecoration;
import android.support.v7.widget.LinearLayoutManager;
import android.support.v7.widget.RecyclerView;
import android.support.v7.widget.Toolbar;
import java.util.ArrayList;
import java.util.Collections;
import java.util.Comparator;
import java.util.List;
public class MainActivity extends AppCompatActivity {
   private RecyclerView recyclerView;
   private StudentAdapter studentAdapter;
   private List studentDataList =new ArrayList<>();
   @TargetApi(Build.VERSION_CODES.O)
   @Override
   protected void onCreate(Bundle savedInstanceState) {
      super.onCreate(savedInstanceState);
      setContentView(R.layout.activity_main);
      recyclerView = findViewById(R.id.recycler_view);
      studentAdapter=new StudentAdapter(studentDataList);
      RecyclerView.LayoutManager manager=new LinearLayoutManager(this);
      recyclerView.setLayoutManager(manager);
      recyclerView.addItemDecoration(new DividerItemDecoration(this, LinearLayoutManager.VERTICAL));
      recyclerView.setAdapter(studentAdapter);
      StudentDataPrepare();
   }
   @RequiresApi(api = Build.VERSION_CODES.N)
   private void StudentDataPrepare() {
      studentData data=new studentData("sai",25);
      studentDataList.add(data);
      data=new studentData("sai",25);
      studentDataList.add(data);
      data=new studentData("raghu",20);
      studentDataList.add(data);
      data=new studentData("raj",28);
      studentDataList.add(data);
      data=new studentData("amar",15);
      studentDataList.add(data);
      data=new studentData("bapu",19);
      studentDataList.add(data);
      data=new studentData("chandra",52);
      studentDataList.add(data);
      data=new studentData("deraj",30);
      studentDataList.add(data);
      data=new studentData("eshanth",28);
      studentDataList.add(data);
      Collections.sort(studentDataList, new Comparator() {
         @Override
         public int compare(studentData o1, studentData o2) {
            return o1.name.compareTo(o2.name);
         }
      });
   }
}
在上面的程式碼中,我們添加了一個RecyclerView和studentAdapter。在studentAdapter中,我們將studentDatalist作為ArrayList傳遞。Student資料列表包含學生姓名和年齡。
為了比較RecyclerView專案,我們使用了集合框架和sort方法,如下所示:
Collections.sort(studentDataList, new Comparator() {
   @Override
   public int compare(studentData o1, studentData o2) {
      return o1.name.compareTo(o2.name);
   }
});
在上面的程式碼中,我們使用姓名進行元素比較。
步驟5 - 以下是修改後的檔案src/StudentAdapter.java的內容。
package com.example.andy.tutorialspoint;
import android.support.annotation.NonNull;
import android.support.v7.widget.RecyclerView;
import android.view.LayoutInflater;
import android.view.View;
import android.view.ViewGroup;
import android.widget.TextView;
import java.util.List;
class StudentAdapter extends RecyclerView.Adapter {
   List studentDataList;
   public StudentAdapter(List studentDataList) {
      this.studentDataList=studentDataList;
   }
   @NonNull
   @Override
   public MyViewHolder onCreateViewHolder(@NonNull ViewGroup viewGroup, int i) {
      View itemView = LayoutInflater.from(viewGroup.getContext())
      .inflate(R.layout.student_list_row, viewGroup, false);
      return new MyViewHolder(itemView);
   }
   @Override
   public void onBindViewHolder(MyViewHolder viewHolder, int i) {
      studentData data=studentDataList.get(i);
      viewHolder.name.setText(data.name);
      viewHolder.age.setText(String.valueOf(data.age));
   }
   @Override
   public int getItemCount() {
      return studentDataList.size();
   }
   class MyViewHolder extends RecyclerView.ViewHolder {
      TextView name,age;
      public MyViewHolder(View itemView) {
         super(itemView);
         name=itemView.findViewById(R.id.name);
         age=itemView.findViewById(R.id.age);
      }
   }
}
在介面卡類中,我們有四個方法,如下所示:
onCreateViewHolder() - 用於建立ViewHolder並返回一個檢視。
onBindViewHolder() - 將與建立的ViewHolder繫結。
getItemCount() - 包含列表的大小。
MyViewHolder類 - 這是ViewHolder內部類,它由RecyclerView.ViewHolder擴充套件。
步驟6 - 以下是修改後的XML檔案res/layout/student_list_row.xml的內容。
<?xml version="1.0" encoding="utf-8"?>
<LinearLayout xmlns:android="http://schemas.android.com/apk/res/android"
   android:orientation="horizontal" android:layout_width="match_parent"
   android:weightSum="1"
   android:layout_height="wrap_content">
   <TextView
      android:id="@+id/name"
      android:layout_width="0dp"
      android:layout_weight="0.5"
      android:gravity="center"
      android:textSize="15sp"
      android:layout_height="100dp" />
   <TextView
      android:id="@+id/age"
      android:layout_width="0dp"
      android:layout_weight="0.5"
      android:gravity="center"
      android:textSize="15sp"
      android:layout_height="100dp" />
</LinearLayout>
在上面的列表項檢視中,我們為姓名和年齡建立了兩個TextView。
步驟7 - 以下是修改後的檔案src/studentData.java的內容。
package com.example.andy.tutorialspoint;
class studentData {
String name;
int age;
public studentData(String name, int age) {
this.name=name;
this.age=age;
}
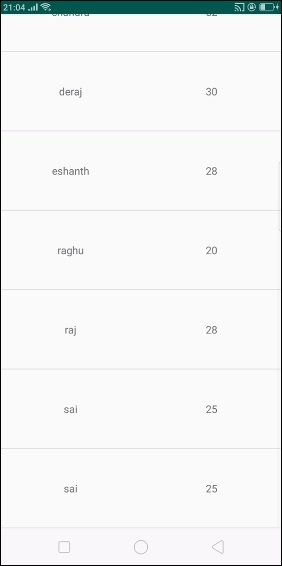
}上面的程式碼提供了關於學生資料物件的資訊。讓我們嘗試執行您的應用程式。我假設您已將您的實際Android移動裝置連線到您的計算機。要在Android Studio中執行應用程式,請開啟您的一個專案活動檔案,然後單擊工具欄中的執行 圖示。選擇您的移動裝置作為選項,然後檢查您的移動裝置,它將顯示您的預設螢幕:

在上面的結果中,我們顯示了從字母A開始的資料。現在向下滾動。它顯示的結果如下:
點選這裡下載專案程式碼

2K+ 次檢視
