
 資料結構
資料結構 網路
網路 關係資料庫管理系統(RDBMS)
 作業系統
作業系統 Java
Java iOS
iOS HTML
HTML CSS
CSS Android
 Python
 C語言程式設計
 C++
C++ C#
C# MongoDB
 MySQL
MySQL Javascript
 PHP
PHP如何在Android中使用RecyclerView構建水平ListView?
在進入示例之前,我們應該瞭解Android中的RecyclerView是什麼。RecyclerView是ListView的更高階版本,它基於ViewHolder設計模式工作。使用RecyclerView,我們可以顯示網格和專案列表。
本示例演示如何透過建立一個漂亮的學生記錄應用程式來使用RecyclerView構建水平ListView,該應用程式顯示學生姓名和年齡。
步驟1 - 在Android Studio中建立一個新專案,轉到檔案⇒新建專案,並填寫所有必需的詳細資訊以建立一個新專案。
步驟2 - 開啟build.gradle並新增RecyclerView和CardView庫依賴項。
apply plugin: 'com.android.application'
android {
   compileSdkVersion 28
   defaultConfig {
      applicationId "com.example.andy.tutorialspoint"
      minSdkVersion 19
      targetSdkVersion 28
      versionCode 1
      versionName "1.0"
      testInstrumentationRunner "android.support.test.runner.AndroidJUnitRunner"
   }
   buildTypes {
      release {
         minifyEnabled false
         proguardFiles getDefaultProguardFile('proguard-android.txt'), 'proguard-rules.pro'
      }
   }
}
dependencies {
   implementation fileTree(dir: 'libs', include: ['*.jar'])
   implementation 'com.android.support:appcompat-v7:28.0.0'
   implementation 'com.android.support:design:28.0.0'
   implementation 'com.android.support.constraint:constraint-layout:1.1.3'
   implementation 'com.android.support:cardview-v7:28.0.0'
   implementation 'com.android.support:recyclerview-v7:28.0.0'
   testImplementation 'junit:junit:4.12'
   androidTestImplementation 'com.android.support.test:runner:1.0.2'
   androidTestImplementation 'com.android.support.test.espresso:espresso-core:3.0.2'
}
步驟3 - 將以下程式碼新增到res/layout/activity_main.xml。
<?xml version = "1.0" encoding = "utf-8"?>
<RelativeLayout
   xmlns:android = "http://schemas.android.com/apk/res/android"
   xmlns:tools = "http://schemas.android.com/tools"
   xmlns:app = "http://schemas.android.com/apk/res-auto"
   android:layout_width = "match_parent"
   android:layout_height = "match_parent"
   app:layout_behavior = "@string/appbar_scrolling_view_behavior"
   tools:showIn = "@layout/activity_main"
   tools:context = ".MainActivity">
   <android.support.v7.widget.RecyclerView
      android:id = "@+id/recycler_view"
      android:layout_width = "match_parent"
      android:layout_height = "wrap_content"
      android:scrollbars = "horizontal" />
</RelativeLayout>
在上面的程式碼中,我們將RecyclerView新增到視窗管理器作為相對父佈局,並分配了水平捲軸以水平滾動。
步驟4 - 將以下程式碼新增到src/MainActivity.java
package com.example.andy.tutorialspoint;

import android.annotation.TargetApi;
import android.os.Build;
import android.os.Bundle;
import android.support.annotation.RequiresApi;
import android.support.v7.app.AppCompatActivity;
import android.support.v7.widget.DividerItemDecoration;
import android.support.v7.widget.GridLayoutManager;
import android.support.v7.widget.LinearLayoutManager;
import android.support.v7.widget.RecyclerView;
import android.view.View;
import android.widget.Button;
import android.widget.LinearLayout;
import android.widget.Toast;
import java.util.ArrayList;
import java.util.Collections;
import java.util.Comparator;
import java.util.List;


public class MainActivity extends AppCompatActivity {
   private RecyclerView recyclerView;
   private StudentAdapter studentAdapter;
   private List studentDataList = new ArrayList<>();
   @TargetApi(Build.VERSION_CODES.O)
   @Override
   protected void onCreate(Bundle savedInstanceState) {
      super.onCreate(savedInstanceState);
      setContentView(R.layout.activity_main);
      recyclerView = findViewById(R.id.recycler_view);
      studentAdapter = new StudentAdapter(studentDataList,MainActivity.this);
      RecyclerView.LayoutManager manager = new LinearLayoutManager(this,LinearLayoutManager.HORIZONTAL, false);
      recyclerView.setLayoutManager(manager);
      recyclerView.setAdapter(studentAdapter);
      StudentDataPrepare();
   }
   @RequiresApi(api = Build.VERSION_CODES.N)
   private void StudentDataPrepare() {
      studentData data = new studentData("sai", 25);
      studentDataList.add(data);
      data = new studentData("sai raj", 25);
      studentDataList.add(data);
      data = new studentData("raghu", 20);
      studentDataList.add(data);
      data = new studentData("raj", 28);
      studentDataList.add(data);
      data = new studentData("amar", 15);
      studentDataList.add(data);
      data = new studentData("bapu", 19);
      studentDataList.add(data);
      data = new studentData("chandra", 52);
      studentDataList.add(data);
      data = new studentData("deraj", 30);
      studentDataList.add(data);
      data = new studentData("eshanth", 28);
      studentDataList.add(data);
      Collections.sort(studentDataList, new Comparator() {
         @Override
         public int compare(studentData o1, studentData o2) {
            return o1.name.compareTo(o2.name);
         }
      });
   }
}
在上面的程式碼中,我們添加了RecyclerView和studentAdapter。在studentAdapter中,我們傳遞了studentDataList作為ArrayList。StudentDataList包含學生的姓名和年齡。
要獲得水平檢視,我們需要新增如下所示的佈局引數:
RecyclerView.LayoutManager manager = new LinearLayoutManager(this,LinearLayoutManager.HORIZONTAL, false);
recyclerView.setLayoutManager(manager);
在上面的程式碼中,我們添加了LinearLayoutManager,並且滾動位置是水平的,因此它將以水平方式滾動。
步驟5 - 以下是修改後的檔案src/StudentAdapter.java的內容。
package com.example.andy.tutorialspoint;

import android.graphics.Color;
import android.support.annotation.NonNull;
import android.support.v7.widget.RecyclerView;
import android.view.LayoutInflater;
import android.view.View;
import android.view.ViewGroup;
import android.widget.LinearLayout;
import android.widget.TextView;

import java.util.List;
import java.util.Random;

class StudentAdapter extends RecyclerView.Adapter {
   List<studentData> studentDataList;
   public StudentAdapter(List studentDataList) {
      this.studentDataList = studentDataList;
   }
   @NonNull
   @Override
   public MyViewHolder onCreateViewHolder(@NonNull ViewGroup viewGroup, int i) {
      View itemView = LayoutInflater.from(viewGroup.getContext())
      .inflate(R.layout.student_list_row, viewGroup, false);
      return new MyViewHolder(itemView);
   }
   @Override
   public void onBindViewHolder(MyViewHolder viewHolder, int i) {
      studentData data = studentDataList.get(i);
      Random rnd = new Random();
      int currentColor = Color.argb(255, rnd.nextInt(256), rnd.nextInt(256), rnd.nextInt(256));
      viewHolder.parent.setBackgroundColor(currentColor);
      viewHolder.name.setText(data.name);
      viewHolder.age.setText(String.valueOf(data.age));
   }
   @Override
   public int getItemCount() {
      return studentDataList.size();
   }
   class MyViewHolder extends RecyclerView.ViewHolder {
      TextView name,age;
      LinearLayout parent;
      public MyViewHolder(View itemView) {
         super(itemView);
         parent = itemView.findViewById(R.id.parent);
         name = itemView.findViewById(R.id.name);
         age = itemView.findViewById(R.id.age);
      }
   }
}
在介面卡類中,我們有四個方法,如下所示:
onCreateViewHolder():用於建立一個ViewHolder,並返回一個檢視。
onBindViewHolder():它將與建立的ViewHolder繫結。
getItemCount():包含列表的大小。
MyViewHolder類:這是一個ViewHolder內部類,它擴充套件了RecyclerView.ViewHolder
為了為RecyclerView專案設定隨機背景,我們使用random類(Android中預定義的類)生成了隨機顏色,並將顏色新增到檢視專案的父項,如下所示:
Random rnd = new Random();
int currentColor = Color.argb(255, rnd.nextInt(256), rnd.nextInt(256), rnd.nextInt(256));
viewHolder.parent.setBackgroundColor(currentColor);
步驟6 - 以下是修改後的xml檔案res/layout/student_list_row.xml的內容。
<?xml version = "1.0" encoding = "utf-8"?>
<android.support.v7.widget.CardView xmlns:android = "http://schemas.android.com/apk/res/android"
   xmlns:card_view = "http://schemas.android.com/apk/res-auto"
   android:layout_width = "match_parent"
   card_view:cardCornerRadius = "4dp"
   android:id = "@+id/card_view"
   android:layout_margin = "10dp"
   android:layout_height = "200dp">
   <LinearLayout
      android:id = "@+id/parent"
      android:layout_gravity = "center"
      android:layout_width = "match_parent"
      android:orientation = "vertical"
      android:gravity = "center"
      android:layout_height = "match_parent">
      <TextView
         android:id = "@+id/name"
         android:layout_width = "wrap_content"
         android:gravity = "center"
         android:textSize = "25sp"
         android:textColor = "#FFF"
         android:layout_height = "wrap_content" />
      <TextView
         android:id = "@+id/age"
         android:layout_width = "wrap_content"
         android:gravity = "center"
         android:textSize = "25sp"
         android:textColor = "#FFF"
         android:layout_height = "wrap_content" />
   </LinearLayout>
</android.support.v7.widget.CardView>
在上面的列表項檢視中,我們在CardView內為名稱和年齡建立了兩個TextView。CardView包含預定義的圓角和陰影屬性。因此,我們使用CardView的圓角。
步驟7 - 以下是修改後的檔案src/studentData.java的內容。 package com.example.andy.tutorialspoint;
class studentData {
String name;
int age;
public studentData(String name, int age) {
this.name = name;
this.age = age;
}
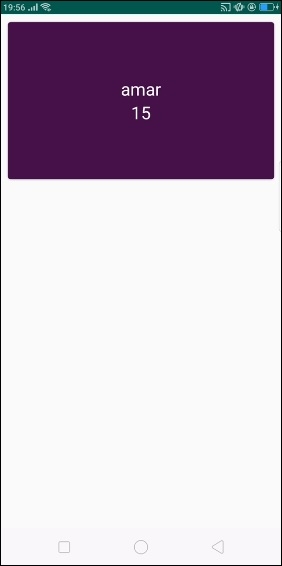
}上面的程式碼介紹了studentData物件。讓我們嘗試執行您的應用程式。我假設您已將您的實際Android移動裝置連線到您的計算機。要從Android Studio執行應用程式,請開啟專案的一個activity檔案,然後單擊工具欄中的執行![]() 圖示。選擇您的移動裝置作為選項,然後檢查您的移動裝置,它將顯示您的預設螢幕:
圖示。選擇您的移動裝置作為選項,然後檢查您的移動裝置,它將顯示您的預設螢幕:
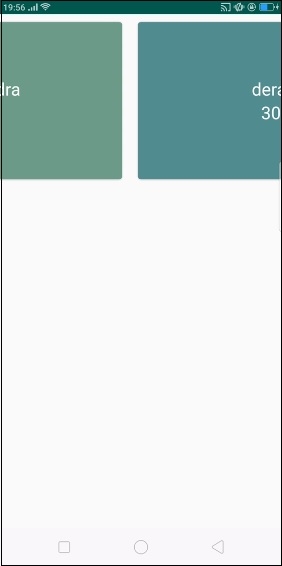
現在水平滾動RecyclerView,它將顯示如下結果:
點選這裡下載專案程式碼

1K+ 次瀏覽
