
 資料結構
資料結構 網路
網路 關係型資料庫管理系統
 作業系統
作業系統 Java
Java iOS
iOS HTML
HTML CSS
CSS Android
 Python
 C 程式設計
 C++
C++ C#
C# MongoDB
 MySQL
MySQL Javascript
 PHP
PHP如何在自動完成文字檢視中設定介面卡?
在進入示例之前,我們應該瞭解 Android 中的自動完成文字檢視是什麼。自動完成文字檢視就像一個編輯文字,它是 editext 的子類,但它將從列表中顯示建議作為下拉列表。我們必須為自動完成文字檢視設定閾值。例如,我們將其閾值設定為 1,因此如果使用者輸入一個字母,它將根據閾值字母給出建議。
此示例演示瞭如何為自動完成文字檢視設定介面卡。
步驟 1 - 在 Android Studio 中建立一個新專案,轉到檔案 ⇒ 新建專案,並填寫所有必需的詳細資訊以建立新專案。
步驟 2 - 將以下程式碼新增到 res/layout/activity_main.xml 中。
<?xml version="1.0" encoding="utf-8"?>
<LinearLayout xmlns:android="http://schemas.android.com/apk/res/android"
   xmlns:app="http://schemas.android.com/apk/res-auto"
   xmlns:tools="http://schemas.android.com/tools"
   android:layout_width="match_parent"
   android:layout_height="match_parent"
   android:gravity="center"
   android:orientation="vertical"
   tools:context=".MainActivity">
   <AutoCompleteTextView
      android:id="@+id/autoComplete"
      android:layout_width="fill_parent"
      android:hint="Enter programming language"
      android:layout_height="wrap_content" />
</LinearLayout>
在上面,我們聲明瞭自動完成文字檢視,當用戶輸入字母時,它將在下拉選單中顯示列表作為建議。
步驟 3 - 將以下程式碼新增到 src/MainActivity.java 中
package com.example.andy.myapplication;
import android.content.BroadcastReceiver;
import android.content.Context;
import android.content.Intent;
import android.content.IntentFilter;
import android.os.Bundle;
import android.support.v7.app.AppCompatActivity;
import android.text.Editable;
import android.text.TextWatcher;
import android.util.Log;
import android.view.View;
import android.widget.AdapterView;
import android.widget.ArrayAdapter;
import android.widget.AutoCompleteTextView;
import android.widget.Button;
import android.widget.RadioButton;
import android.widget.Toast;
import java.util.ArrayList;
public class MainActivity extends AppCompatActivity {
   RadioButton radioButton;
   @Override
   protected void onCreate(Bundle savedInstanceState) {
      super.onCreate(savedInstanceState);
      setContentView(R.layout.activity_main);
      final AutoCompleteTextView autoCompleteTextView=findViewById(R.id.autoComplete);
      ArrayList arrayList=new ArrayList<>();
      arrayList.add("Android");
      arrayList.add("JAVA");
      arrayList.add("CPP");
      arrayList.add("C Programming");
      arrayList.add("Kotlin");
      arrayList.add("CSS");
      arrayList.add("HTML");
      arrayList.add("PHP");
      arrayList.add("Swift");
      ArrayAdapter arrayAdapter=new ArrayAdapter(this, android.R.layout.simple_dropdown_item_1line, arrayList);
      autoCompleteTextView.setAdapter(arrayAdapter);
      autoCompleteTextView.setThreshold(1);
      autoCompleteTextView.addTextChangedListener(new TextWatcher() {
         @Override
         public void beforeTextChanged(CharSequence s, int start, int count, int after) {
            Log.d("beforeTextChanged", String.valueOf(s));
         }
         @Override
         public void onTextChanged(CharSequence s, int start, int before, int count) {
            Log.d("onTextChanged", String.valueOf(s));
         }
         @Override
         public void afterTextChanged(Editable s) {
            Log.d("afterTextChanged", String.valueOf(s));
         }
      });
   }
}
在上面的程式碼中,我們已將一些值儲存在 ArrayList 中並將 ArrayList 附加到陣列介面卡。我們已將介面卡設定為自動完成文字檢視並將閾值新增為 1。讓我們嘗試執行您的應用程式。我假設您已將您的實際 Android 移動裝置連線到您的計算機。要從 Android Studio 執行應用程式,請開啟您專案中的一個活動檔案,然後單擊工具欄中的執行 ![]() 圖示。選擇您的移動裝置作為選項,然後檢查您的移動裝置,它將顯示您的預設螢幕 -
圖示。選擇您的移動裝置作為選項,然後檢查您的移動裝置,它將顯示您的預設螢幕 -

最初,它將顯示如上所示的螢幕,並在該文字檢視中輸入 ja,它將顯示介面卡中的結果,如下所示 -
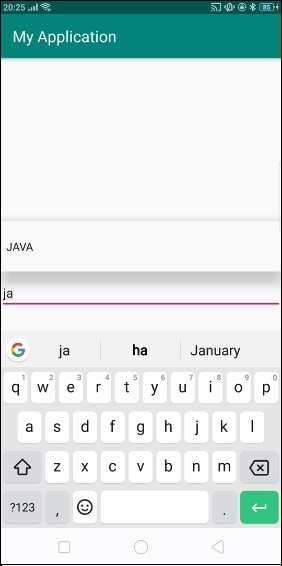
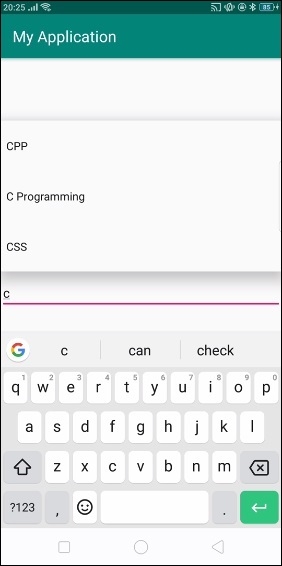
在上述結果中,我們只有一個建議,刪除 J 並在該文字檢視中鍵入 c,它將顯示多個建議,如下所示 -

更新於:2019-07-30
1K+ 次檢視

廣告