如何使用 Swift(iOS)在郵件中傳送附件?
瞭解如何在電子郵件中傳送附件非常重要,因為大多數應用程式都具有共享功能。因此,擁有實踐經驗很重要。
在這篇文章中,我們將瞭解如何使用 Swift 在郵件中傳送附件。
那麼,讓我們開始吧。
為此,我們將使用 MFMailComposeViewController,這是一個標準的檢視控制器,其介面允許使用者管理、編輯和傳送電子郵件。
您可以在此處瞭解更多資訊 https://developer.apple.com/documentation/messageui/mfmailcomposeviewcontroller
我們還將使用 MFMailComposeViewControllerDelegate 來處理 MFMailComposeResult 的結果。
您可以在此處瞭解更多資訊 https://developer.apple.com/documentation/messageui/mfmailcomposeviewcontrollerdelegate
我們將建立一個示例應用程式來理解:
步驟 1 - 開啟 Xcode → 單檢視應用程式 → 將其命名為 EmailAttachment
步驟 2 - 開啟 Main.storyboard 並新增一個按鈕,將其命名為傳送郵件,如下所示:

步驟 3 - 建立 @IBAction 並將其命名為 btnSendMail,如下所示:
@IBAction func btnSendMail(_ sender: Any) { }步驟 4 - 在 ViewController.swift 中,匯入 MessageUI
import MessageUI
步驟 5 - 將類確認到 MFMailComposeViewControllerDelegate
class ViewController: UIViewController, MFMailComposeViewControllerDelegate
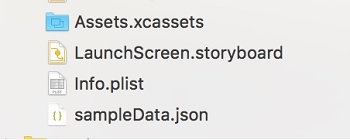
步驟 6 - 將附件檔案新增到專案中:

步驟 7 - 在 btnSendMail 中編寫以下函式:
@IBAction func btnSendMail(_ sender: Any) {
   if MFMailComposeViewController.canSendMail() {
      let mail = MFMailComposeViewController()
      mail.setToRecipients(["test@gmail.com"])
      mail.setSubject("GREETING")
      mail.setMessageBody("Welcome to Tutorials Point!", isHTML: true)
      mail.mailComposeDelegate = self
      //add attachment
      if let filePath = Bundle.main.path(forResource: "sampleData", ofType: "json") {
         if let data = NSData(contentsOfFile: filePath) {
            mail.addAttachmentData(data as Data, mimeType: "application/json" , fileName: "sampleData.json")
         }
      }
      present(mail, animated: true)
      }
   else {
      print("Email cannot be sent")
   }
}
搞定!
但是我們也需要處理其他條件,例如郵件已傳送、已取消或失敗。為此,我們才確認了上述協議。
讓我們實現委託方法:
func mailComposeController(_ controller: MFMailComposeViewController, didFinishWith result: MFMailComposeResult, error: Error?) {
   if let _ = error {
      self.dismiss(animated: true, completion: nil)
   }
   switch result {
      case .cancelled:
      print("Cancelled")
      break
      case .sent:
      print("Mail sent successfully")
      break
      case .failed:
      print("Sending mail failed")
      break
      default:
      break
   }
   controller.dismiss(animated: true, completion: nil)
}
搞定!
在真機上執行程式:

完整程式碼
import UIKit
import MessageUI
class ViewController: UIViewController, MFMailComposeViewControllerDelegate {
   override func viewDidLoad() {
   }
   @IBAction func btnSendMail(_ sender: Any) {
      if MFMailComposeViewController.canSendMail() {
         let mail = MFMailComposeViewController()
         mail.setToRecipients(["test@gmail.com"])
         mail.setSubject("GREETING")
         mail.setMessageBody("Welcome to Tutorials Point!", isHTML: true)
         mail.mailComposeDelegate = self
         if let filePath = Bundle.main.path(forResource: "sampleData", ofType: "json") {
            if let data = NSData(contentsOfFile: filePath) {
               mail.addAttachmentData(data as Data, mimeType: "application/json" , fileName: "sampleData.json")
            }
         }
         present(mail, animated: true)
      }
      else {
         print("Email cannot be sent")
      }
   }
   func mailComposeController(_ controller: MFMailComposeViewController, didFinishWith result:          MFMailComposeResult, error: Error?) {
      if let _ = error {
         self.dismiss(animated: true, completion: nil)
      }
      switch result {
         case .cancelled:
         print("Cancelled")
         break
         case .sent:
         print("Mail sent successfully")
         break
         case .failed:
         print("Sending mail failed")
         break
         default:
         break
      }
      controller.dismiss(animated: true, completion: nil)
   }
}


 資料結構
資料結構 網路
網路 關係資料庫管理系統
 作業系統
作業系統 Java
Java iOS
iOS HTML
HTML CSS
CSS Android
 Python
 C 語言程式設計
 C++
C++ C#
C# MongoDB
 MySQL
MySQL Javascript
 PHP
PHP