
 資料結構
資料結構 網路
網路 關係資料庫管理系統 (RDBMS)
 作業系統
作業系統 Java
Java iOS
iOS HTML
HTML CSS
CSS Android
 Python
 C語言程式設計
 C++
C++ C#
C# MongoDB
 MySQL
MySQL Javascript
 PHP
PHP如何在Tkinter網格中插入新行?
Tkinter是Python中廣泛使用的GUI(圖形使用者介面)工具包,它提供了一個強大的網格幾何管理器,可以方便地在表格結構中組織小部件。在開發圖形應用程式的過程中,能夠無縫地將新行插入Tkinter網格是一項寶貴的技能。
本文旨在提供關於在Tkinter網格中有效插入新行的全面指南,使開發人員能夠建立動態和自適應的使用者介面。在深入研究動態行插入的細節之前,瞭解Tkinter網格系統的基礎知識至關重要。讓我們開始這段旅程,提高我們在Tkinter中建立靈活和響應式佈局的能力。
Tkinter 網格
網格作為幾何管理器,負責在圖形使用者介面中以行和列的形式排列小部件。小部件系統地放置在單元格中,由特定的行和列索引界定。
讓我們從包含一些小部件的基本Tkinter網格佈局開始。
示例
# Importing the necessary libraries
import tkinter as tk

# Create the main window
root = tk.Tk()
root.title("Basic Tkinter Grid Layout")

# Set window dimensions
root.geometry("720x250")

label1 = tk.Label(root, text="Widget 1")
label2 = tk.Label(root, text="Widget 2")

label1.grid(row=0, column=0)
label2.grid(row=1, column=0)

# Run the Tkinter event loop
root.mainloop()
在這個例子中,兩個標籤分別放置在第一行和第二行。我們將在此基礎上進行構建,以演示動態插入行。
輸出

插入新行
要在Tkinter網格中插入新行,我們需要遵循系統的方法。讓我們一步一步地分解它。
步驟1:定義行插入函式
建立一個處理新行插入的函式。此函式應該建立您要插入的小部件並將它們放置在適當的行中。
def insert_new_row():
   new_label = tk.Label(root, text="New Widget")
   last_row = root.grid_size()[1]
   new_label.grid(row=last_row, column=0)
在這裡,insert_new_row函式建立一個新的標籤並將其放置在下一個可用的行中。
步驟2:呼叫函式觸發器
建立一個用於呼叫函式的觸發器。根據您的應用程式,此觸發器可以是按鈕單擊或任何其他事件。
insert_button = tk.Button(root, text="Insert New Row", command=insert_new_row)
insert_button.grid(row=2, column=0)
在本例中,建立了一個標有“插入新行”的按鈕,並將insert_new_row函式分配給它的command引數。單擊按鈕將執行該函式。
示例
將所有內容放在一起,完整的程式碼如下所示:
# Importing the necessary libraries
import tkinter as tk
# Defining the function to insert new rows
def insert_new_row():
new_label = tk.Label(root, text="New Widget")
last_row = root.grid_size()[1]
new_label.grid(row=last_row, column=0)
# Create the main window
root = tk.Tk()
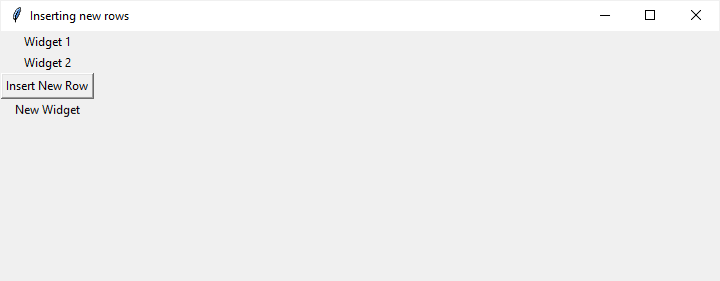
root.title("Inserting new rows")
# Set window dimensions
root.geometry("720x250")
label1 = tk.Label(root, text="Widget 1")
label2 = tk.Label(root, text="Widget 2")
label1.grid(row=0, column=0)
label2.grid(row=1, column=0)
# Creating the insert button
insert_button = tk.Button(root, text="Insert New Row", command=insert_new_row)
insert_button.grid(row=2, column=0)
root.mainloop()
單擊“插入新行”按鈕,它將在Tkinter網格中插入新行。讓我們在下面的輸出中檢視:
輸出
示例
讓我們透過在新行中插入Entry小部件來增強示例。這展示了該方法的靈活性。
# Importing the necessary libraries
import tkinter as tk
# Defining the function to insert new rows
def insert_new_row():
   entry1 = tk.Entry(root)
   entry2 = tk.Entry(root)

   last_row = root.grid_size()[1]

   entry1.grid(row=last_row, column=0)
   entry2.grid(row=last_row, column=1)

# Create the main window
root = tk.Tk()
root.title("Inserting new rows")

# Set window dimensions
root.geometry("720x250")

entry1 = tk.Entry(root)
entry2 = tk.Entry(root)

entry1.grid(row=0, column=0)
entry2.grid(row=0, column=1)

# Creating the insert button
insert_button = tk.Button(root, text="Insert New Row", command=insert_new_row)
insert_button.grid(row=1, column=0, columnspan=2)

# Run the Tkinter event loop
root.mainloop()
在這個例子中,單擊按鈕會在下一行插入兩個新的Entry小部件,動態擴充套件網格。
輸出

結論
掌握動態將新行插入Tkinter網格的技巧,為開發人員提供了一個強大的工具,可以建立既適應性強又引人入勝的使用者介面。透過瀏覽Tkinter網格幾何管理器的複雜性並遵循系統的方法,開發人員可以無縫地將新元素整合到他們的佈局中,從而增強靈活性和動態性。
這份全面的指南,以及說明性示例,為冒險進入Tkinter領域的開發人員提供了一份路線圖。當您繼續探索Tkinter的強大功能時,請記住,構建引人注目且使用者友好的介面的關鍵在於將技術能力與創造力相結合。

870 次瀏覽
