
 資料結構
資料結構 網路
網路 關係資料庫管理系統 (RDBMS)
 作業系統
作業系統 Java
Java iOS
iOS HTML
HTML CSS
CSS Android
 Python
 C語言程式設計
 C++
C++ C#
C# MongoDB
 MySQL
MySQL Javascript
 PHP
PHP如何在KivyMD-Python中建立橫幅?
在KivyMD-Python中,橫幅是一種圖形元素,用於向用戶顯示簡短的訊息或通知。它可以用於告知使用者應用程式的狀態,例如任務的成功完成或發生的錯誤。
橫幅可以自定義顏色、文字和螢幕上的位置。它們對於空間有限且需要快速反饋使用者的移動應用程式特別有用。橫幅可以透過提供及時且相關的資訊來改善整體使用者體驗。
橫幅型別
在KivyMD-Python中,有兩種型別的橫幅可用:
Snackbar橫幅 - Snackbar是一個簡短的訊息,出現在螢幕底部,並很快消失。它通常用於顯示通知或警報。
BottomAppBar橫幅 - BottomAppBar是一個持久存在的橫幅,出現在螢幕底部,可以包含導航選項或操作按鈕。它通常用於移動應用程式中替代傳統的工具欄。
兩種型別的橫幅都可以使用不同的顏色、圖示和文字進行自定義。
建立Snackbar橫幅的語法
在KivyMD-Python中建立Snackbar橫幅的語法如下:
Snackbar(text="Your message here").show()
在此語法中,我們使用所需的訊息作為“text”引數建立一個Snackbar類的新的例項,然後呼叫“show()”方法顯示橫幅。您可以透過使用Snackbar類的其他屬性和方法(例如“duration”來設定顯示時間或“button_text”和“button_callback”來新增帶有回撥函式的按鈕)來進一步自定義Snackbar橫幅。
建立Snackbar橫幅的步驟
以下是KivyMD-Python中建立Snackbar橫幅的演算法:
步驟1 - 從KivyMD庫匯入Snackbar類。
步驟2 - 使用所需的訊息作為“text”引數建立一個新的“Snackbar”類例項。
步驟3 - 可選地透過設定其他屬性(如“duration”、“button_text”或“button_callback”)來自定義Snackbar橫幅。
步驟4 - 呼叫Snackbar例項的“show()”方法以顯示橫幅。
步驟5 - Snackbar橫幅將臨時顯示在螢幕底部,顯示指定的訊息和任何其他自定義內容。
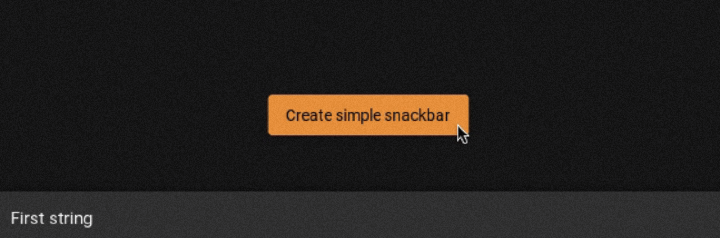
示例1
from kivy.lang import Builder
from kivymd.app import MDApp

KV = '''
#:import Snackbar kivymd.uix.snackbar.Snackbar
MDScreen:
   MDRaisedButton:
      text: "Create simple snackbar"
      on_release: Snackbar(text="This is a snackbar!").open()
      pos_hint: {"center_x": .5, "center_y": .5}
'''
class Test(MDApp):
   def build(self):
      return Builder.load_string(KV)
Test().run()
輸出
建立BottomAppBar橫幅的語法
在KivyMD-Python中建立BottomAppBar橫幅的語法如下:
MDBottomAppBar(
   MDToolbar(title="Your title here"),
   ... # Other parameters and widgets here
)
在此語法中,我們使用MDToolbar例項作為第一個引數建立一個新的“MDBottomAppBar”類例項,這將設定橫幅的標題。可以新增其他引數和小部件來自定義BottomAppBar橫幅的外觀和功能。
例如,您可以設定“icon”引數以向橫幅新增選單圖示,並設定“on_icon_press”引數以指定按下圖示時的回撥函式。您還可以透過將它們作為其他引數傳遞給建構函式,向BottomAppBar橫幅新增其他小部件,例如按鈕或標籤。
建立BottomAppBar橫幅的步驟
以下是KivyMD-Python中建立BottomAppBar橫幅的演算法:
步驟1 - 從KivyMD庫匯入MDBottomAppBar和MDToolbar類。
步驟2 - 使用所需的標題建立一個新的MDToolbar類例項。
步驟3 - 使用MDToolbar例項作為第一個引數建立一個新的MDBottomAppBar類例項。
步驟4 - 可選地透過設定其他屬性(如icon、on_icon_press或md_bg_color)來自定義BottomAppBar橫幅。
步驟5 - 透過將它們作為其他引數傳遞給MDBottomAppBar建構函式,向BottomAppBar橫幅新增任何其他小部件,例如按鈕或標籤。
步驟6 - 從KivyMD應用程式的build()方法返回MDBottomAppBar例項。
步驟7 - BottomAppBar橫幅將顯示在螢幕底部。
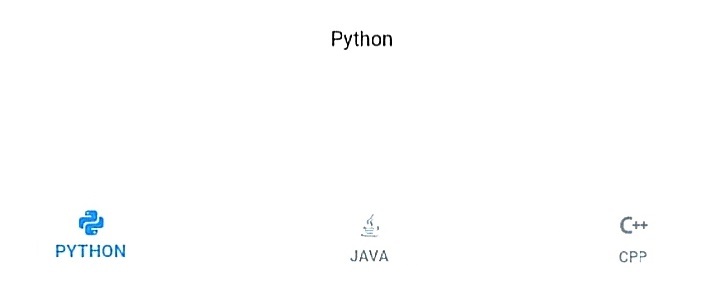
示例2
要在KivyMD-Python中建立橫幅,您可以使用“MDBanner”小部件。以下是建立橫幅的基本示例:
# import packages
from kivy.lang import Builder
from kivymd.app import MDApp
# writing kv lang
KV = '''
# declaring layout/screen
MDScreen:
   # this will create a space navigation bottom
   MDBottomNavigation:
      # this will create a navigation button on the bottom of screen
      MDBottomNavigationItem:
         name: 'screen 1'
         text: 'Python'
         icon: 'language-python'
         # this will be triggered when screen 1 is selected
         # creates a label
         MDLabel:
            text: 'Python'
            halign: 'center'
      # this will create a navigation button on the bottom of screen
      MDBottomNavigationItem:
         name: 'screen 2'
         text: 'Java'
         icon: 'language-java'
         # this will be triggered when screen 2 is selected
         # creates a label
         MDLabel:
            text: 'Java'
            halign: 'center'
      # this will create a navigation button on the bottom of the screen
      MDBottomNavigationItem:
         name: 'screen 3'
         text: 'CPP'
         icon: 'language-cpp'
         # this will be triggered when screen 3 is selected
         # creates a label
         MDLabel:
            text: 'CPP'
            halign: 'center'
'''
# App class
class Test(MDApp):
   def build(self):
      # this will load kv lang
      screen = Builder.load_string(KV)
      # returning screen
      return screen
# running app
Test().run()
輸出
結論
使用Python在KivyMD中建立橫幅是一個簡單而高效的過程。按照本文中概述的步驟,任何人都可以輕鬆地為其應用程式設計和實現視覺上吸引人的橫幅。
憑藉KivyMD使用者友好的介面和廣泛的設計元素庫,開發人員可以建立高質量、功能強大且美觀的橫幅。透過將這些橫幅整合到他們的應用程式中,開發人員可以增強使用者體驗,並建立一個更具吸引力和沉浸感的環境。

561 次瀏覽
