
 資料結構
資料結構 網路
網路 關係資料庫管理系統 (RDBMS)
 作業系統
作業系統 Java
Java iOS
iOS HTML
HTML CSS
CSS Android
 Python
 C語言程式設計
 C++
C++ C#
C# MongoDB
 MySQL
MySQL Javascript
 PHP
PHP如何在Python中建立動畫?
Python 提供了幾個用於建立動畫的庫,例如 Matplotlib、Pygame 和 Pyglet。Matplotlib 是一個流行的 Python 資料視覺化庫,它也提供了使用“FuncAnimation”函式建立動畫的功能。“FuncAnimation”是“matplotlib.animation”模組中的一個類,它透過呼叫使用者定義的函式來建立動畫。在本教程中,我們將學習使用“FuncAnimation”函式建立動畫,並演示此方法的三個示例。
語法
animation = FuncAnimation(fig, animate_func, frames=frame_values, interval=interval_value, repeat=repeat_value)
在上面的語法中,fig 是我們要動畫化的物件,animate_func 更新每一幀的繪圖,“frame_values”是確定要顯示的幀的可迭代值,“interval_value”是幀之間的時間間隔(以毫秒為單位),“repeat_value”是一個布林值,它決定動畫是否在結束後重復。
示例 1
在這個例子中,我們使用“subplots()”函式建立了一個圖形物件“fig”和一個“an”座標軸物件 ax。接下來,我們建立了一個包含 0 到 2π 之間 200 個點的 numpy 陣列“x”,以及一個繪製“x”正弦值的線物件“line”。
動畫的每一幀都會呼叫“animate()”函式,它透過向“x”新增“i/10.0”來更新“line”物件的 y 資料。然後,該函式返回“line”物件。之後,我們透過傳遞“fig”、“animate”、“frames=100”(表示我們要顯示 100 幀)和“interval=50”(將幀之間的時間間隔設定為 50 毫秒)來建立“FuncAnimation”的例項。然後,我們呼叫“plt.show()”來顯示動畫。
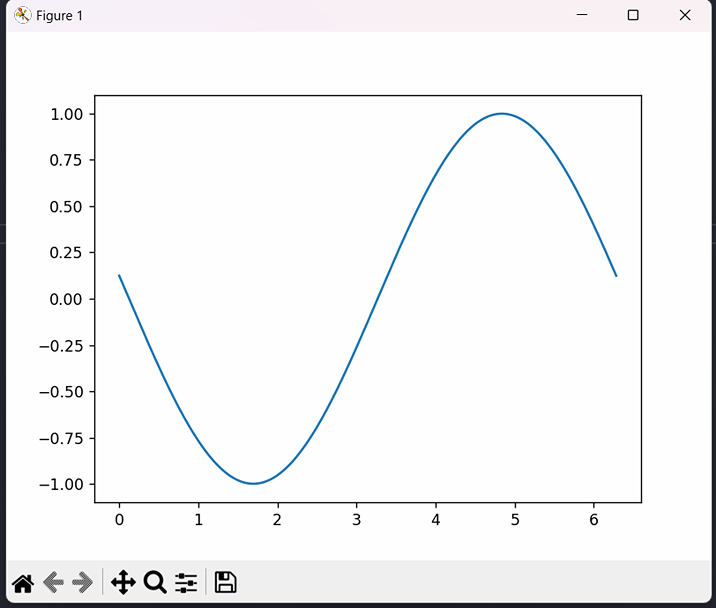
這是一個建立正弦波動畫的簡單示例:
import numpy as np
import matplotlib.pyplot as plt
from matplotlib.animation import FuncAnimation

fig, ax = plt.subplots()
x = np.linspace(0, 2*np.pi, 200)
line, = ax.plot(x, np.sin(x))

def animate(i):
   line.set_ydata(np.sin(x + i/10.0))
   return line,
animation = FuncAnimation(fig, animate, frames=100, interval=50)
plt.show()
輸出
示例 2
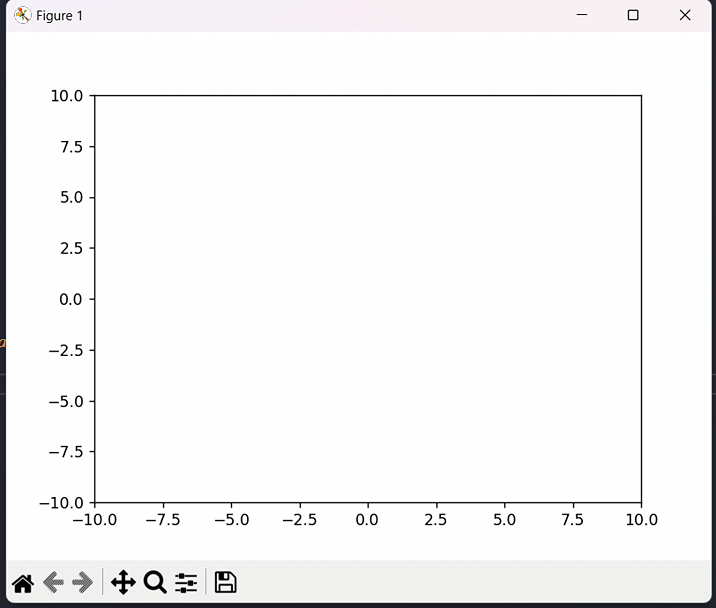
在這個例子中,我們使用“FuncAnimation”動畫化了一個在繪圖中間垂直滾動的球。首先,我們使用“plt.Circle()”建立了一個“circle”物件,在“init()”函式中設定了“ax”的 x 和 y 限制,並將“circle”物件新增到座標軸。在“animate()”函式中,使用“i”變數更新“circle”的垂直位置,並返回“circle”物件。
然後,使用“fig”、“animate”、“init_func=init”、“frames=100”、“interval=20”和“blit=True”建立 FuncAnimation 的例項。然後使用“plt.show()”顯示動畫。
import numpy as np
import matplotlib.pyplot as plt
from matplotlib.animation import FuncAnimation
fig, ax = plt.subplots()
circle = plt.Circle((0, 0), 1, fc='r')

def init():
   ax.set_xlim(-10, 10)
   ax.set_ylim(-10, 10)
   ax.add_artist(circle)
   return circle,

def animate(i):
   x, y = circle.center
   circle.center = (x, i/5)
   return circle,

animation = FuncAnimation(fig, animate, init_func=init, frames=100, interval=20, blit=True)
plt.show()
輸出
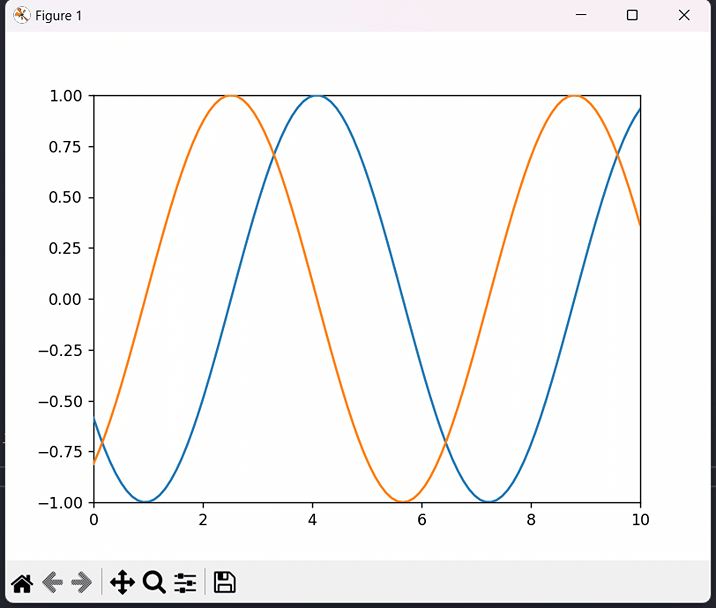
示例 3
在這個例子中,我們動畫化了兩條水平移動的線。首先,我們建立了一個圖形物件“fig”和一個座標軸物件“ax”。然後,我們定義了兩個線物件“x1_line”和“x2_line”,它們代表兩條水平移動的線。
呼叫“init()”函式來初始化繪圖。我們設定“ax”的 x 和 y 限制,並返回“x1_line”和“x2_line”物件。接下來,動畫的每一幀都會呼叫“animate()”函式,它更新“x1_line”和“x2_line”物件的資料。我們生成一個包含 0 到 10 之間 100 個點的 numpy 陣列“x1”,以及一個幅度為 1、相移為 -i/10.0 的正弦波 numpy 陣列“y1”。然後,我們將“x1_line”的 x 資料設定為“x1”,y 資料設定為“y1”。
類似地,我們生成一個包含 0 到 10 之間 100 個點的 numpy 陣列“x2”,以及一個幅度為 1、相移為 -i/10.0 的餘弦波 numpy 陣列“y2”。然後,我們將“x2_line”的 x 資料設定為“x2”,y 資料設定為“y2”。然後,我們透過傳遞“fig”、“animate”、“init_func=init”、“frames=100”(表示 100 幀)和“interval=50”(將幀之間的時間間隔設定為 50 毫秒)來建立“FuncAnimation”的例項。我們還設定“blit=True”以提高效能。然後,我們呼叫“plt.show()”進行顯示。
import numpy as np
import matplotlib.pyplot as plt
from matplotlib.animation import FuncAnimation

fig, ax = plt.subplots()
x1_line, = ax.plot([], [])
x2_line, = ax.plot([], [])

def init():
   ax.set_xlim(0, 10)
   ax.set_ylim(-1, 1)
   return x1_line, x2_line

def animate(i):
   x1 = np.linspace(0, 10, 100)
   y1 = np.sin(x1 - i/10.0)
   x1_line.set_data(x1, y1)
   x2 = np.linspace(0, 10, 100)
   y2 = np.cos(x2 - i/10.0)
   x2_line.set_data(x2, y2)
   return x1_line, x2_line

animation = FuncAnimation(fig, animate, init_func=init, frames=100, interval=50, blit=True)
plt.show()
輸出
結論
我們瞭解到 Matplotlib 是 Python 中流行的資料視覺化庫,使用“FuncAnimation”建立動畫可以讓我們基本瞭解如何使用 Matplotlib 建立繪圖並對其進行自定義。在 Python 中使用“FuncAnimation”建立動畫是瞭解動畫工作原理以及如何使用 Matplotlib 建立引人入勝的視覺化效果的好方法。透過建立動畫,可以增強 Python 程式設計技能,並透過解決諸如更新每一幀的繪圖、控制動畫速度以及處理錯誤和異常等挑戰來培養解決問題的能力。此外,建立動畫還可以發揮創造力和創新性,因為可以設計出視覺上吸引人且互動式的動畫,以有效地傳達複雜的資料和概念。總而言之,我們可以使用此方法建立動畫並對其進行進一步自定義。

9K+ 次瀏覽
