
 資料結構
資料結構 網路
網路 關係資料庫管理系統 (RDBMS)
 作業系統
作業系統 Java
Java iOS
iOS HTML
HTML CSS
CSS Android
 Python
 C語言程式設計
 C++
C++ C#
C# MongoDB
 MySQL
MySQL Javascript
 PHP
PHP如何配置Nagios伺服器以監控Apache伺服器
在本文中,我們將介紹如何在CentOS 6.7上安裝Nagios 4(一個非常流行的開源監控工具)。我們將介紹一些基本的配置步驟,這些步驟可能對透過Web介面監控大量資源很有用。在這裡,我們還將使用Nagios遠端外掛執行器(NRPE),它作為代理安裝在遠端主機上,以監控伺服器/客戶端的本地資源。
Nagios可用於跟蹤伺服器清單,並確保關鍵服務正常執行。在任何生產伺服器環境中,Nagios作為監控系統都是必不可少的工具。
前提條件
要配置Nagios,理想情況下,我們必須在執行Nagios的Linux伺服器上擁有root使用者許可權。
安裝Nagios 4
**建立Nagios使用者和組**: 我們必須建立一個使用者和組來執行Nagios程序。建立“Nagios”使用者和“nagcmd”組,然後使用以下命令將使用者新增到該組
# useradd nagios
# groupadd nagcmd
# usermod -a -G nagcmd nagios
安裝構建依賴項
由於我們是從原始碼構建Nagios Core,因此我們必須安裝一些開發庫,以便完成構建。同時,我們還將安裝**apache2-utils**,它將用於設定Nagios Web介面。
首先,更新您的Yum軟體包列表
# yum update
然後,安裝所需的軟體包
# yum install -y httpd php gcc glibc glibc-common gd gd-devel make net-snmp perl-rrd xinetd openssl-devel package perl-GD* ntp perl-rrd*
下載Nagios 4.1.1 Core和外掛
# wget http://prdownloads.sourceforge.net/sourceforge/nagios/nagios-4.1.1.tar.gz
# wget https://www.nagios-plugins.org/download/nagios-plugins-2.1.1.tar.gz
安裝Nagios Core 4.1.1
我們需要使用tar命令解壓下載的軟體包,如下所示。
# tar –xvf nagios-4.1.1.tar.gz
# cd nagios-*
在構建Nagios之前,我們必須對其進行配置。如果您想將其配置為使用postfix(可以使用apt-get安裝),請將`–with-mail=/usr/sbin/sendmail`新增到以下命令中
# ./configure --with-nagios-group=nagios --with-command-group=nagcmd

Output:

General Options:
-------------------------
Nagios executable: nagios
Nagios user/group: nagios,nagios
Command user/group: nagios,nagcmd
Event Broker: yes
Install ${prefix}: /usr/local/nagios
Install ${includedir}: /usr/local/nagios/include/nagios
Lock file: ${prefix}/var/nagios.lock
Check result directory: ${prefix}/var/spool/checkresults
Init directory: /etc/init.d
Apache conf.d directory: /etc/httpd/conf.d
Mail program: /usr/bin/mail
Host OS: nagios.test.com
Web Interface Options:
------------------------
HTML URL: https:///nagios/
CGI URL: https:///nagios/cgi-bin/
Traceroute (used by WAP): /usr/sbin/traceroute
Review the options above for accuracy. If they look okay,
type 'make all' to compile the main program and CGIs
*** Main program, CGIs and HTML files installed ***
Now compile Nagios with this command:

Output:
You can continue with installing Nagios as follows (type 'make'without any arguments for a list of all possible options):
# make install-init
– 這會將init指令碼安裝在`/etc/rc.d/init.d`中
# make install-commandmode
– 這會安裝並配置儲存外部命令檔案的目錄的許可權
# make install-init
為了使nagios能夠從命令列工作,我們需要安裝命令模式。
# make install-commandmode
接下來,安裝示例nagios檔案,請執行以下命令。
# make install-config

Output:
/usr/bin/install -c -m 775 -o nagios -g nagios -d /usr/local/nagios/etc
/usr/bin/install -c -m 775 -o nagios -g nagios -d /usr/local/nagios/etc/objects
/usr/bin/install -c -b -m 664 -o nagios -g nagios sample-config/nagios.cfg /usr/local/nagios/etc/nagios.cfg
/usr/bin/install -c -b -m 664 -o nagios -g nagios sample-config/cgi.cfg /usr/local/nagios/etc/cgi.cfg
/usr/bin/install -c -b -m 660 -o nagios -g nagios sample-config/resource.cfg /usr/local/nagios/etc/resource.cfg
/usr/bin/install -c -b -m 664 -o nagios -g nagios sample-config/template-object/templates.cfg
/usr/local/nagios/etc/objects/templates.cfg/usr/bin/install -c -b -m 664 -o nagios -g nagios sample-config/template-object/commands.cfg
/usr/local/nagios/etc/objects/commands.cfg
/usr/bin/install -c -b -m 664 -o nagios -g nagios sample-config/template-object/contacts.cfg /usr/local/nagios/etc/objects/contacts.cfg
/usr/bin/install -c -b -m 664 -o nagios -g nagios sample-config/template-object/timeperiods.cfg /usr/local/nagios/etc/objects/timeperiods.cfg
/usr/bin/install -c -b -m 664 -o nagios -g nagios sample-config/template-object/localhost.cfg /usr/local/nagios/etc/objects/localhost.cfg
/usr/bin/install -c -b -m 664 -o nagios -g nagios sample-config/template-object/windows.cfg /usr/local/nagios/etc/objects/windows.cfg
/usr/bin/install -c -b -m 664 -o nagios -g nagios sample-config/template-object/printer.cfg /usr/local/nagios/etc/objects/printer.cfg
/usr/bin/install -c -b -m 664 -o nagios -g nagios sample-config/template-object/switch.cfg /usr/local/nagios/etc/objects/switch.cfg
*** Config files installed ***
安裝Nagios外掛
在此處查詢Nagios外掛的最新版本:Nagios外掛下載。複製最新版本的連結地址,並複製連結地址以便您可以將其下載到您的Nagios伺服器。
在撰寫本文時,最新版本是Nagios Plugins 2.1.1。
# cd /root/nagios
# cd tar –xvf nagios-plugins-2.1.1.tar.gz
# ./configure --with-nagios-user=nagios --with-nagios-group=nagios --with-openssl=/usr/bin/openssl --enable-perl-modules --enable-libtap
# make
# make install
安裝NRPE
在NRPE下載頁面查詢NRPE最新穩定版本的原始碼。將最新版本下載到您的Nagios伺服器。
在撰寫本文時,最新版本是2.15。
# mkdir -p /usr/local/src/nrpe
# cd /usr/local/src/nrpe
下載檔案並解壓
# wget http://kent.dl.sourceforge.net/project/nagios/nrpe-2.x/nrpe-2.15/nrpe-2.15.tar.gz
# tar -xf nrpe-2.15.tar.gz
# cd nrpe-2.15
由於OpenSSL庫資料夾存在問題,我們需要使用`/usr/lib`以外的另一個路徑
#./configure --with-ssl=/usr/bin/openssl --with-ssl-lib=/usr/lib/x86_64-linux-gnu
現在進行make和make install
# make all
接下來,安裝NRPE外掛守護程式和示例守護程式配置檔案。
# make install-plugin
# make install-daemon
# make install-daemon-config
將NRPE守護程式作為服務安裝在xinetd下。
# make install-xinetd
接下來,開啟`/etc/services`檔案,在檔案的底部為NRPE守護程式新增以下條目。
# vi /etc/services
nrpe 5666/tcp                   NRPE
重啟xinetd服務。
# service xinetd restart
本地驗證NRPE守護程式
執行以下命令以驗證NRPE守護程式在xinetd下是否正常工作。
# netstat -at | grep nrpe
tcp 0 0 *:nrpe                   *:*                LISTEN
驗證NRPE守護程式是否正常執行。
# /usr/local/nagios/libexec/check_nrpe -H localhost
Output:
NRPE v2.15
現在Nagios 4.1.1已安裝,我們需要對其進行配置。
配置Nagios
現在讓我們執行初始Nagios配置。您只需要在Nagios伺服器上執行此部分一次。
在您最喜歡的文字編輯器中開啟主要的Nagios配置檔案。我們將使用vi編輯該檔案
# vi /usr/local/nagios/etc/nagios.cfg
現在找到並取消註釋此行(刪除#)
# cfg_dir=/usr/local/nagios/etc/servers
現在建立將儲存每個要監控的伺服器的配置檔案的目錄
# mkdir /usr/local/nagios/etc/servers
配置Nagios聯絡人
在您最喜歡的文字編輯器中開啟Nagios聯絡人配置。我們將使用vi編輯該檔案
# vi /usr/local/nagios/etc/objects/contacts.cfg
找到email指令,並將其值(突出顯示的部分)替換為您自己的電子郵件地址
email nagios@localhost ; <<***** CHANGE THIS TO YOUR EMAIL ADDRESS ******
配置check_nrpe命令
讓我們向Nagios配置新增一個新命令
# vi /usr/local/nagios/etc/objects/commands.cfg
將以下內容新增到檔案的末尾
define command{
command_name             check_nrpe
command_line             $USER1$/check_nrpe -H $HOSTADDRESS$ -c $ARG1$
}
安裝和配置Nagios的Web介面
我們完成了後端的所有配置,現在我們將使用以下命令配置Nagios的Web介面。以下命令將配置Nagios的Web介面,並將建立一個Web管理員使用者“nagiosadmin”。
# make install-webconf
在此步驟中,我們將為“nagiosadmin”建立密碼。執行此命令後,請兩次提供密碼並記住它,因為此密碼將在您登入Nagios Web介面時使用。
# htpasswd -s -c /usr/local/nagios/etc/htpasswd.users nagiosadmin
New password:************
Re-type new password:************
新增nagiosadmin使用者的密碼
重新啟動Apache以使新設定生效。
# service httpd start
Nagios現在正在執行,所以讓我們嘗試登入。
訪問Nagios Web介面
開啟您最喜歡的Web瀏覽器,然後轉到您的Nagios伺服器http://nagios_server_public_IP或私有IP地址/nagios。
因為我們將Apache配置為使用htpasswd,所以您必須輸入您之前建立的登入憑據。我們使用“nagiosadmin”作為使用者名稱

身份驗證後,您將看到預設的Nagios主頁。單擊左側導航欄中的“主機”連結,以檢視Nagios正在監控哪些主機

如您所見,Nagios僅監控“localhost”或自身。

監控/使用NRPE新增新主機
在本節中,我們將向您展示如何向Nagios新增新主機,以便對其進行監控。對於要監控的每臺伺服器,重複此部分。
在要監控的伺服器上,更新apt-get
# yum update
現在安裝Nagios外掛和NRPE
# yum install nagios-plugins nagios-nrpe-server
配置允許的主機
現在,讓我們更新NRPE配置檔案。在您最喜歡的編輯器中開啟它(我們使用vi)
# vi /etc/nagios/nrpe.cfg
找到allowed_hosts指令,並將Nagios伺服器的私有IP地址新增到逗號分隔的列表中(用突出顯示的示例替換它)
allowed_hosts=127.0.0.1,10.132.224.168
儲存並退出。這將配置NRPE以透過其私有IP地址或公共IP地址接受來自Nagios伺服器的請求。
新增主機
# cd /usr/local/nagios/etc
# vi /usr/local/nagios/etc/hosts.cfg
define host{ name linux-box ; 此模板的名稱 use generic-host ; 繼承預設值 check_period 24x7 check_interval 5 retry_interval 1 max_check_attempts 10 check_command check-host-alive notification_period 24x7 notification_interval 30 notification_options d,r contact_groups admins register 0 } define host{ use linux-box ; 從模板繼承預設值 host_name Testbox ; 我們為此伺服器提供的名稱 alias CentOS 6.7 ; 伺服器的更長名稱 address 192.168.1.84 ; 遠端Linux主機的IP地址 }
要新增服務,我們需要編輯services.cfg檔案,我們新增CPU負載、總程序、當前使用者、根分割槽、主目錄分割槽、Ping狀態
# vi /usr/local/nagios/etc/services.cfg
define service{
   use                       generic-service
   host_name                 TestBox
   service_description       CPU Load
   check_command             check_nrpe!check_load
}
define service{
   use                       generic-service
   host_name                 Testbox
   service_description       Total Processes
   check_command             check_nrpe!check_total_procs
}
define service{
   use                       generic-service
   host_name                 Testbox
   service_description       Current Users
   check_command             check_nrpe!check_users
}
define service{
   use                       generic-service
   host_name                 Testbox
   service_description       Root Partition
   check_command             check_nrpe!check_disk
}
define service{
   use                       generic-service
   host_name                 Testbox
   service_description       Home Partition
   check_command             check_nrpe!check_disk_home
}
define service{
   use                      generic-service
   host_name                Testbox
   service_description      Ping Status
   check_command            check_ping!10.0,80%!50.0,90%
}
我們需要在nagios.cfg中新增此配置檔案。
# vi /usr/local/nagios/nagios.cfg

cfg_file=/usr/local/nagios/etc/hosts.cfg
cfg_file=/usr/local/nagios/etc/services.cfg
現在需要在commands.cfg檔案中建立NRPE命令定義。
# vi /usr/local/nagios/etc/objects/commands.cfg
define command{
   command_name check_nrpe
   command_line $USER1$/check_nrpe -H $HOSTADDRESS$ -c $ARG1$
}
最後,驗證Nagios配置檔案中是否存在任何錯誤。
驗證Nagios配置檔案
現在我們完成了Nagios配置,現在該驗證它了,為此,請執行以下命令。如果一切順利,它將顯示類似於以下輸出的結果。
# /usr/local/nagios/bin/nagios -v /usr/local/nagios/etc/nagios.cfg
Output:
Nagios Core 4.1.1
Copyright (c) 2009-present Nagios Core Development Team and Community Contributors
Copyright (c) 1999-2009 Ethan Galstad
Last Modified: 08-19-2015
License: GPL
Website: https://www.nagios.org
Reading configuration data...
Read main config file okay...
Read object config files okay...
Running pre-flight check on configuration data...
Checking objects...
Checked 7 services.
Checked 1 hosts.
Checked 1 host groups.
Checked 0 service groups.
Checked 1 contacts.
Checked 1 contact groups.
Checked 7 commands.
Checked 5 time periods.
Checked 0 host escalations.
Checked 0 service escalations.
Checking for circular paths...
Checked 1 hosts
Checked 0 service dependencies
Checked 0 host dependencies
Checked 1 timeperiods
Checking global event handlers...
Checking obsessive compulsive processor commands...
Checking misc settings...
Total Warnings: 0
Total Errors: 0
Things look okay - No serious problems were detected during the pre-flight check
重新啟動Nagios伺服器
# service nagios reload
Running configuration check...
Stopping nagios: done.
Starting nagios: done.
監控Apache Web伺服器
Nagios也可用於監控Apache Web伺服器。
Apache監控要求
監控Apache伺服器是否可用。這項任務非常容易,因為Nagios為此內建了一個命令,我們需要編輯下面的檔案。
# vi /etc/nagios3/conf.d/services.cfg
define service{
use generic-service
host_name Webserver
service_description Check Apache Web Server
check_command check_http
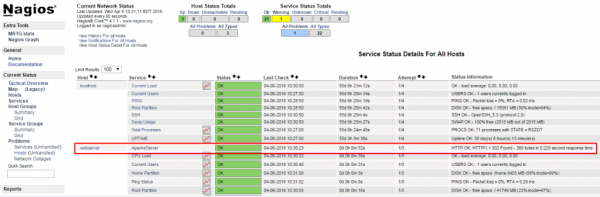
}完成後,請檢查Nagios配置並在我們開啟Web介面並單擊服務後重新啟動服務,我們可以看到Apache服務正在監控。
結論
現在您瞭解了Nagios及其功能,例如監控您的主機和某些服務,您可能需要花一些時間來確定哪些服務對您至關重要,以便您可以開始監控這些伺服器。您可能還需要設定通知,例如,當磁碟利用率達到警告或臨界閾值或您的主要網站關閉時,您會收到電子郵件,以便您可以立即或在問題發生之前解決問題。

2K+ 次瀏覽
