
 資料結構
資料結構 網路
網路 關係資料庫管理系統 (RDBMS)
 作業系統
作業系統 Java
Java iOS
iOS HTML
HTML CSS
CSS Android
 Python
 C 程式設計
 C++
C++ C#
C# MongoDB
 MySQL
MySQL Javascript
 PHP
PHP配置 Exim4 SMTP 中繼伺服器
本文將指導您配置 Exim4 SMTP 中繼伺服器,該伺服器僅允許您為已知的域名和 IP 地址轉發電子郵件。通常,此類服務用於轉發伺服器執行狀況狀態報告的通知電子郵件,其中實際電子郵件地址不存在或傳送自動回覆電子郵件。
簡介
Exim4 是劍橋大學開發的一種郵件傳輸代理 (MTA),用於連線到網際網路的 Unix 系統。可以安裝 Exim4 來替換 Sendmail 或 Postfix,儘管 Exim4 的配置與 sendmail 的配置大相徑庭。
安裝
要安裝 exim4,請使用以下命令:
# hostname testserver.com
# sudo –i (to Enter with root permissions)
# apt-get update
# apt-get install exim4
示例輸出應如下所示:
Reading package lists... Done
Building dependency tree
Reading state information... Done
The following extra packages will be installed:
exim4-base exim4-config exim4-daemon-light heirloom-mailx
Suggested packages:
mail-reader eximon4 exim4-doc-html exim4-doc-info spf-tools-perl swaks
Recommended packages:
mailx
The following NEW packages will be installed:
exim4 exim4-base exim4-config exim4-daemon-light heirloom-mailx
0 upgraded, 5 newly installed, 0 to remove and 66 not upgraded.
Need to get 1,862 kB of archives.
After this operation, 4,258 kB of additional disk space will be used.
Do you want to continue? [Y/n] y
Get:1 http://us.archive.ubuntu.com/ubuntu/ wily/main exim4-config all 4.86-3 ubuntu1 [299 kB]
Get:2 http://us.archive.ubuntu.com/ubuntu/ wily/main exim4-base amd64 4.86-3ubuntu1 [869 kB]
Get:3 http://us.archive.ubuntu.com/ubuntu/ wily/main exim4-daemon-light amd64 4.86-3ubuntu1 [465 kB]
Get:4 http://us.archive.ubuntu.com/ubuntu/ wily/main exim4 all 4.86-3ubuntu1 [7,916 B]
Get:5 http://us.archive.ubuntu.com/ubuntu/ wily/universe heirloom-mailx amd64 12.5-5 [221 kB]
Fetched 1,862 kB in 49s (37.7 kB/s)
Preconfiguring packages ...
Selecting previously unselected package exim4-config.
(Reading database ... 91615 files and directories currently installed.)
Preparing to unpack .../exim4-config_4.86-3ubuntu1_all.deb ...
Unpacking exim4-config (4.86-3ubuntu1) ...
................................................
我們需要配置 exim4 來中繼電子郵件。
# dpkg-reconfigure exim4-config
輸出應如下所示: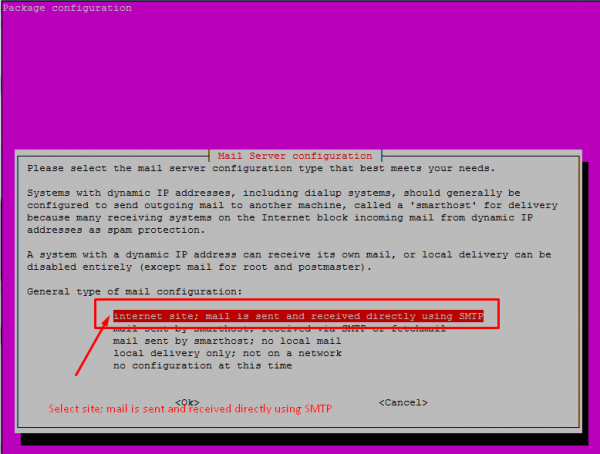
選擇 **“internet site; mail is sent and received directly using SMTP”** 選項

提供 **Exim4 SMTP** 伺服器的伺服器名稱。預設情況下,它將採用機器的主機名。
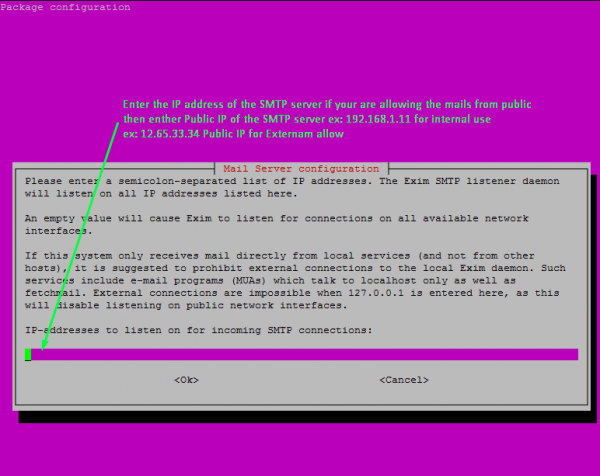
提供您要從中接收請求併發送電子郵件的 IP 地址。
在這裡,您可以為多個 IP 提供用分號分隔的 IP 地址列表。
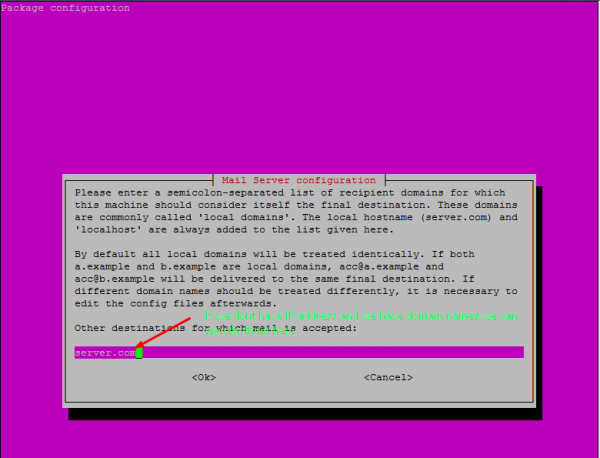
輸入此 SMTP 將為其轉發郵件的客戶端接收方域的域名地址。
請注意,您可以為多個域提供用分號分隔的域名地址列表。
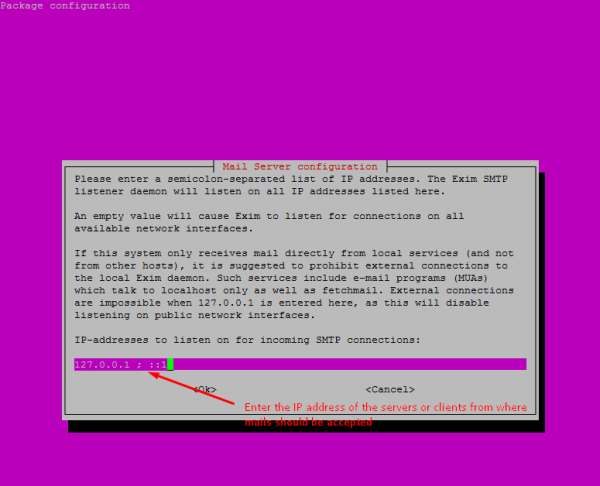
輸入此係統將無條件轉發郵件的 IP 地址範圍的用分號分隔的列表。(充當智慧主機)。這通常是將要使用的本地主機。
將 **保持 DNS 查詢數量最少 (按需撥號)** 選擇為 **否**(以前,我們使用的是撥號連線,但目前大多數網際網路使用者都使用寬頻連線)

選擇本地郵件的傳遞方法。在這裡,我已經在 **home** **目錄**中選擇了 **Maildir 格式**

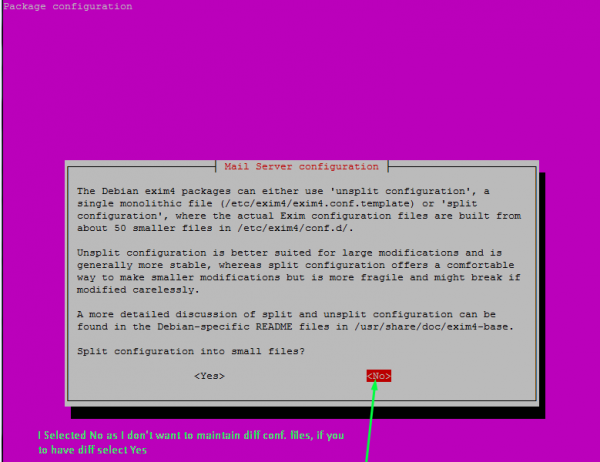
將 **將配置拆分為小檔案?** 選擇為 **否**。如果您有興趣將配置儲存到小檔案中,則可以選擇 **是**
現在您已完成,您的 SMTP 伺服器已準備好轉發任何通知傳送的電子郵件。在 SMTP 伺服器地址配置中使用此機器的 IP 地址,或者如果已註冊域名,則使用域名。
配置後,我們可以使用相同的配置命令新增客戶端,或者可以直接編輯配置檔案並將其他客戶端新增到此 SMTP 伺服器中使用。
開啟配置檔案並編輯或新增客戶端 IP 或域名
# vi /etc/exim4/update-exim4.conf.conf
**update-exim4.conf.conf** 檔案應如下所示:
## Edit this file and /etc/mailname by hand and execute update-exim4.conf
# yourself or use 'dpkg-reconfigure exim4-config'#
# Please note that this is _not_ a dpkg-conffile and that automatically changes
# to this file might happen. The code handling this will honor your local
# changes, so this is usually fine, but will break local schemes that mess
# around with multiple versions of the file.
## update-exim4.conf uses this file to determine variable values to generate
# exim configuration macros for the configuration file.
## Most settings found in here do have corresponding questions in the
# Debconf configuration, but not all of them.
## This is a Debian specific file
dc_eximconfig_configtype='internet'
dc_other_hostnames='server.com'
dc_local_interfaces='127.0.0.1'
dc_readhost=''
dc_relay_domains='192.168.1.1'
dc_minimaldns='false'
dc_relay_nets='cgi.com'
dc_smarthost=''
CFILEMODE='644'
dc_use_split_config='false'
dc_hide_mailname=''
dc_mailname_in_oh='true'
dc_localdelivery='maildir_home'
現在,使用分號分隔符編輯配置中的以下行
dc_relay_nets 用於新增客戶端/伺服器的 IP 地址
dc_relay_domains 用於新增客戶端/伺服器的域名
成功配置後,您可以使用此伺服器從您的伺服器和客戶端傳送或轉發電子郵件,以傳送程式或專案的通知。

6K+ 次瀏覽
