
 資料結構
資料結構 網路
網路 關係資料庫管理系統(RDBMS)
 作業系統
作業系統 Java
Java iOS
iOS HTML
HTML CSS
CSS Android
 Python
 C語言程式設計
 C++
C++ C#
C# MongoDB
 MySQL
MySQL Javascript
 PHP
PHP如何在EditText中更改線條顏色
在某些情況下,我們需要根據背景顏色更改編輯文字底線顏色。本例演示如何在EditText中更改線條顏色。
步驟1 − 在Android Studio中建立一個新專案,轉到檔案⇒新建專案,並填寫所有必需的詳細資訊以建立新專案。
步驟2 − 將以下程式碼新增到res/layout/activity_main.xml。
<?xml version="1.0" encoding="utf-8"?>
<LinearLayout xmlns:android="http://schemas.android.com/apk/res/android"
   android:id="@+id/parent"
   xmlns:tools="http://schemas.android.com/tools"
   android:layout_width="match_parent"
   android:layout_height="match_parent"
   tools:context=".MainActivity"
   android:gravity="center"
   android:orientation="vertical">
   <EditText
      android:id="@+id/editText"
      android:hint="Bottom line color change"
      android:layout_width="wrap_content"
      android:backgroundTint="@android:color/holo_green_light"
      android:layout_height="wrap_content" >
   </EditText>
</LinearLayout>
在上面的程式碼中,我們使用了EditText。要更改線條顏色,請對EditText使用以下程式碼:
android:backgroundTint="@android:color/holo_green_light"
我們可以根據專案需求更改顏色。我們使用綠色作為示例。
步驟3 − 將以下程式碼新增到src/MainActivity.java
package com.example.andy.myapplication;
import android.os.Build;
import android.os.Bundle;
import android.support.annotation.RequiresApi;
import android.support.v7.app.AppCompatActivity;
public class MainActivity extends AppCompatActivity {
   int view = R.layout.activity_main;
   @RequiresApi(api = Build.VERSION_CODES.JELLY_BEAN)
   @Override
   protected void onCreate(Bundle savedInstanceState) {
      super.onCreate(savedInstanceState);
      setContentView(view);
   }
}
讓我們嘗試執行您的應用程式。我假設您已將您的實際Android移動裝置連線到您的計算機。要從Android Studio執行應用程式,請開啟專案的其中一個活動檔案,然後單擊工具欄中的“執行Eclipse執行圖示”圖示。選擇您的移動裝置作為選項,然後檢查您的移動裝置,它將顯示您的預設螢幕:
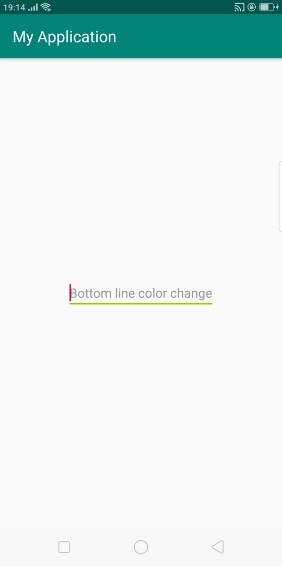
在上述結果中,我們更改了線條顏色。
點選這裡下載專案程式碼

更新於:2019年7月30日
3K+ 瀏覽量

廣告