
 資料結構
資料結構 網路
網路 RDBMS
RDBMS 作業系統
作業系統 Java
Java iOS
iOS HTML
HTML CSS
CSS Android
 Python
 C 程式設計
 C++
C++ C#
C# MongoDB
 MySQL
MySQL Javascript
 PHP
PHP如何在 Android Kotlin 中在延遲後呼叫方法?
此示例演示瞭如何在 Android Kotlin 中在延遲後呼叫方法。
步驟 1 − 在 Android Studio 中建立一個新專案,轉到檔案?新建專案並填寫所有必需的詳細資訊來建立一個新專案。
步驟 2 − 將以下程式碼新增到 res/layout/activity_main.xml。
示例
<?xml version="1.0" encoding="utf-8"?>
<RelativeLayout xmlns:android="http://schemas.android.com/apk/res/android"
xmlns:tools="http://schemas.android.com/tools"
   android:layout_width="match_parent"
   android:layout_height="match_parent"
   android:padding="16sp"
   tools:context=".MainActivity">
   <TextView
      android:id="@+id/textViewTitle"
      android:layout_width="wrap_content"
      android:layout_height="wrap_content"
      android:layout_centerHorizontal="true"
      android:layout_marginTop="50dp"
      android:padding="8dp"
      android:text="Tutorials Point"
      android:textColor="@color/colorPrimaryDark"
      android:textSize="48sp"
      android:textStyle="bold" />
   <TextView
      android:layout_width="wrap_content"
      android:layout_height="wrap_content"
      android:layout_below="@id/textViewTitle"
      android:layout_centerInParent="true"
      android:text="Wait for the Toast to display."
      android:textColor="@android:color/background_dark"
      android:textSize="24sp"
      android:textStyle="bold" />
   <TextView
      android:id="@+id/textView"
      android:layout_width="wrap_content"
      android:layout_height="wrap_content"
      android:layout_centerInParent="true"
      android:textColor="@android:color/holo_blue_dark"
      android:textSize="24sp"
      android:textStyle="bold" />
</RelativeLayout>
步驟 3 − 將以下程式碼新增到 src/MainActivity.kt
示例
import android.os.Bundle
import android.os.Handler
import android.widget.TextView
import android.widget.Toast
import androidx.appcompat.app.AppCompatActivity
class MainActivity : AppCompatActivity() {
   lateinit var textView: TextView
   private val string = "Delay by 5 seconds"
   override fun onCreate(savedInstanceState: Bundle?) {
      super.onCreate(savedInstanceState)
      setContentView(R.layout.activity_main)
      title = "KotlinApp"
      textView = findViewById(R.id.textView)
      val handler = Handler()
      handler.postDelayed({ testToast() }, 5000)
   }
   private fun testToast() {
      Toast.makeText(this, "This method is called after a delay!", Toast.LENGTH_SHORT).show()
      textView.text = string
   }
}
步驟 4 − 將以下程式碼新增到 androidManifest.xml
示例
<?xml version="1.0" encoding="utf-8"?>
<manifest xmlns:android="http://schemas.android.com/apk/res/android" package="app.com.kotlipapp">
   <application
      android:allowBackup="true"
      android:icon="@mipmap/ic_launcher"
      android:label="@string/app_name"
      android:roundIcon="@mipmap/ic_launcher_round"
      android:supportsRtl="true"
      android:theme="@style/AppTheme">
      <activity android:name=".MainActivity">
         <intent-filter>
            <action android:name="android.intent.action.MAIN" />
            <category android:name="android.intent.category.LAUNCHER" />
         </intent-filter>
      </activity>
   </application>
</manifest>
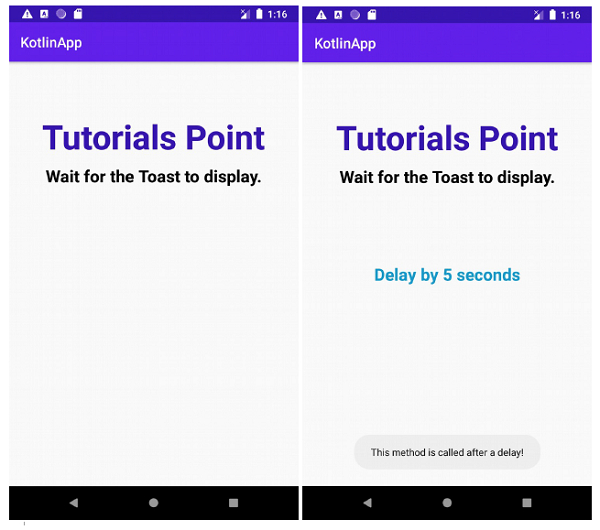
讓我們嘗試執行你的應用程式。我假設你已將你的 Android 移動裝置與計算機連線。要從 Android Studio 執行應用程式,請開啟你專案的某個活動檔案並單擊工具欄中的執行圖示![]() 。選擇你的移動裝置作為選項,然後檢視你的移動裝置它會顯示你的預設螢幕 −
。選擇你的移動裝置作為選項,然後檢視你的移動裝置它會顯示你的預設螢幕 −

更新於: 23-May-2020
768 次瀏覽

廣告