
 資料結構
資料結構 網路
網路 關係資料庫管理系統
 作業系統
作業系統 Java
Java iOS
iOS HTML
HTML CSS
CSS Android
 Python
 C 程式設計
 C++
C++ C#
C# MongoDB
 MySQL
MySQL Javascript
 PHP
PHP如何使用 Swift 以程式設計方式新增約束
本文旨在解釋如何在 Swift 語言中以程式設計方式新增約束。
要以程式設計方式在 Swift 中新增約束,可以使用 NSLayoutConstraint 類來定義要新增的約束。
用於新增約束的概念如下
translatesAutoresizingMaskIntoConstraints 是 UIKit 框架中 UIView 的一個屬性。它是一個布林值,用於確定檢視的 autoresizingMask 屬性是否轉換為自動佈局約束。當 translatesAutoresizingMaskIntoConstraints 設定為 NO 時,將忽略 autoresizingMask,並且檢視將根據使用自動佈局系統設定的任何約束進行調整大小。
widthAnchor 是 UIKit 框架中 UIView 的一個屬性,它指的是表示檢視寬度的佈局錨點。
heightAnchor 是 UIKit 框架中 UIView 的一個屬性,它指的是表示檢視高度的佈局錨點。
leadingAnchor 是 UIKit 框架中 UIView 的一個屬性,它指的是表示檢視前緣的佈局錨點。對於從左到右的語言,前緣是檢視的左邊緣;對於從右到左的語言,前緣是檢視的右邊緣。
trailingAnchor 是 UIKit 框架中 UIView 的一個屬性,它指的是表示檢視後緣的佈局錨點。對於從左到右的語言,後緣是檢視的右邊緣;對於從右到左的語言,後緣是檢視的左邊緣。
constraint(equalTo:) 是 UIKit 框架中 NSLayoutAnchor 類的一個方法,用於在兩個佈局錨點之間建立約束。該約束指定一個檢視的佈局屬性應等於另一個檢視的佈局屬性。
以下是如何在 Swift 中向檢視新增約束的示例
在本例中,您將學習如何一步一步以程式設計方式新增子檢視。讓我們開始吧。
基本設定
在此步驟中,您將建立一個基本登入螢幕,並進行如下所示的初始設定
import UIKit
class RegisterViewController: UIViewController {
   override func viewDidLoad() {
      super.viewDidLoad()
      setupUIComponents()
   }
   private func setupUIComponents() {
      view.backgroundColor = .white
      // add all views here
   }
}
解釋
在上面的程式碼中,我們建立了一個 RegisterViewController 類來設計一個基本的註冊螢幕。此外,在本例中,我們將學習如何向 UI 元件新增約束以繪製螢幕。
個人資料圖片設定
在本節中,我們將設定一個個人資料圖片檢視。
// profile image view customization
private let profileImageView: UIImageView = {
   let imageView = UIImageView()
   imageView.contentMode = .scaleAspectFill
   imageView.layer.cornerRadius = 16
   imageView.layer.masksToBounds = true
   imageView.backgroundColor = UIColor(white: 0, alpha: 0.1)
   return imageView
}()
private func setupUIComponents() {
   view.backgroundColor = .white

   // adding constraints to profileImageView
   view.addSubview(profileImageView)
   profileImageView.translatesAutoresizingMaskIntoConstraints = false
   profileImageView.widthAnchor.constraint(equalToConstant: 150).isActive = true
   profileImageView.heightAnchor.constraint(equalToConstant: 150).isActive = true
   profileImageView.centerXAnchor.constraint(equalTo: view.centerXAnchor).isActive = true
   profileImageView.topAnchor.constraint(equalTo: view.topAnchor, constant: 100).isActive = true
}
在上面的示例中,您已初始化並自定義了個人資料圖片檢視。之後新增約束以將其顯示在螢幕上。
電子郵件文字欄位設定
在本節中,我們將設定一個電子郵件文字欄位。
private let emailTextField: UITextField = {
   let textField = UITextField()
   textField.keyboardType = .emailAddress
   textField.layer.cornerRadius = 8
   textField.layer.masksToBounds = true
   textField.layer.borderWidth = 1.0
   textField.layer.borderColor = UIColor(white: 0, alpha:0.3).cgColor
   textField.placeholder = "Email Address"
   textField.textAlignment = .center
   return textField
}()
private func setupUIComponents() {
   view.backgroundColor = .white

   // adding constraints to email text field
   view.addSubview(emailTextField)
   emailTextField.translatesAutoresizingMaskIntoConstraints = false
   emailTextField.leadingAnchor.constraint(equalTo:view.leadingAnchor, constant: 30).isActive = true
   emailTextField.trailingAnchor.constraint(equalTo:view.trailingAnchor, constant: -30).isActive = true
   emailTextField.heightAnchor.constraint(equalToConstant:50).isActive = true
   emailTextField.topAnchor.constraint(equalTo:profileImageView.bottomAnchor, constant: 60).isActive = true
}
在上面的示例中,您已初始化並自定義了一個文字欄位以輸入電子郵件地址。之後新增約束以將其顯示在螢幕上。
密碼文字欄位設定
在本節中,我們將設定一個密碼文字欄位。
private let passwordTextField: UITextField = {
   let textField = UITextField()
   textField.layer.cornerRadius = 8
   textField.layer.masksToBounds = true
   textField.isSecureTextEntry = true
   textField.layer.borderWidth = 1.0
   textField.layer.borderColor = UIColor(white: 0, alpha:
   0.3).cgColor
   textField.placeholder = "Password"
   textField.textAlignment = .center
   return textField
}()
private func setupUIComponents() {
   view.backgroundColor = .white

   // adding constraints to passwordTextField
   view.addSubview(passwordTextField)
   passwordTextField.translatesAutoresizingMaskIntoConstraints =   false
   passwordTextField.leadingAnchor.constraint(equalTo: view.leadingAnchor, constant: 30).isActive = true
   passwordTextField.trailingAnchor.constraint(equalTo:view.trailingAnchor, constant: -30).isActive = true
   passwordTextField.heightAnchor.constraint(equalToConstant: 50).isActive = true
   passwordTextField.topAnchor.constraint(equalTo: emailTextField.bottomAnchor, constant: 30).isActive = true
}
在上面的示例中,您已初始化並自定義了一個文字欄位以輸入密碼。之後新增約束以將其顯示在螢幕上。
註冊按鈕設定
在本節中,我們將設定一個註冊按鈕。
private let registerButton: UIButton = {
   let button = UIButton(type: .system)
   button.backgroundColor = .darkGray
   button.setTitle("Register", for: .normal)
   button.setTitleColor(.white, for: .normal)
   button.layer.cornerRadius = 8
   button.layer.masksToBounds = true
   return button
}()
private func setupUIComponents() {
   view.backgroundColor = .white

   // adding constraints to register button
   view.addSubview(registerButton)
   registerButton.translatesAutoresizingMaskIntoConstraints = false
   registerButton.leadingAnchor.constraint(equalTo: view.leadingAnchor, constant: 30).isActive = true
   registerButton.trailingAnchor.constraint(equalTo: view.trailingAnchor, constant: -30).isActive = true
   registerButton.heightAnchor.constraint(equalToConstant: 50).isActive = true
   registerButton.topAnchor.constraint(equalTo: passwordTextField.bottomAnchor, constant: 50).isActive = true
}
在上面的示例中,您自定義了一個用於註冊功能的按鈕。
最終輸出
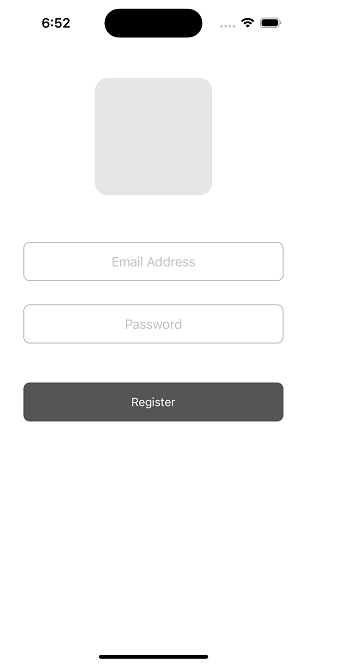
這裡需要注意的一些要點
在新增約束之前,應將檢視新增到父檢視。
在以程式設計方式新增約束的情況下,translatesAutoresizingMaskIntoConstraints 應為 false。
小心地新增相關約束,否則檢視可能無法在螢幕上正確顯示。
結論
以程式設計方式新增約束非常有趣且簡單,但在新增約束時要小心。應仔細應用依賴約束。您可以應用不同型別的約束,例如寬度、高度、前緣、後緣、頂部和底部。

12K+ 瀏覽量
