
 資料結構
資料結構 網路
網路 關係型資料庫管理系統
 作業系統
作業系統 Java
Java iOS
iOS HTML
HTML CSS
CSS Android
 Python
 C語言程式設計
 C++
C++ C#
C# MongoDB
 MySQL
MySQL Javascript
 PHP
PHP如何在Android中實現類似於FlowLayout的功能?
在Android應用程式中,我們經常需要向用戶逐步解釋如何在應用程式中執行特定任務,例如如何預訂應用程式提供的服務。為此,我們需要以流程佈局的形式顯示詳細的指南。
本文將探討如何在Android中建立類似於流程佈局的功能。
實現
我們將建立一個簡單的應用程式,其中顯示一個簡單的文字檢視。建立文字檢視後,我們將建立一個步驟檢視,用於顯示應用程式開發生命週期中需要遵循的基本步驟。現在,我們將轉向Android Studio建立一個新專案。
步驟 1:在Android Studio中建立新專案
導航到Android Studio,如下面的螢幕截圖所示。在下面的螢幕截圖中,點選“新建專案”以建立新的Android Studio專案。

點選“新建專案”後,您將看到下面的螢幕。

在此螢幕中,只需選擇“空活動”,然後點選“下一步”。點選“下一步”後,您將看到下面的螢幕。
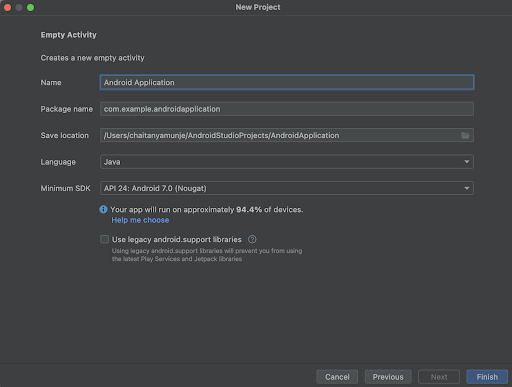
在此螢幕中,只需指定專案名稱。然後包名將自動生成。
注意 - 確保將語言選擇為Java。
指定完所有詳細資訊後,點選“完成”以建立新的Android Studio專案。
專案建立完成後,我們將看到兩個開啟的檔案,即activity_main.xml和MainActivity.java檔案。
步驟 2:在build.gradle檔案中新增Step View的依賴項
導航到Gradle Scripts > build.gradle檔案,並在dependencies部分中新增以下依賴項。
implementation 'com.github.shuhart:stepview:1.5.1'
新增上述依賴項後,只需同步您的專案以安裝它。
步驟 3:使用activity_main.xml
導航到activity_main.xml。如果此檔案不可見,要開啟此檔案,在左側窗格中導航到app > res > layout > activity_main.xml以開啟此檔案。開啟此檔案後,向其中新增以下程式碼。程式碼中添加了註釋以便於詳細瞭解。
<?xml version="1.0" encoding="utf-8"?>
<RelativeLayout xmlns:android="http://schemas.android.com/apk/res/android"
   xmlns:app="http://schemas.android.com/apk/res-auto"
   xmlns:tools="http://schemas.android.com/tools"
   android:layout_width="match_parent"
   android:layout_height="match_parent"
   android:layoutDirection="ltr"
   android:paddingTop="8dp"
   android:paddingBottom="8dp"
   tools:context=".MainActivity">
   <!--     creating a text view on below line-->
   <TextView
       android:layout_width="match_parent"
       android:layout_height="wrap_content"
       android:layout_above="@id/step_view"
       android:layout_centerInParent="true"
       android:layout_marginStart="20dp"
       android:layout_marginTop="20dp"
       android:layout_marginEnd="20dp"
       android:layout_marginBottom="20dp"
       android:padding="4dp"
       android:text="Flow Layout in Android"
       android:textAlignment="center"
       android:textColor="@color/black"
       android:textSize="20sp"
       android:textStyle="bold" />
   <!--     creating a step view on below line-->
   <com.shuhart.stepview.StepView
       android:id="@+id/step_view"
       android:layout_width="match_parent"
       android:layout_height="wrap_content"
       android:layout_centerInParent="true"
       android:background="@color/purple_500"
       android:backgroundTint="@color/purple_500"
       android:layoutDirection="ltr"
       android:padding="16dp"
       app:layout_constraintLeft_toLeftOf="parent"
       app:layout_constraintRight_toRightOf="parent"
       app:sv_animationType="All"
       app:sv_doneTextColor="@color/purple_500"
       app:sv_nextTextColor="@color/white"
       app:sv_selectedCircleColor="@color/white"
       app:sv_selectedCircleRadius="18dp"
       app:sv_selectedTextColor="@color/white"
       app:sv_stepNumberTextSize="18sp"
       app:sv_stepPadding="12dp"
       app:sv_textSize="12sp"
       tools:ignore="MissingConstraints" />
   <!-- creating linear layout for buttons on below line -->
   <LinearLayout
       android:layout_width="match_parent"
       android:layout_height="wrap_content"
       android:layout_below="@id/step_view"
       android:orientation="horizontal"
       android:weightSum="2">
       <!-- creating a button for next on below line -->
       <Button
           android:id="@+id/idBtnNxt"
           android:layout_width="0dp"
           android:layout_height="wrap_content"
           android:layout_margin="16dp"
           android:layout_weight="1"
           android:backgroundTint="@color/purple_500"
           android:text="Next"
           android:textAllCaps="false" />
       <!-- creating a button for back on below line -->
       <Button
           android:id="@+id/idBtnBack"
           android:layout_width="0dp"
           android:layout_height="wrap_content"
           android:layout_margin="16dp"
           android:layout_weight="1"
           android:backgroundTint="@color/purple_500"
           android:text="Back"
           android:textAllCaps="false" />
   </LinearLayout>
</RelativeLayout>
說明:在上面的程式碼中,我們建立了一個根佈局作為相對佈局。在此佈局內,我們建立了一個文字檢視,用於顯示應用程式的標題。之後,我們建立了一個StepView,我們將使用它以流程的形式顯示構建Android應用程式的步驟。之後,我們建立了一個水平線性佈局。在此線性佈局內,我們將建立兩個按鈕:下一步按鈕和後退按鈕。點選“下一步”將轉到下一步,點選“後退”將返回上一步。
步驟 4:使用MainActivity.java檔案
導航到MainActivity.java。如果此檔案不可見,要開啟此檔案,在左側窗格中導航到app > res > layout > MainActivity.java以開啟此檔案。開啟此檔案後,向其中新增以下程式碼。程式碼中添加了註釋以便於詳細瞭解。
package com.example.java_test_application;

import android.os.Bundle;
import android.util.Log;
import android.view.View;
import android.widget.Button;
import android.widget.TextView;
import android.widget.Toast;
import androidx.appcompat.app.AppCompatActivity;
import androidx.core.content.ContextCompat;
import androidx.core.content.res.ResourcesCompat;
import com.shuhart.stepview.StepView;
import java.util.ArrayList;
import java.util.List;

public class MainActivity extends AppCompatActivity {

   // creating variables on below line for current number of steps.
   private int currentStep = 0;
   // creating variables for buttons and step view on below line
   private Button nextBtn, backBtn;
   private StepView stepView;

   @Override
   protected void onCreate(Bundle savedInstanceState) {
       super.onCreate(savedInstanceState);
       setContentView(R.layout.activity_main);
       //initializing variable for steps view on below line.
       stepView = findViewById(R.id.step_view);
       nextBtn = findViewById(R.id.idBtnNxt);
       backBtn = findViewById(R.id.idBtnBack);
       // creating an array list for the steps to be displayed in steps view.
       List<String> steps = new ArrayList<String>() {{
           add("App
Strategy");
           add("Analysis &
Planning");
           add("UI/UX
Design");
           add("App
Development");
           add("Application
Testing");
       }};

       // adding click listner for each step in step view.
       stepView.setOnStepClickListener(new StepView.OnStepClickListener() {
           @Override
           public void onStepClick(int step) {
               // displaying action for each step in the form of toast message.
               Toast.makeText(MainActivity.this, steps.get(step), Toast.LENGTH_SHORT).show();
           }
       });

       // on below line adding click listner for our next button.
       nextBtn.setOnClickListener(new View.OnClickListener() {
           @Override
           public void onClick(View v) {
               // on below line checking if current step is < step view.
               if (currentStep < stepView.getStepCount() - 1) {
                   // increasing current steps.
                   currentStep++;
                   // on below line going forward on step view.
                   stepView.go(currentStep, true);
               } else {
                   // on below line setting step view to true.
                   stepView.done(true);
               }
               // on below line checking for last step.
               if (currentStep == stepView.getStepCount() - 1) {
                   // if last step is reach displaying below toast message.
                   Toast.makeText(MainActivity.this, "Application ready for release..", Toast.LENGTH_SHORT).show();
               }
           }
       });

       // adding click listener for back button
       backBtn.setOnClickListener(new View.OnClickListener() {
           @Override
           public void onClick(View v) {
               // on below line checking for the steps.
               if (currentStep > 0) {
                   // decreasing current step.
                   currentStep--;
               }
               // on below line adding step view to done.
               stepView.done(false);
               // on below line setting step view to go.
               stepView.go(currentStep, true);
           }
       });
       // on below line setting steps for step view.
       stepView.setSteps(steps);
   }
}
說明 - 在上面的程式碼中,首先我們為按鈕、步驟檢視和一個變數建立變數,該變數將儲存使用者當前所在的步驟。現在我們將看到onCreate方法。這是每個Android應用程式的預設方法。當應用程式檢視建立時,將呼叫此方法。在此方法內,我們設定內容檢視,即名為activity_main.xml的佈局檔案,以從該檔案設定UI。在onCreate方法內,我們使用我們在activity_main.xml檔案中提供的id初始化步驟檢視和按鈕。之後,我們在其中指定我們已在步驟檢視或流程佈局中顯示的步驟的字串陣列列表。
之後,我們為步驟檢視添加了一個點選監聽器,以便當使用者點選步驟檢視中的任何步驟時,我們將為此特定步驟顯示一個吐司訊息。之後,我們為“下一步”按鈕添加了一個點選監聽器。在此方法的點選監聽器內,我們首先檢查當前步驟變數,然後將步驟檢視移動到下一步並增加當前步驟變數。之後,我們檢查當前步驟是否已到達最後一步。在這種情況下,我們將再次顯示一條吐司訊息,表示已到達最後一步,應用程式已準備好部署。
之後,我們為“後退”按鈕添加了一個點選監聽器。在點選方法內,我們檢查當前步驟是否大於0,然後我們減少當前步驟變數並使用步驟檢視。最後,我們將步驟陣列列表新增到步驟檢視。
新增上述程式碼後,現在只需點選頂部的綠色圖示即可在移動裝置上執行我們的應用程式。
注意 - 確保已連線到您的真實裝置或模擬器。
輸出
結論
在本文中,我們探討了如何在Android應用程式中建立類似於流程佈局的功能。

534 次瀏覽
