
 資料結構
資料結構 網路
網路 關係型資料庫管理系統
 作業系統
作業系統 Java
Java iOS
iOS HTML
HTML CSS
CSS Android
 Python
 C 程式設計
 C++
C++ C#
C# MongoDB
 MySQL
MySQL Javascript
 PHP
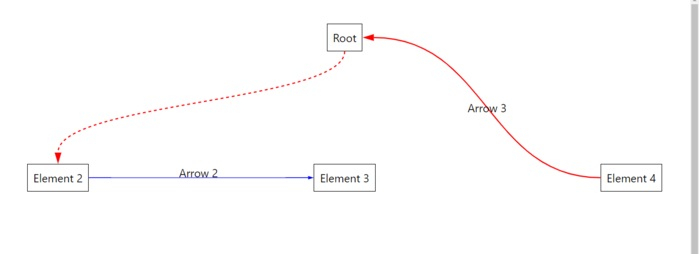
PHP使用 react-archer 在 React JS 中繪製 DOM 元素之間的箭頭
在本文中,我們將瞭解如何在 React JS 中繪製流程圖狀的箭頭來連線不同的 DOM 元素。您可以使用此功能建立獨特的網頁設計。這裡我們將使用 **react-archer** 包來繪製連線 DOM 元素的箭頭。
DOM 元素類似於頁面上的 DIV、HTML、BODY 元素。您可以使用 CSS 為所有這些元素新增類,或使用 JS 與它們互動。
示例
首先建立一個 React 專案 -
npx create-react-app tutorialpurpose
現在轉到專案目錄 -
cd tutorialpurpose
下載並安裝 **react-archer** 包 -
npm install react-archer
我們將使用 **react-archer** 包新增箭頭並連線不同的 DOM 元素。
現在,在 **App.js** 中插入以下程式碼行:-
import { ArcherContainer, ArcherElement } from "react-archer";

const rootStyle = { display: "flex", justifyContent: "center" };
const rowStyle = {
   margin: "200px 0",
   display: "flex",
   justifyContent: "space-between",
};

const boxStyle = { padding: "10px", border: "1px solid black" };

const App = () => {
   return (
      <div style={{ height: "500px", margin: "50px" }}>
         <ArcherContainer strokeColor="red">
            <div style={rootStyle}>
               <ArcherElement
                   id="root"
                   relations={[
                     {
                        targetId: "element2",
                        targetAnchor: "top",
                        sourceAnchor: "bottom",
                        style: { strokeDasharray: "5,5" },
                      },
                  ]}
                >
                <div style={boxStyle}>Root</div>
               </ArcherElement>
            </div>
            <div style={rowStyle}>
               <ArcherElement
               id="element2"
               relations={[
                  {
                     targetId: "element3",
                     targetAnchor: "left",
                     sourceAnchor: "right",
                     style: { strokeColor: "blue", strokeWidth: 1 },
                     label: <div style={{ marginTop: "-20px"}}>Arrow 2</div>,
                  },
               ]}
            >
            <div style={boxStyle}>Element 2</div>
                </ArcherElement>
                <ArcherElement id="element3">
                   <div style={boxStyle}>Element 3</div>
               </ArcherElement>

              <ArcherElement
                 id="element4"
                 relations={[
                    {
                       targetId: "root",
                       targetAnchor: "right",
                       sourceAnchor: "left",
                       label: "Arrow 3",
                   },
               ]}
            >
            <div style={boxStyle}>Element 4</div>
            </ArcherElement>
         </div>
      </ArcherContainer>
   </div>
   );
};
export default App;
解釋
概念很簡單。我們在其中包含 DOM 元素,建立了一個 **Archer** 元素。
每個 **Archer** 元素都將具有 **唯一的 ID** 和一個 **relation** 屬性,該屬性將指示許多內容,例如 -
箭頭應從源 DOM 的哪個部分生成,
箭頭應指向的目標 DOM,以及
箭頭應指向哪一側等。
所有這些內容都將在 **relation** 屬性中定義。
輸出
執行後,它將生成以下輸出 -

更新於: 2021 年 9 月 29 日
2K+ 次檢視

廣告