
 資料結構
資料結構 網路
網路 關係資料庫管理系統 (RDBMS)
 作業系統
作業系統 Java
Java iOS
iOS HTML
HTML CSS
CSS Android
 Python
 C語言程式設計
 C++
C++ C#
C# MongoDB
 MySQL
MySQL Javascript
 PHP
PHP使用Python的Pygame建立雷達掃描動畫
Pygame是一個跨平臺的Python模組集,用於編寫影片遊戲。它包含專為Python程式語言設計的計算機圖形和聲音庫。Pygame不是遊戲開發引擎,而是一套工具和庫,允許開發者用Python建立2D遊戲。
Pygame提供了各種函式和類來幫助開發者建立遊戲,包括影像載入和處理、聲音播放和錄製、鍵盤和滑鼠輸入處理、精靈和組管理以及碰撞檢測。它還包含對動畫、滾動和基於平鋪的地圖等常見遊戲開發任務的內建支援。
Pygame是開源的且免費使用,它可以在Windows、macOS、Linux和其他平臺上執行。它經常在教育環境中用作遊戲開發入門或教學程式設計概念的工具。
雷達掃描動畫的組成部分
基本的雷達掃描動畫包括以下元件:
雷達圓圈 - 代表雷達範圍的圓圈。它以原點為中心,具有固定半徑。
雷達掃描線 - 圍繞圓心旋轉的線。它代表雷達發射的光束,並掃描360度。
雷達目標 - 我們想用雷達檢測的物件。它們以螢幕上的點表示。
現在我們知道了雷達掃描動畫的組成部分,讓我們深入研究使用Pygame的實現。
先決條件
在我們深入任務之前,需要在您的系統上安裝一些東西:
系統:
推薦設定列表:
pip install Numpy, pygame 和 Math
使用者應該能夠訪問任何獨立的IDE,例如VSCode、PyCharm、Atom或Sublime text。
也可以使用線上Python編譯器,例如Kaggle.com、Google Cloud Platform或任何其他編譯器。
更新版本的Python。在撰寫本文時,我使用了3.10.9版本。
Jupyter notebook的使用知識。
虛擬環境的知識和應用將是有益的,但不是必需的。
還期望使用者對統計學和數學有良好的理解。
實現細節
匯入庫 - 我們將首先匯入必要的庫 - Pygame、NumPy和Math。
import pygame
import math
import random
初始化遊戲視窗 - 我們將使用Pygame庫初始化具有所需寬度和高度的遊戲視窗。
WIDTH = 800
HEIGHT = 600
pygame.init()
screen = pygame.display.set_mode((WIDTH, HEIGHT))
pygame.display.set_caption("Radar Sweep Animation")
clock = pygame.time.Clock()
設定遊戲環境 - 我們將透過定義動畫的顏色、背景和幀率來設定遊戲環境。
WHITE = (255, 255, 255)
BLACK = (0, 0, 0)
RED = (255, 0, 0)
BLUE = (0, 0, 255)
設定動畫的幀率
定義雷達圓圈 - 我們將定義具有所需半徑和中心座標的雷達圓圈。我們還將設定圓圈的顏色和線粗細。
radar_circle_radius = 200
radar_circle_center_x = int(WIDTH / 2)
radar_circle_center_y = int(HEIGHT / 2)
定義雷達掃描線 - 我們將透過將初始角度設定為零度並在每一幀中遞增它來定義雷達掃描線,使其掃描360度。我們還將設定掃描線的顏色和粗細。
定義雷達掃描線
radar_sweep_angle = 0
radar_sweep_length = radar_circle_radius + 50
def update():
   # Increment the angle in each frame
   global radar_sweep_angle
   radar_sweep_angle += 1
# Draw the radar sweep line
def draw_radar_sweep():
   x = radar_circle_center_x + radar_sweep_length *
math.sin(math.radians(radar_sweep_angle))
   y = radar_circle_center_y + radar_sweep_length *
math.cos(math.radians(radar_sweep_angle))
   pygame.draw.line(screen, BLACK, (radar_circle_center_x,
radar_circle_center_y), (x, y), 3)
定義雷達目標 - 我們將使用雷達圓圈範圍內的隨機x和y座標來定義雷達目標。我們還將設定目標的顏色和半徑。
num_targets = 10
target_radius = 10
targets = []
for i in range(num_targets):
   x = random.randint(radar_circle_center_x - radar_circle_radius,
radar_circle_center_x + radar_circle_radius)
   y = random.randint(radar_circle_center_y - radar_circle_radius,
radar_circle_center_y + radar_circle_radius)
   targets.append((x, y))
   # Draw the radar targets
def draw_radar_targets():
   for target in targets:
      pygame.draw.circle(screen, BLUE, target, target_radius)
      distance_to_target = math.sqrt((target[0] - x) ** 2 + (target[1] - y) ** 2)
      if distance_to_target <= target_radius:
         pygame.draw.rect(screen, RED, (target[0], target[1], 60, 20))
         font = pygame.font.SysFont(None, 25)
         text = font.render("DETECTED", True, BLACK)
         screen.blit(text, (target[0], target[1]))
運行遊戲 - 我們將透過建立pygame視窗、設定必要的事件處理程式和運行遊戲迴圈來運行遊戲。
# Main game loop
running = True
while running:
   for event in pygame.event.get():
      if event.type == pygame.QUIT:
         running = False
   screen.fill(WHITE)
   update()
   draw_radar_sweep()
   draw_radar_targets()
   pygame.display.update()
   clock.tick(FPS)
# Quit the game
pygame.quit()
最終程式程式碼
import pygame
import math
import random
# Initializing the Game Window:
WIDTH = 800
HEIGHT = 600
pygame.init()
screen = pygame.display.set_mode((WIDTH, HEIGHT))
pygame.display.set_caption("Radar Sweep Animation")
clock = pygame.time.Clock()
# Defining colors:
WHITE = (255, 255, 255)
BLACK = (0, 0, 0)
RED = (255, 0, 0)
BLUE = (0, 0, 255)
# Set the frame rate of the animation
FPS = 60
# Defining the Radar Circle:
radar_circle_radius = 200
radar_circle_center_x = int(WIDTH / 2)
radar_circle_center_y = int(HEIGHT / 2)
# Define the radar sweep
radar_sweep_angle = 0
radar_sweep_length = radar_circle_radius + 50
# Define the radar targets
num_targets = 10
target_radius = 10
targets = []
for i in range(num_targets):
   x = random.randint(radar_circle_center_x - radar_circle_radius,
radar_circle_center_x + radar_circle_radius)
   y = random.randint(radar_circle_center_y - radar_circle_radius,
radar_circle_center_y + radar_circle_radius)
targets.append((x, y))
def update():
   # Increment the angle in each frame
   global radar_sweep_angle
   radar_sweep_angle += 1
# Draw the radar sweep line
def draw_radar_sweep():
   x = radar_circle_center_x + radar_sweep_length *
math.sin(math.radians(radar_sweep_angle))
   y = radar_circle_center_y + radar_sweep_length *
math.cos(math.radians(radar_sweep_angle))
   pygame.draw.line(screen, BLACK, (radar_circle_center_x,
radar_circle_center_y), (x, y), 3)
# Draw the radar targets
def draw_radar_targets():
   for target in targets:
      pygame.draw.circle(screen, BLUE, target, target_radius)
      distance_to_target = math.sqrt((target[0] - x) ** 2 + (target[1] - y)** 2)
      if distance_to_target <= target_radius:
         pygame.draw.rect(screen, RED, (target[0], target[1], 60, 20))
         font = pygame.font.SysFont(None, 25)
         text = font.render("DETECTED", True, BLACK)
         screen.blit(text, (target[0], target[1]))
# Main game loop
running = True
while running:
   for event in pygame.event.get():
      if event.type == pygame.QUIT:
         running = False
         screen.fill(WHITE)
         update()
         draw_radar_sweep()
         draw_radar_targets()
      pygame.display.update()
      clock.tick(FPS)
# Quit the game
pygame.quit()
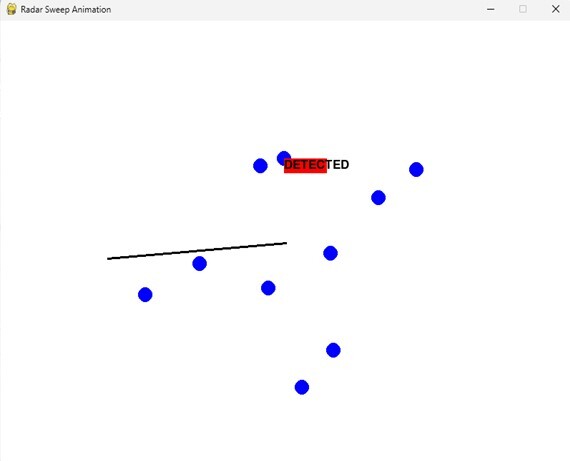
我們可以看到程式的輸出,其中可以觀察到遊戲的動畫。
結論
在本檔案中,我們探討了如何使用Python中的Pygame建立雷達掃描動畫。我們瞭解了雷達掃描動畫的組成部分,並使用程式碼片段和實際示例逐步講解了實現細節。Pygame提供了一個使用者友好的遊戲開發API,是建立2D影片遊戲和動畫的絕佳選擇。透過從本文獲得的知識,您現在應該能夠使用Pygame建立自己的雷達掃描動畫。

635 次瀏覽
