
 資料結構
資料結構 網路
網路 關係資料庫管理系統 (RDBMS)
 作業系統
作業系統 Java
Java iOS
iOS HTML
HTML CSS
CSS Android
 Python
 C語言程式設計
 C++
C++ C#
C# MongoDB
 MySQL
MySQL Javascript
 PHP
PHP使用Python和Weatherstack API建立天氣預報GUI
為什麼需要天氣預報?
天氣預報是人類生活中必不可少的一部分。近年來,技術的進步使得高精度的天氣預報更容易實現。OpenWeatherMap是一個流行的API,允許開發者檢索天氣資料。在本教程中,我們將使用Python和OpenWeatherMap API建立一個天氣預報圖形使用者介面(GUI)。本教程將涵蓋構建GUI和從OpenWeatherMap API檢索資料的必要步驟。
前提條件
在我們開始任務之前,需要在您的系統上安裝以下內容:
推薦設定列表:
pip install tkinter
使用者應該能夠訪問任何獨立的IDE,例如VS-Code、PyCharm、Atom或Sublime Text。
也可以使用線上Python編譯器,例如Kaggle.com、Google Cloud Platform或其他任何編譯器。
更新版本的Python。在撰寫本文時,我使用了3.10.9版本。
瞭解如何使用Jupyter Notebook。
瞭解和應用虛擬環境將是有益的,但不是必需的。
還期望使用者對統計學和數學有良好的理解。
完成任務所需的步驟
步驟1:匯入必要的模組
import tkinter as tk
import requests
tkinter模組用於建立GUI視窗、標籤和輸入欄位。requests模組用於向Weatherstack API發出API請求。
步驟2:設定您的Weatherstack API金鑰
API_KEY = "your_weatherstack_api_key"
將your_weatherstack_api_key替換為您實際的API金鑰。
步驟3:定義Weatherstack API的URL
API_URL = "http://api.weatherstack.com/current"
這是將用於向Weatherstack API發出請求的URL。
步驟4:定義GUI視窗
root = tk.Tk()
root.title("Weather Forecast")
這將建立GUI的主視窗,並將標題設定為“天氣預報”。
步驟5:定義城市和國家/地區的標籤和輸入欄位
city_label = tk.Label(root, text="City:")
city_label.grid(row=0, column=0, padx=5, pady=5)

city_entry = tk.Entry(root)
city_entry.grid(row=0, column=1, padx=5, pady=5)

country_label = tk.Label(root, text="Country:")
country_label.grid(row=1, column=0, padx=5, pady=5)

country_entry = tk.Entry(root)
country_entry.grid(row=1, column=1, padx=5, pady=5)
這些將建立標籤和輸入欄位,供使用者輸入他們想要獲取天氣資料的城市和國家/地區。
步驟6:定義從API獲取天氣資料的函式
def get_weather():
   city = city_entry.get()
   country = country_entry.get()
   # Build the URL with the API key, city, and country
   url = f"{API_URL}?access_key={API_KEY}&query={city},{country}"
   # Make the API request and get the JSON response
   response = requests.get(url).json()
   # Extract the relevant weather data from the JSON response
   temperature = response["current"]["temperature"]
   weather_desc = response["current"]["weather_descriptions"][0]
   # Display the weather data in the GUI
   temperature_label.config(text=f"Temperature: {temperature}°C")
   weather_desc_label.config(text=f"Weather Description: {weather_desc}")
此函式從輸入欄位獲取城市和國家/地區,使用API金鑰、城市和國家/地區構建API請求URL,發出API請求,並從JSON響應中提取相關的天氣資料。然後,它將溫度和天氣描述顯示在GUI中的相應標籤中。
步驟7:定義獲取天氣資料的按鈕
get_weather_button = tk.Button(root, text="Get Weather", command=get_weather)
get_weather_button.grid(row=2, column=0, columnspan=2, padx=5, pady=5)
這將建立一個按鈕,單擊時呼叫get_weather函式。
步驟8:定義顯示天氣資料的標籤
temperature_label = tk.Label(root, text="")
temperature_label.grid(row=3, column=0, columnspan=2, padx=5, pady=5)

weather_desc_label = tk.Label(root, text="")
weather_desc_label.grid(row=4, column=0, columnspan=2, padx=5, pady=5)
這些將建立顯示溫度和天氣描述的標籤。
步驟9:執行GUI視窗
root.mainloop()
這將啟動GUI,並在使用者需要時保持執行。
最終程式碼,程式
import tkinter as tk
import requests

# Set your weatherstack API key here
API_KEY = "your_weatherstack_api_key"

# Define the URL for the weatherstack API
API_URL = "http://api.weatherstack.com/current"

# Define the GUI window
root = tk.Tk()
root.title("Weather Forecast")

# Define the labels and entry fields for the city and country
city_label = tk.Label(root, text="City:")
city_label.grid(row=0, column=0, padx=5, pady=5)

city_entry = tk.Entry(root)
city_entry.grid(row=0, column=1, padx=5, pady=5)

country_label = tk.Label(root, text="Country:")
country_label.grid(row=1, column=0, padx=5, pady=5)

country_entry = tk.Entry(root)
country_entry.grid(row=1, column=1, padx=5, pady=5)

# Define the function to get the weather data from the API
def get_weather():
   city = city_entry.get()
   country = country_entry.get()
   # Build the URL with the API key, city, and country
   url = f"{API_URL}?access_key={API_KEY}&query={city},{country}"
   # Make the API request and get the JSON response
   response = requests.get(url).json()
   # Extract the relevant weather data from the JSON response
   temperature = response["current"]["temperature"]
   weather_desc = response["current"]["weather_descriptions"][0]
   # Display the weather data in the GUI
   temperature_label.config(text=f"Temperature: {temperature}°C")
   weather_desc_label.config(text=f"Weather Description: {weather_desc}")

# Define the button to get the weather data
get_weather_button = tk.Button(root, text="Get Weather", command=get_weather)
get_weather_button.grid(row=2, column=0, columnspan=2, padx=5, pady=5)

# Define the labels to display the weather data
temperature_label = tk.Label(root, text="")
temperature_label.grid(row=3, column=0, columnspan=2, padx=5, pady=5)

weather_desc_label = tk.Label(root, text="")
weather_desc_label.grid(row=4, column=0, columnspan=2, padx=5, pady=5)

# Run the GUI window
root.mainloop()
在這個例子中,我們首先匯入必要的庫:tkinter和requests。然後,我們設定Weatherstack API金鑰並定義API URL。我們使用tk.Tk()函式建立一個GUI視窗,並設定視窗標題。
我們使用tk.Label()和tk.Entry()函式為城市和國家/地區建立兩個標籤和兩個輸入欄位。然後,我們定義一個名為get_weather()的函式,該函式從API獲取天氣資料並在GUI中顯示它。該函式使用requests.get()函式向API URL發出GET請求,其中包含來自輸入欄位的城市和國家/地區。然後,它從JSON響應中提取溫度和天氣描述資料,並更新GUI中的溫度和天氣描述標籤。
我們使用tk.Button()函式建立一個獲取天氣資料的按鈕,並將command引數設定為get_weather()函式。我們還建立了兩個標籤來顯示溫度和天氣描述資料。
最後,我們使用root.mainloop()函式執行GUI視窗。當用戶輸入城市和國家/地區並單擊“獲取天氣”按鈕時,get_weather()函式將向
輸出
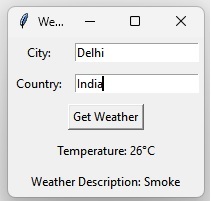
此圖片顯示了輸入城市和國家/地區名稱後天氣應用程式GUI的輸出。API金鑰將根據使用者而變化。
結論
在本教程中,我們學習瞭如何使用Python和Weatherstack API建立天氣預報GUI。我們已經介紹了構建GUI和從Weatherstack API檢索資料的必要步驟。我們還解釋了每個小節,並提供了使用Weatherstack API的實際天氣預報應用程式示例。

799 次瀏覽
