
 資料結構
資料結構 網路
網路 關係資料庫管理系統(RDBMS)
 作業系統
作業系統 Java
Java iOS
iOS HTML
HTML CSS
CSS Android
 Python
 C語言程式設計
 C++
C++ C#
C# MongoDB
 MySQL
MySQL Javascript
 PHP
PHPC語言程式,用於以PGM格式寫入影像
PGM是可移植灰度圖。如果我們想在C語言中將二維陣列儲存為PNG、JPEG或任何其他影像格式的影像,則必須在寫入檔案之前完成大量工作才能以某種指定格式對資料進行編碼。
Netpbm格式提供了一種簡單易移植的解決方案。Netpbm是一個開源的圖形程式包,主要用於Linux或Unix平臺。它也可以在Microsoft Windows系統下執行。
每個檔案以兩個位元組的魔數開頭。此魔數用於標識檔案型別。型別包括PBM、PGM、PPM等。它還標識編碼(ASCII或二進位制)。魔數是大寫字母P後跟一個單數字。
ASCII編碼允許人工讀取並輕鬆傳輸到其他平臺;二進位制格式在檔案大小方面更有效率,但可能存在本機位元組序問題。
如何編寫PGM檔案?
- 設定魔數P2
- 新增空格(空格、製表符、回車符、換行符)
- 新增寬度,格式化為十進位制ASCII字元
- 新增空格
- 新增高度,格式化為十進位制ASCII字元
- 新增空格
- 新增最大灰度值,同樣為十進位制ASCII
- 新增空格
- 寬度 x 高度灰度值,每個都為十進位制ASCII(範圍在0到最大值之間),由空格分隔,從上到下。
示例程式碼
#include <stdio.h>
main() {
int i, j;
int w = 13, h = 13;
// This 2D array will be converted into an image The size is 13 x 13
int image[13][13] = {
{ 15, 15, 15, 15, 15, 15, 15, 15, 15, 15, 15, 15, 15 },
{ 31, 31, 31, 31, 31, 31, 31, 31, 31, 31, 31, 31, 31},
{ 47, 47, 47, 47, 47, 47, 47, 47, 47, 47, 47, 47, 47},
{ 63, 63, 63, 63, 63, 63, 63, 63, 63, 63, 63, 63, 63},
{ 79, 79, 79, 79, 79, 79, 79, 79, 79, 79, 79, 79, 79},
{ 95, 95, 95, 95, 95, 95, 95, 95, 95, 95, 95, 95, 95 },
{ 111, 111, 111, 111, 111, 111, 111, 111, 111, 111, 111, 111, 111},
{ 127, 127, 127, 127, 127, 127, 127, 127, 127, 127, 127, 127, 127},
{ 143, 143, 143, 143, 143, 143, 143, 143, 143, 143, 143, 143, 143},
{ 159, 159, 159, 159, 159, 159, 159, 159, 159, 159, 159, 159, 159},
{ 175, 175, 175, 175, 175, 175, 175, 175, 175, 175, 175, 175, 175},
{ 191, 191, 191, 191, 191, 191, 191, 191, 191, 191, 191, 191, 191},
{ 207, 207, 207, 207, 207, 207, 207, 207, 207, 207, 207, 207, 207}
};
FILE* pgmimg;
pgmimg = fopen("my_pgmimg.pgm", "wb"); //write the file in binary mode
fprintf(pgmimg, "P2
"); // Writing Magic Number to the File
fprintf(pgmimg, "%d %d
", w, h); // Writing Width and Height into the
file
fprintf(pgmimg, "255
"); // Writing the maximum gray value
int count = 0;
for (i = 0; i < h; i++) {
for (j = 0; j < w; j++) {
fprintf(pgmimg, "%d ", image[i][j]); //Copy gray value from
array to file
}
fprintf(pgmimg, "
");
}
fclose(pgmimg);
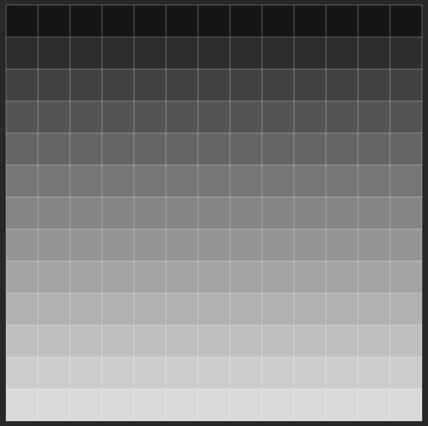
}PGM影像如下所示
輸出

更新於:2019年7月30日
2K+ 次瀏覽

廣告