
 資料結構
資料結構 網路
網路 關係資料庫管理系統(RDBMS)
 作業系統
作業系統 Java
Java iOS
iOS HTML
HTML CSS
CSS Android
 Python
 C語言程式設計
 C++
C++ C#
C# MongoDB
 MySQL
MySQL Javascript
 PHP
PHPBMP180壓力感測器
BMP180感測器是一種可以連線到麵包板上的微控制器的感測器,可以測量一個地方的壓力、溫度和海拔高度。它可以連線到ESP32或Arduino等控制器,並可由程式讀取其值。本文透過三個不同的示例,演示了使用ESP32使用BMP180感測器的方法。電路使用ESP32微控制器和BMP180感測器製作,測量溫度、壓力或海拔高度的程式使用Arduino軟體編寫。
示例1 - 使用BMP180感測器測量一個地方的溫度
示例2 - 使用BMP180感測器測量一個地方的壓力
示例3 - 使用BMP180感測器測量一個地方的海拔高度
在麵包板上使用ESP32製作電路
按照此處所示製作電路:
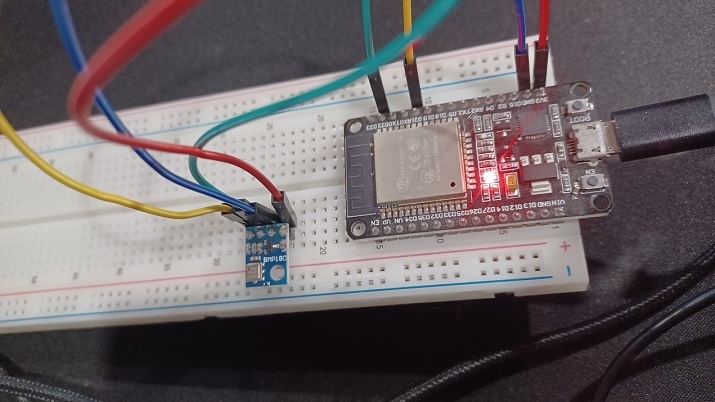
圖1:麵包板上顯示BMP180感測器與ESP32連線的電路圖
BMP180感測器的詳細檢視
BMP180感測器的圖片如下所示:
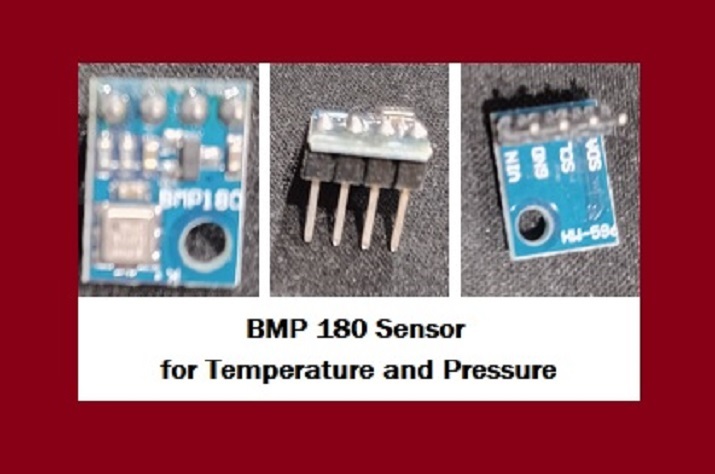
圖2:顯示BMP180感測器及其引腳。
示例1:使用BMP180感測器測量一個地方的溫度
在此,BMP180感測器用於測量溫度。此處的C語言程式使用Wire.h進行主ESP32和從BMP180之間的I2C通訊。為了使用BMP180感測器,使用了Adafruit_BMP085.h。結果可以使用序列埠監視器檢視。
電路設計步驟和編碼
步驟1 - 首先將ESP32微控制器放置在麵包板上。
步驟2 - 接下來將BMP180感測器插入麵包板。
步驟3 - 將BMP180感測器的Vin連線到ESP32的3V3/Vin引腳。將BMP180感測器的GND連線到ESP32的GND引腳。將BMP180感測器的SCL引腳連線到ESP32的D22引腳,將SDA引腳連線到D21。
步驟4 - 使用Arduino為測量溫度編寫C程式。
步驟5 - 使用USB資料線將ESP32連線到計算機。
步驟6 - 將程式碼編譯並傳輸到ESP32,並在序列埠監視器上檢查結果。
程式碼
// Read the temperature of the place using BMP180 sensor
//required libraries
#include <Wire.h>
#include <Adafruit_BMP085.h>
//bmp object
Adafruit_BMP085 bmp;
void setup() {
   //specified baud rate
   Serial.begin(9600);
   //if bmp is not detected
   if (!bmp.begin()) {
      Serial.println("Could not found BMP180");
      while (1) {}
   }
}
void loop() {
   // Check these readings using the Serial Monitor
   //print the Temperature of the place
   Serial.print("Temperature Now = ");
   Serial.print(bmp.readTemperature());
   Serial.println(" *C");
   Serial.println();
   delay(500);
}
檢視結果 - 示例1
程式碼編譯並傳輸/上傳到ESP32後,可以在序列埠監視器中看到結果。
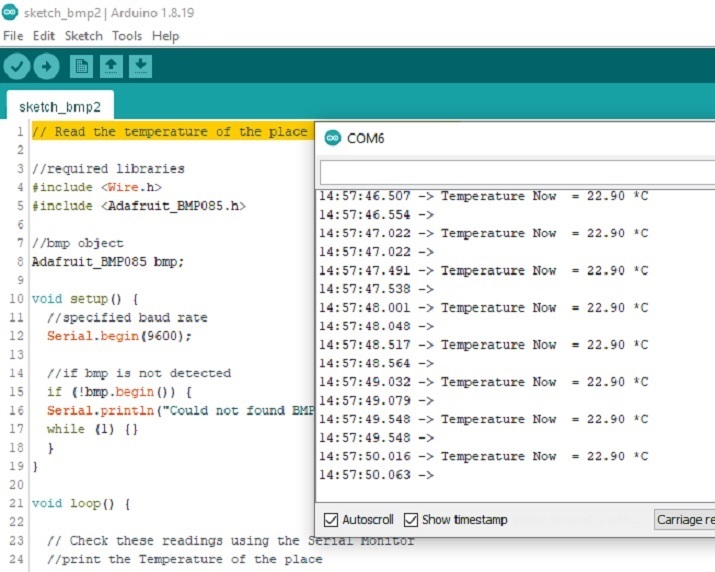
圖:顯示使用序列埠監視器讀取溫度的結果
示例2:使用BMP180感測器測量一個地方的壓力
在此,BMP180感測器用於測量壓力。此處的C語言程式使用Wire.h進行主ESP32和從BMP180之間的I2C通訊。為了使用BMP180感測器,使用了Adafruit_BMP085.h。結果可以使用序列埠監視器檢視。
電路設計步驟和編碼
步驟1 - 首先將ESP32微控制器放置在麵包板上。
步驟2 - 接下來將BMP180感測器插入麵包板。
步驟3 - 將BMP180感測器的Vin連線到ESP32的3V3/Vin引腳。將BMP180感測器的GND連線到ESP32的GND引腳。將BMP180感測器的SCL引腳連線到ESP32的D22引腳,將SDA引腳連線到D21。
步驟4 - 使用Arduino為測量大氣壓力編寫C程式。
步驟5 - 使用USB資料線將ESP32連線到計算機。
步驟6 - 將程式碼編譯並傳輸到ESP32,並在序列埠監視器上檢查結果。
程式碼
// Read the pressure at the place using BMP180 sensor
//required libraries
#include <Wire.h>
#include <Adafruit_BMP085.h>
//bmp object
Adafruit_BMP085 bmp;
void setup() {
   //specified baud rate
   Serial.begin(9600);
   //if bmp is not detected
   if (!bmp.begin()) {
      Serial.println("Could not found BMP180!!");
      while (1) {}
   }
}
void loop() {
   // Check these readings using the Serial Monitor
   //print the Pressure at the place
   Serial.print("Pressure Here = ");
   Serial.print(bmp.readPressure());
   Serial.println(" Pa");
   Serial.println();
   delay(500);
}
檢視結果 - 示例2
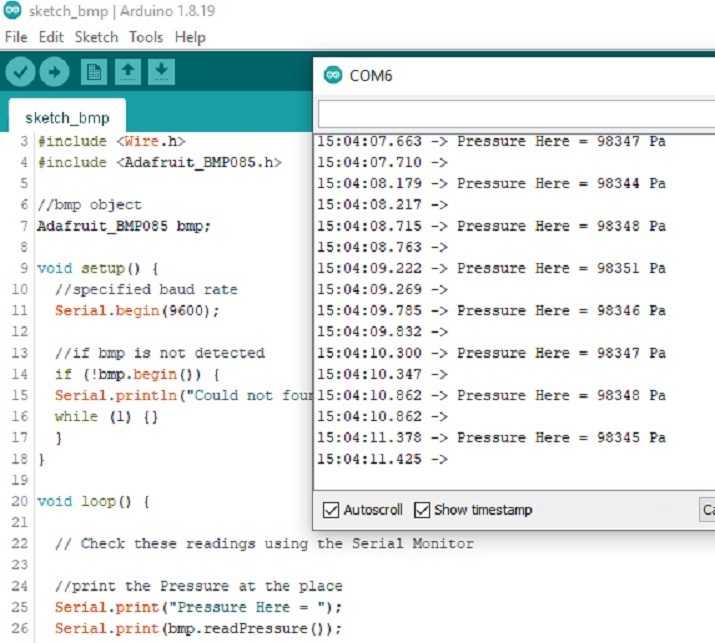
圖3:顯示使用序列埠監視器讀取壓力結果。
示例3:使用BMP180感測器測量一個地方的海拔高度
在此,BMP180感測器用於測量海拔高度。此處的C語言程式使用Wire.h進行主ESP32和從BMP180之間的I2C通訊。為了使用BMP180感測器,使用了Adafruit_BMP085.h。結果可以使用序列埠監視器檢視。
程式碼
// Read the altitude of the place using a BMP180 sensor
//required libraries
#include <Wire.h>
#include <Adafruit_BMP085.h>
//bmp object
Adafruit_BMP085 bmp;
void setup() {
   //specified baud rate
   Serial.begin(9600);
   //if bmp is not detected
   if (!bmp.begin()) {
      Serial.println("Could not found BMP180");
      while (1) {}
   }
}
void loop() {
   // Find the altitude
   Serial.print("Altitude = ");
   Serial.print(bmp.readAltitude());
   Serial.println(" meters");
   // Check these readings using the Serial Monitor
   Serial.println();
   delay(500);
}
檢視結果 - 示例2
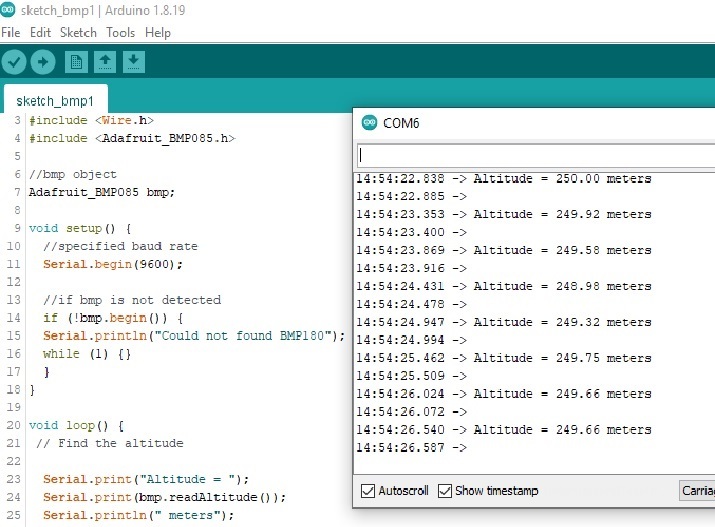
圖3:顯示使用序列埠監視器讀取海拔高度結果。
本文透過三個不同的示例,介紹了使用BMP180感測器與ESP32的方法。在第一個示例中,BMP180感測器用於測量溫度。在第二個示例中,BMP180感測器用於測量壓力,在第三個示例中,BMP180感測器用於測量一個地方的海拔高度。

383次瀏覽
