Android AsyncTasks 並行執行
在進入示例之前,我們應該知道什麼是 AsyncTask。AsyncTask 將在後臺執行緒中執行操作,並在主執行緒中更新。以下是關於 Android AsyncTask 並行執行的簡單解決方案。
步驟 1 - 在 Android Studio 中建立一個新專案,轉到檔案 ⇒ 新建專案,並填寫所有必需的詳細資訊以建立一個新專案。
步驟 2 - 將以下程式碼新增到 res/layout/activity_main.xml 中。
<?xml version = "1.0" encoding = "utf-8"?>
<LinearLayout xmlns:android = "http://schemas.android.com/apk/res/android"
   xmlns:tools = "http://schemas.android.com/tools"
   android:id = "@+id/rootview"
   android:layout_width = "match_parent"
   android:layout_height = "match_parent"
   android:orientation = "vertical"
   android:background = "#c1c1c1"
   android:gravity = "center_horizontal"
   tools:context = ".MainActivity">
   <Button
      android:id = "@+id/asyncTask"
      android:text = "Download"
      android:layout_width = "wrap_content"
      android:layout_height = "wrap_content" />
   <ImageView
      android:id = "@+id/image"
      android:layout_width = "300dp"
      android:layout_height = "300dp" />
   <ImageView
      android:id = "@+id/image2"
      android:layout_width = "300dp"
      android:layout_height = "300dp" />
</LinearLayout>
在上面的程式碼中,我們聲明瞭兩個 ImageView 和一個 Button,當用戶點選按鈕時,它將從不同的網際網路源下載兩個影像並附加到 ImageView。
步驟 3 - 將以下程式碼新增到 src/MainActivity.java 中
package com.example.andy.myapplication;

import android.app.ProgressDialog;
import android.graphics.Bitmap;
import android.graphics.BitmapFactory;
import android.os.AsyncTask;
import android.os.Bundle;
import android.support.v7.app.AppCompatActivity;
import android.view.View;
import android.widget.Button;
import android.widget.ImageView;
import java.io.IOException;
import java.io.InputStream;
import java.net.HttpURLConnection;
import java.net.URL;

public class MainActivity extends AppCompatActivity {
   URL ImageUrl = null;
   InputStream is = null;
   Bitmap bmImg = null;
   ImageView imageView = null;
   ImageView imageView2 = null;
   AsyncTaskExample asyncTask = null;
   AsyncTaskExample2 asyncTask2 = null;
   ProgressDialog p;
   @Override
   protected void onCreate(Bundle savedInstanceState) {
      super.onCreate(savedInstanceState);
      setContentView(R.layout.activity_main);
      Button button = findViewById(R.id.asyncTask);
      imageView = findViewById(R.id.image);
      imageView2 = findViewById(R.id.image2);
      button.setOnClickListener(new View.OnClickListener() {
         @Override
         public void onClick(View v) {
            asyncTask2 = new AsyncTaskExample2();
               asyncTask2.executeOnExecutor(AsyncTask.THREAD_POOL_EXECUTOR, "https://tutorialspoint.tw/cprogramming/images/logo.png");
            asyncTask = new AsyncTaskExample();
            asyncTask.executeOnExecutor(AsyncTask.THREAD_POOL_EXECUTOR, "https://tutorialspoint.tw/images/tp-logo-diamond.png");
         }
      });
   }
   private class AsyncTaskExample extends AsyncTask<String, String, Bitmap> {
      @Override
      protected void onPreExecute() {
         super.onPreExecute();
         p = new ProgressDialog(MainActivity.this);
         p.setMessage("Please wait...It is downloading");
         p.setIndeterminate(true);
         p.setCancelable(false);
         p.show();
      }
      @Override
      protected Bitmap doInBackground(String... strings) {
         try {
            ImageUrl = new URL(strings[0]);
            HttpURLConnection conn = (HttpURLConnection) ImageUrl
            .openConnection();
            conn.setDoInput(true);
            conn.connect();
            is = conn.getInputStream();
            BitmapFactory.Options options = new BitmapFactory.Options();
            options.inPreferredConfig = Bitmap.Config.RGB_565;
            bmImg = BitmapFactory.decodeStream(is, null, options);
         } catch (IOException e) {
            e.printStackTrace();
         }
         return bmImg;
      }
      @Override
      protected void onPostExecute(Bitmap bitmap) {
         super.onPostExecute(bitmap);
         if (imageView ! = null) {
            p.hide();
            imageView.setImageBitmap(bitmap);
         } else {
            p.show();
         }
      }
   }
   private class AsyncTaskExample2 extends AsyncTask<String, String, Bitmap> {
      @Override
      protected Bitmap doInBackground(String... strings) {
         try {
            ImageUrl = new URL(strings[0]);
            HttpURLConnection conn = (HttpURLConnection) ImageUrl
            .openConnection();
            conn.setDoInput(true);
            conn.connect();
            is = conn.getInputStream();
            BitmapFactory.Options options = new BitmapFactory.Options();
            options.inPreferredConfig = Bitmap.Config.RGB_565;
            bmImg = BitmapFactory.decodeStream(is, null, options);
         } catch (IOException e) {
            e.printStackTrace();
         }
         return bmImg;
      }
      @Override
      protected void onPostExecute(Bitmap bitmap) {
         super.onPostExecute(bitmap);
         if (imageView2 ! = null) {
            imageView2.setImageBitmap(bitmap);
         } else {
         }
      }
   }
}
在上面的程式碼中,我們使用 executeOnExecutor() 來執行兩個或多個 AsyncTask。Android 最多支援五個 AsyncTask 並行執行。
步驟 4 - 將以下程式碼新增到 manifest.xml 中
<?xml version = "1.0" encoding = "utf-8"?>
<manifest xmlns:android = "http://schemas.android.com/apk/res/android" package = "com.example.andy.myapplication">
   <uses-permission android:name = "android.permission.INTERNET"/>
   <application
      android:allowBackup = "true"
      android:icon = "@mipmap/ic_launcher"
      android:label = "@string/app_name"
      android:roundIcon = "@mipmap/ic_launcher_round"
      android:supportsRtl = "true"
      android:theme = "@style/AppTheme">
      <activity android:name = ".MainActivity">
         <intent-filter>
            <action android:name = "android.intent.action.MAIN" />
            <category android:name = "android.intent.category.LAUNCHER" />
         </intent-filter>
      </activity>
   </application>
</manifest>
在上面的程式碼中,我們授予了網際網路許可權以從網際網路源下載影像。
讓我們嘗試執行您的應用程式。我假設您已將您的實際 Android 移動裝置連線到您的計算機。要從 Android Studio 執行應用程式,請開啟專案的一個活動檔案,然後單擊執行 Eclipse 執行 ![]() 圖示 從工具欄中。選擇您的移動裝置作為選項,然後檢查您的移動裝置,它將顯示您的預設螢幕 -
圖示 從工具欄中。選擇您的移動裝置作為選項,然後檢查您的移動裝置,它將顯示您的預設螢幕 -

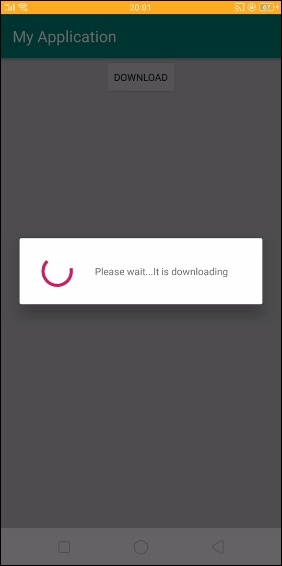
當用戶點選按鈕時,它將使用進度條從網際網路源下載影像,如下所示 -

它將並行下載兩張圖片並顯示如下 -

點選 這裡 下載專案程式碼

廣告

 資料結構
資料結構 網路
網路 關係資料庫管理系統
 作業系統
作業系統 Java
Java iOS
iOS HTML
HTML CSS
CSS Android
 Python
 C 程式設計
 C++
C++ C#
C# MongoDB
 MySQL
MySQL Javascript
 PHP
PHP