
 資料結構
資料結構 網路
網路 關係資料庫管理系統 (RDBMS)
 作業系統
作業系統 Java
Java iOS
iOS HTML
HTML CSS
CSS Android
 Python
 C 語言程式設計
 C++
C++ C#
C# MongoDB
 MySQL
MySQL Javascript
 PHP
PHPAndroid 中 FillParent 和 wrap_content 的區別是什麼?
本示例演示瞭如何在 Android 中顯示 FillParent 和 wrap_content 的區別。
步驟 1 − 在 Android Studio 中建立一個新專案,轉到檔案 ⇒ 新建專案,並填寫所有必需的詳細資訊以建立新專案。
步驟 2 − 將以下程式碼新增到 res/layout/activity_main.xml。
<?xml version="1.0" encoding="utf-8"?>
<RelativeLayout
   xmlns:android="http://schemas.android.com/apk/res/android"
   xmlns:tools="http://schemas.android.com/tools"
   android:layout_width="match_parent"
   android:layout_height="match_parent"
   tools:context=".MainActivity">
   <TextView
      android:layout_width="fill_parent"
      android:layout_height="fill_parent"
      android:text="A wiki is run using wiki software, otherwise known as a wiki engine. A wiki
      engine is a type of content management system, but it differs from most other such systems,
      including blog software, in that the content is created without any defined owner or leader,
       and wikis have little inherent structure, allowing structure to emerge according to the needs
       of the users."/>
   <TextView
      android:layout_width="wrap_content"
      android:layout_height="wrap_content"
      android:layout_centerInParent="true"
      android:text="This is a Wrap text"/>
</RelativeLayout>
步驟 3 − 將以下程式碼新增到 src/MainActivity.java。
import android.support.v7.app.AppCompatActivity;
import android.os.Bundle;
public class MainActivity extends AppCompatActivity {
   @Override
   protected void onCreate(Bundle savedInstanceState) {
      super.onCreate(savedInstanceState);
      setContentView(R.layout.activity_main);
   }
}
步驟 4 − 將以下程式碼新增到 androidManifest.xml。
<?xml version="1.0" encoding="utf-8"?>
<manifest
   xmlns:android="http://schemas.android.com/apk/res/android"
   package="app.com.sample">
   <application
      android:allowBackup="true"
      android:icon="@mipmap/ic_launcher"
      android:label="@string/app_name"
      android:roundIcon="@mipmap/ic_launcher_round"
      android:supportsRtl="true"
      android:theme="@style/AppTheme">
      <activity android:name=".MainActivity">
         <intent-filter>
            <action
               android:name="android.intent.action.MAIN" />
            <category
               android:name="android.intent.category.LAUNCHER" />
         </intent-filter>
      </activity>
   </application>
</manifest>
讓我們嘗試執行您的應用程式。我假設您已將您的實際 Android 移動裝置連線到您的計算機。要從 Android Studio 執行應用程式,請開啟您的一個專案活動檔案,然後單擊工具欄中的執行![]() 圖示。選擇您的移動裝置作為選項,然後檢查您的移動裝置,它將顯示您的預設螢幕 −
圖示。選擇您的移動裝置作為選項,然後檢查您的移動裝置,它將顯示您的預設螢幕 −
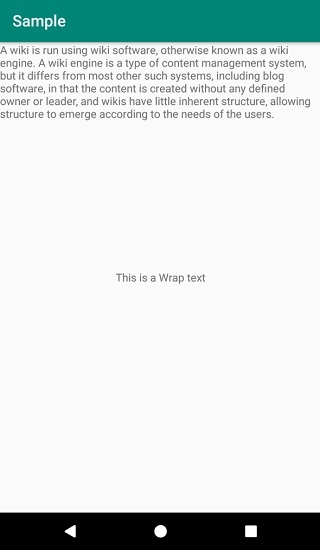
FillParent/match_parent:FillParent 是舊版本,更新版本是 match_parent,它佔據整個螢幕。
wrap_content:wrap_content 根據文字長度幷包裹其內容。例如:“這是一個換行文字”。wrap_content 從“這”開始包裹,到“文字”結束。

更新於:2020年7月2日
3K+ 次瀏覽

廣告