
 資料結構
資料結構 網路
網路 關係資料庫管理系統 (RDBMS)
 作業系統
作業系統 Java
Java iOS
iOS HTML
HTML CSS
CSS Android
 Python
 C 程式設計
 C++
C++ C#
C# MongoDB
 MySQL
MySQL Javascript
 PHP
PHP在 iPhone 中設定簡單的委託來實現兩個檢視控制器之間的通訊
在這篇文章中,您將學習關於委託以及如何建立委託。首先,
什麼是委託?
委託是一個簡單的術語,指的是物件之間的通訊。它是一種連線物件並在它們之間進行通訊的簡單方法。
委託是如何工作的?
委託是藉助協議建立的。協議在類中宣告,在該類中將發生某些事件,這些事件應該通知其他類。在協議中,我們編寫函式的宣告,並在呼叫類中定義它。
如何建立委託?
我們將透過一個示例專案來完成。
執行步驟:
建立一個類,命名為 FirstViewController,再建立一個類並將其命名為 SecondViewController。在故事板中建立它們各自的檢視控制器。
在 SecondViewController 中宣告一個協議。協議是在任何類或其他物件之外宣告的。
protocol SecondViewControllerDelegate {
   func buttonPressedInVC2()
}
在 SecondViewController 中,建立一個我們剛剛建立的委託的可選物件。
var delegate: SecondViewControllerDelegate?
當 SecondViewController 中發生某些事件時,我們需要呼叫在協議中宣告的函式,讓我們建立一個在第二個檢視控制器中按下按鈕時發生的事件。
@IBAction func buttonTapped(_ sender: UIButton) {
   self.delegate?.buttonPressedInVC2()
   self.navigationController?.popViewController(animated: true)
}
所有這些都在 SecondViewController 中完成,現在讓我們處理 FirstViewController。
我們需要使 FirstViewController 符合/實現 SecondViewControllerDelegate,它會自動提示您新增協議存根。
extension FirstViewController: SecondViewControllerDelegate {
   func buttonPressedInVC2() { }
}
在我們剛剛實現的協議中,我們應該編寫當此委託操作發生時想要執行的程式碼。
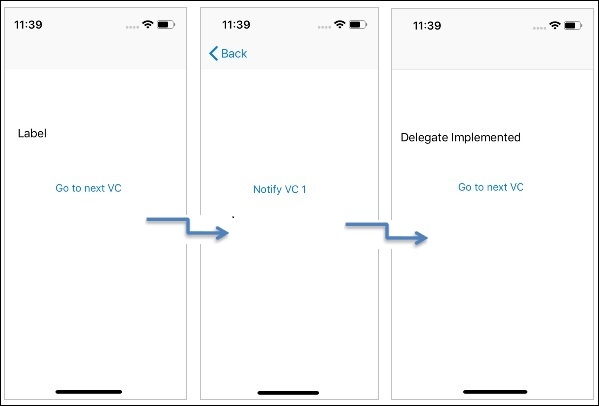
讓我們在 FirstViewController 中建立一個標籤,並在呼叫委託方法時更改其文字。
extension FirstViewController: SecondViewControllerDelegate {
   func buttonPressedInVC2() {
      self.lblOne.text = "Delegate Implemented"
   }
}
剩下最後一步,即 SecondViewController 中的委託物件是可選的,並且在分配之前將為 nil,因此在 FirstViewController 中,我們將在從 FirstViewController 轉到 SecondViewController 時分配該物件。
讓我們為此在 FirstViewController 中建立一個按鈕。
@IBAction func goToNextVC(_ sender: Any) {
   let vc = self.storyboard?.instantiateViewController(withIdentifier: "SecondViewController") as! SecondViewController
   vc.delegate = self
   self.navigationController?.pushViewController(vc, animated: true)
}
如果您還沒意識到,我們需要將 FirstViewController 嵌入導航控制器中。讓我們執行應用程式並檢視它的工作方式。

631 次瀏覽
