
 資料結構
資料結構 網路
網路 關係資料庫管理系統 (RDBMS)
 作業系統
作業系統 Java
Java iOS
iOS HTML
HTML CSS
CSS Android
 Python
 C 程式設計
 C++
C++ C#
C# MongoDB
 MySQL
MySQL Javascript
 PHP
PHPReact 中帶下拉選單的響應式側邊欄
您可能在您喜歡的某些網站上遇到過響應式側邊欄。此 Web 應用程式功能為使用者提供了一種便捷的導航方式,方法是託管下拉選單。您可以閱讀本文以瞭解如何在 React 中整合帶下拉選單的響應式側邊欄。
先決條件
React 專案的執行需要您在 PC 上具備以下內容。
- 您需要一個 React 環境,這意味著一個可用的程式碼編輯器(我將使用 Visual Studio Code)和最新 Node.js 的安裝。在您的 Nodejs 中使用 node -v 命令檢查您是否正在執行 v20.17.0 或更高版本,以確保專案能夠無縫編譯。
- 您可以使用 create-react-app 命令設定 React 環境,但更多內容將在後續部分介紹。
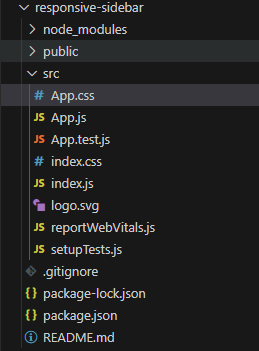
專案結構
專案結構將適應您打算建立 React 應用程式的檔案路徑。在我的情況下,我將應用程式託管在一個名為 responsive-sidebar 的資料夾中,以符合任務的目標。下面是我的檔案目錄的螢幕截圖,以幫助您瞭解檔案結構。
方法
本節將分解您必須在 React 環境中執行的步驟。
步驟 1:設定 React 環境
從先決條件部分開始,您應該使用 create-react-app 命令在您首選的資料夾中建立 React 專案。本節中的其他步驟包括安裝必要的依賴項,如 react-icons(用於圖示)和 styled-components(用於樣式)。
在終端中執行以下命令建立 React 應用程式,然後按 Enter 鍵執行。
npx create-react-app responsive-sidebar

cd responsive-sidebar
透過鍵入以下命令安裝 react-icons。
npm install react-icons
安裝依賴項是在終端中鍵入以下命令。
npm install styled-components
步驟 2:構建側邊欄和主元件結構
構建側邊欄和主元件的結構需要您調整 Apps.js 資料夾中的內容。您必須定義側邊欄、下拉選單和主要內容區域的結構。為此,您可以使用 useState、Sidebar 和 DropDown 函式來管理側邊欄切換狀態。
App.js:複製以下程式碼並將其貼上到您的 App.js 檔案中。
// App.js
import React, { useState } from 'react';
import './App.css'; // Custom styles for the sidebar

// Create a Sidebar component with an open and close toggle state
function Sidebar() {
  const [isOpen, setIsOpen] = useState(false);

  const toggleSidebar = () => {
    setIsOpen(!isOpen);
  };

  // Render the Sidebar with a clickable hamburger icon
  return (
    <div className="sidebar-container">
      {/* Hamburger Icon */}
      <div className="hamburger" onClick={toggleSidebar}>
        ☰
      </div>

      {/* Sidebar */}
      <div className={`sidebar ${isOpen ? 'open' : ''}`}>
        <ul>
          <li><a href="#dashboard"> TutorialsPoint Dashboard</a></li>
          <li><a href="#profile">Profile</a></li>
          <li><a href="#settings">Settings</a></li>
          <li><a href="#notifications">Notifications</a></li>
          <li><a href="#support">Support</a></li>
        </ul>
      </div>
    </div>
  );
}

export default Sidebar;
步驟 3:新增 CSS 以實現佈局和響應性
CSS 樣式部分是您可以自定義側邊欄專案的佈局和響應性的位置。在 src 資料夾中建立一個新檔案,並將其重新命名為 App.css。
/* Sidebar styling for Sidebar.css */
 .sidebar-container {
     position: relative;
}
 .hamburger {
     font-size: 30px;
     cursor: pointer;
     padding: 10px;
}
 .sidebar {
     position: fixed;
     top: 0;
     left: -250px;
     height: 100%;
     width: 250px;
     background-color: purple;
     transition: left 0.3s ease;
     padding-top: 60px;
     box-shadow: 2px 0 5px rgba(0, 0, 0, 0.2);
}
 .sidebar.open {
     left: 0;
}
 .sidebar ul {
     list-style-type: none;
     padding: 0;
}
 .sidebar ul li {
     padding: 15px 20px;
     text-align: left;
}
 .sidebar ul li a {
     text-decoration: none;
     color: white;
     font-size: 18px;
     display: block;
}
 .sidebar ul li:hover {
     background-color: #5d3b91;
    /* Set the sidebar background to purple on hover */
}
/* Ensure the backdrop of the main page is white */
 body {
     background-color: white;
     margin: 0;
     font-family: Arial, sans-serif;
}
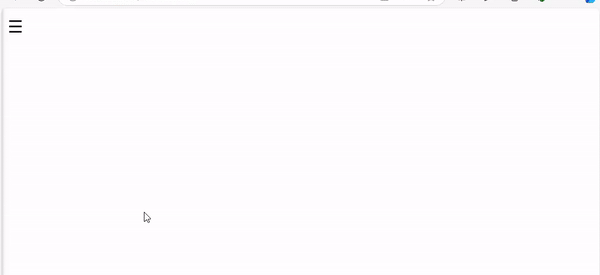
輸出
最後一步是啟動 React 開發伺服器,您可以在其中測試您的響應式側邊欄功能。React 響應式功能確保 Web 應用程式在移動裝置上無縫執行。啟動一個終端並導航到專案的目錄,然後使用 npm start 命令。

100 次瀏覽
