
 資料結構
資料結構 網路
網路 關係資料庫管理系統 (RDBMS)
 作業系統
作業系統 Java
Java iOS
iOS HTML
HTML CSS
CSS Android
 Python
 C語言程式設計
 C++
C++ C#
C# MongoDB
 MySQL
MySQL Javascript
 PHP
PHP如何在Ubuntu 16.04上設定Apache使用密碼認證
在本文中,我們將學習如何設定和配置Apache Web伺服器,以限制未經身份驗證的訪問者,從而可以向未經身份驗證的使用者隱藏某些重要和關鍵資訊。
前提條件
- 我們需要一臺Ubuntu機器,該機器上擁有Sudo許可權的非root使用者。
- 機器上安裝了Apache2 Web伺服器。
安裝Apache實用程式
我們需要安裝一個名為“htpasswd”的Apache2實用程式包,此實用程式是“apache2-utils”包的一部分。
這將幫助我們建立和管理訪問網站受限部分所需的使用者名稱和密碼。
以下是安裝“apache2-utils”包的命令。
$ sudo apt-get install apache2-utils
Output:
Reading package lists... Done
Building dependency tree
Reading state information... Done
The following package was automatically installed and is no longer required:
apache2-data
The following NEW packages will be installed: apache2-utils
0 upgraded, 1 newly installed, 0 to remove and 92 not upgraded.
Need to get 0 B/81.3 kB of archives.
After this operation, 323 kB of additional disk space will be used.
Selecting previously unselected package apache2-utils.
(Reading database ... 117511 files and directories currently installed.)
Preparing to unpack .../apache2-utils_2.4.18-2ubuntu3.1_amd64.deb ...
Unpacking apache2-utils (2.4.18-2ubuntu3.1) ...
Setting up apache2-utils (2.4.18-2ubuntu3.1) ...
Reading package lists... Done
Need to get 0 B/81.3 kB of archives.
After this operation, 323 kB of additional disk space will be used.
Selecting previously unselected package apache2-utils.
(Reading database ... 117511 files and directories currently installed.)
Preparing to unpack .../apache2-utils_2.4.18-2ubuntu3.1_amd64.deb ...
Unpacking apache2-utils (2.4.18-2ubuntu3.1) ...
Setting up apache2-utils (2.4.18-2ubuntu3.1) ...
建立Apache2密碼檔案
安裝apache2-utils後,我們將擁有htpasswd命令,我們將使用此htpasswd命令建立Apache將用於使用者身份驗證的密碼檔案。
以下是使用使用者身份驗證資訊建立htpasswd檔案的命令。
當我們第一次為Apache 2建立檔案時,我們將使用以下命令以及–c選項。
$ sudo htpasswd -c /etc/apache2/.htpasswd user1
Output:
New password:
Re-type new password:
Adding password for user user1
“–c”選項用於在第一次建立時建立初始檔案。
$ sudo htpasswd /etc/apache2/.htpasswd user2
Output:
New password:
Re-type new password:
Adding password for user user2
如果我們新增–c選項,它將用新檔案覆蓋舊檔案,您將丟失之前建立的所有使用者。
要驗證是否已建立使用者,我們將檢查位於/etc/apache2/的.htpasswd檔案。
以下是檢查檔案內容的命令:
$ cat /etc/apache2/.htpasswd
Output:
user1:$apr1$8mLF0tmz$rvN0z15hv6tnIU9ymXPmH1
user2:$apr1$vGFgrOU4$K0uAbeRlc5sb8ICJJbhxe.
如果您可以看到此檔案包含使用者的使用者名稱和加密密碼。
配置Apache以使用密碼身份驗證
在此演示中,我們只使用虛擬主機檔案進行身份驗證,我們也可以透過其他方法提供身份驗證。由於我們具有與Apache2 Web伺服器可以讀取的相同格式的已認證使用者的檔案。
我們將透過向虛擬主機新增密碼保護來實現此目的,預設虛擬主機配置檔案為000-default.conf,位於/etc/apache2/sites-enabled
以下是編輯apache2配置檔案的命令。
$ sudo vi /etc/apache2/sites-enabled/000-default.conf
原始Apache Web伺服器配置檔案如下所示,我們需要編輯此檔案。
<VirtualHost *:80>
   ServerAdmin admin@webhost.com
   DocumentRoot /var/www/html
   ErrorLog ${APACHE_LOG_DIR}/error.log
   CustomLog ${APACHE_LOG_DIR}/access.log combined
</VirtualHost>
我們將在directory塊中新增身份驗證,身份驗證基於目錄進行。以下是帶有身份驗證的示例配置
<VirtualHost *:80>
   ServerAdmin admin@webhost.com
   DocumentRoot /var/www/html
   ErrorLog ${APACHE_LOG_DIR}/error.log
   CustomLog ${APACHE_LOG_DIR}/access.log combined
   <Directory "/var/www/html">
      AuthType Basic
      AuthName "Restricted Content"
      AuthUserFile /etc/apache2/.htpasswd
      Require valid-user
   </Directory>
</VirtualHost>
“directory”塊有一些選項,現在我們將看到我們用於密碼身份驗證的選項。
**AuthType Basic**: 這將為站點設定基本身份驗證。
**AuthName “Restricted Contents”**: 這將在提示符處顯示身份驗證的名稱。
**AuthUserFile /etc/apache2/.htpasswd**: 這將顯示身份驗證檔案的位置。
**Require Valid-user**: 這將被任何已驗證身份驗證的使用者使用,這些使用者被允許訪問網站。
編輯配置檔案後,我們將重新啟動Apache2 Web伺服器並檢查狀態
$ sudo systemctl restart apache2
$ sudo systemctl status apache2
Output:
apache2.service - LSB: Apache2 web server
Loaded: loaded (/etc/init.d/apache2; bad; vendor preset: enabled)
Drop-In: /lib/systemd/system/apache2.service.d
└─apache2-systemd.conf
Active: active (running) since Mon 2016-09-19 16:33:34 IST; 6s ago
Docs: man:systemd-sysv-generator(8)
Process: 19606 ExecStop=/etc/init.d/apache2 stop (code=exited, status=0/SUCCESS)
Process: 19630 ExecStart=/etc/init.d/apache2 start (code=exited, status=0/SUCCESS)
Tasks: 55 (limit: 512)
Memory: 6.3M
CPU: 54ms
CGroup: /system.slice/apache2.service
├─19648 /usr/sbin/apache2 -k start
├─19651 /usr/sbin/apache2 -k start
└─19652 /usr/sbin/apache2 -k start
Sep 19 16:33:33 ubuntu-16 systemd[1]: Starting LSB: Apache2 web server...
Sep 19 16:33:33 ubuntu-16 apache2[19630]: * Starting Apache httpd web server apache2
Sep 19 16:33:34 ubuntu-16 apache2[19630]: *
Sep 19 16:33:34 ubuntu-16 systemd[1]: Started LSB: Apache2 web server.
驗證密碼身份驗證
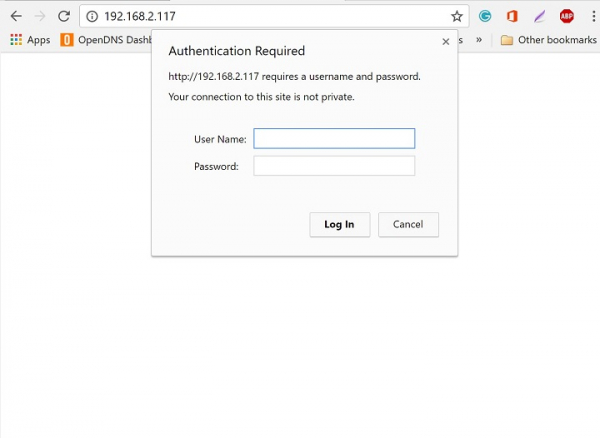
要驗證密碼身份驗證是否有效,我們需要從Web瀏覽器訪問Apache。當我們訪問站點時,Apache將用於身份驗證,如果我們提供正確的使用者憑據,Apache將允許使用者訪問網頁。
您可以看到下圖是Apache2 Web伺服器的密碼身份驗證頁面。
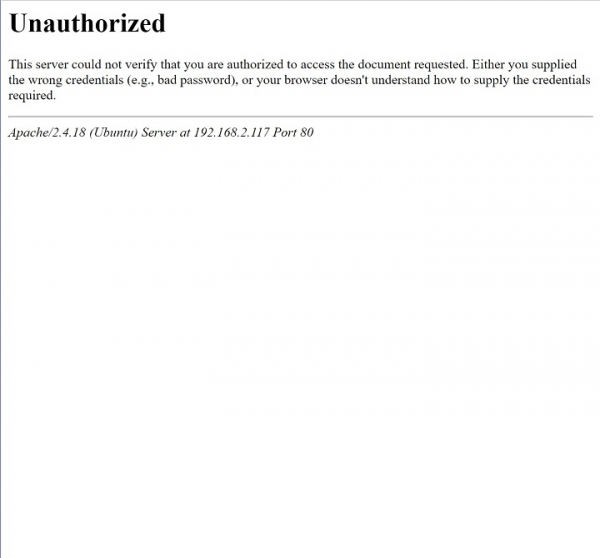
如果使用者未提供正確的憑據,或者我們意外單擊取消,您將看到如下所示的“未授權”視窗:
透過使用以上文章和設定,我們可以保護網站或網頁的某些部分,我們可以限制使用者在未經身份驗證的情況下訪問某些關鍵資訊,在此設定中,我們僅使用了基本身份驗證,有關更多選項和配置,可以檢視Apache2原始文件或網站。

463 次瀏覽
