
 資料結構
資料結構 網路
網路 關係資料庫管理系統 (RDBMS)
 作業系統
作業系統 Java
Java iOS
iOS HTML
HTML CSS
CSS Android
 Python
 C語言程式設計
 C++
C++ C#
C# MongoDB
 MySQL
MySQL Javascript
 PHP
PHP如何在Ubuntu/Linux Mint上快速安裝WordPress
WordPress是一個免費的開源網站和部落格工具,它是網際網路上最流行的CMS(內容管理系統)。它允許您在MySQL後端和PHP處理的基礎上輕鬆設定靈活的部落格和網站。本文介紹了“如何使用bash指令碼在Linux上安裝WordPress”。Bash指令碼會自動下載並在您選擇的任何位置安裝最新版本的WordPress。
安裝LAMP
要在您的系統上安裝並執行WordPress,需要在您的Web伺服器上進行預安裝。
使用以下命令安裝LAMP Web伺服器。
$ sudo apt-get install lamp-server^
示例輸出如下:
Reading package lists... Done
Building dependency tree
Reading state information... Done
Note, selecting 'mysql-server-core-5.5' for task 'lamp-server'
Note, selecting 'mysql-server-5.5' for task 'lamp-server'
Note, selecting 'libaio1' for task 'lamp-server'
Note, selecting 'mysql-client-core-5.5' for task 'lamp-server'
Note, selecting 'apache2-mpm-prefork' for task 'lamp-server'
Note, selecting 'libaprutil1' for task 'lamp-server'
Note, selecting 'libapache2-mod-php5' for task 'lamp-server'
Note, selecting 'php5-mysql' for task 'lamp-server'
Note, selecting 'php5-common' for task 'lamp-server'
Note, selecting 'libaprutil1-dbd-sqlite3' for task 'lamp-server'
Note, selecting 'php5-readline' for task 'lamp-server'
Note, selecting 'ssl-cert' for task 'lamp-server'
Note, selecting 'mysql-client-5.5' for task 'lamp-server'
Note, selecting 'libhtml-template-perl' for task 'lamp-server'
Note, selecting 'libterm-readkey-perl' for task 'lamp-server'
Note, selecting 'libaprutil1-ldap' for task 'lamp-server'
Note, selecting 'mysql-common' for task 'lamp-server'
Note, selecting 'php5-cli' for task 'lamp-server'
Note, selecting 'libmysqlclient18' for task 'lamp-server'
Note, selecting 'apache2-data' for task 'lamp-server'
Note, selecting 'php5-json' for task 'lamp-server'
Note, selecting 'libapr1' for task 'lamp-server'
Note, selecting 'apache2' for task 'lamp-server'
................................................
要重新啟動Apache2,請使用以下命令:
$ sudo service apache2 restart
要重新啟動mySQL,請使用以下命令:
$ sudo service mysql restart
現在開啟localhost目錄,使用以下命令開啟localhost目錄:
$ cd /var/www/html
現在使用**wget**命令訪問wp-install.sh,使用以下命令:
$ sudo wget https://goo.gl/MndEJc --no-check-certificate -O wp-install.sh
示例輸出如下:
--2016-03-16 12:13:06-- https://goo.gl/MndEJc
Resolving goo.gl (goo.gl)... 216.58.196.110, 2404:6800:4007:806::200e
Connecting to goo.gl (goo.gl)|216.58.196.110|:443... connected.
HTTP request sent, awaiting response... 301 Moved Permanently
Location: https://raw.githubusercontent.com/WebPraktikos/wp-install/master/wp-install.sh [following]
--2016-03-16 12:13:06-- https://raw.githubusercontent.com/WebPraktikos/wp-install/master/wp-install.sh
Resolving raw.githubusercontent.com (raw.githubusercontent.com)... 103.245.222.133
Connecting to raw.githubusercontent.com (raw.githubusercontent.com)|103.245.222.133|:443... connected.
HTTP request sent, awaiting response... 200 OK
Length: 4410 (4.3K) [text/plain]
Saving to: ‘wp-install.sh’

100%[======================================>] 4,410 --.-K/s in 0s

2016-03-16 12:13:07 (1003 MB/s) - ‘wp-install.sh’ saved [4410/4410]
要安裝wp-install.sh,請使用以下命令:
$ sudo bash wp-install.sh
示例輸出如下:
creating: w3-total-cache/lib/EDD/
inflating: w3-total-cache/lib/EDD/integration.php
inflating: w3-total-cache/lib/EDD/EDD_SL_Plugin_Updater.php
creating: w3-total-cache/lib/SNS/
creating: w3-total-cache/lib/SNS/lib/
creating: w3-total-cache/lib/SNS/lib/requestcore/
inflating: w3-total-cache/lib/SNS/lib/requestcore/requestcore.class.php
inflating: w3-total-cache/lib/SNS/lib/requestcore/cacert.pem
inflating: w3-total-cache/lib/SNS/lib/requestcore/README.md
inflating: w3-total-cache/lib/SNS/lib/requestcore/LICENSE
creating: w3-total-cache/lib/SNS/utilities/
inflating: w3-total-cache/lib/SNS/utilities/utilities.class.php
inflating: w3-total-cache/lib/SNS/utilities/request.class.php
inflating: w3-total-cache/lib/SNS/utilities/response.class.php
inflating: w3-total-cache/lib/SNS/utilities/simplexml.class.php
inflating: w3-total-cache/lib/SNS/README.md
inflating: w3-total-cache/lib/SNS/sdk.class.php
creating: w3-total-cache/lib/SNS/services/
creating: w3-total-cache/lib/SNS/services/MessageValidator/
inflating: w3-total-cache/lib/SNS/services/MessageValidator/MessageValidator.php
inflating: w3-total-cache/lib/SNS/services/MessageValidator/sns-exceptions.php
inflating: w3-total-cache/lib/SNS/services/MessageValidator/Message.php
inflating: w3-total-cache/lib/SNS/services/sns.class.php
creating: w3-total-cache/lib/Microsoft/
..........................................................
安裝**WordPress**期間,系統會詢問資料庫名稱和密碼。請確保提供正確的資料來設定WordPress。在您喜歡的Web瀏覽器中輸入以下URL:
https:///wp-admin/install.php
示例輸出如下:

根據您的需要填寫詳細資訊,然後按安裝WordPress按鈕。成功完成所有步驟後,您將看到如下所示的螢幕:
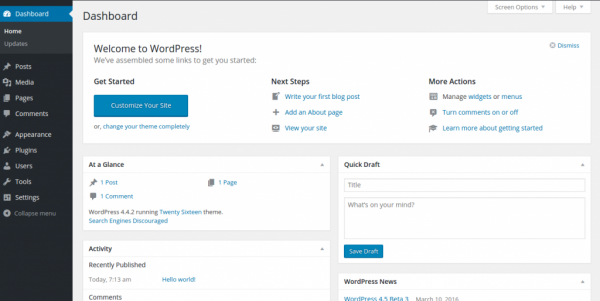
恭喜!現在,您知道了“如何在Ubuntu/Linux Mint上快速安裝WordPress”。我們將在下一篇文章中學習更多關於這些型別的Linux命令。繼續關注!

更新於:2020年1月20日
968 次瀏覽

廣告