
 資料結構
資料結構 網路
網路 關係資料庫管理系統
 作業系統
作業系統 Java
Java iOS
iOS HTML
HTML CSS
CSS Android
 Python
 C 程式設計
 C++
C++ C#
C# MongoDB
 MySQL
MySQL Javascript
 PHP
PHP如何在 Android sqlite 中使用 where 子句、“BETWEEN” 和“AND” 過濾資料?
在進入示例之前,我們應該瞭解 Android 中的 sqlite 資料庫是什麼。SQLite 是一個開源的 SQL 資料庫,它將資料儲存到裝置上的文字檔案中。Android 自帶內建的 SQLite 資料庫實現。SQLite 支援所有關係資料庫功能。要訪問此資料庫,您不需要像 JDBC、ODBC 等那樣為其建立任何連線。
此示例演示瞭如何在 Android sqlite 中使用 where 子句、“BETWEEN” 和“AND” 過濾資料。
步驟 1 - 在 Android Studio 中建立一個新專案,轉到檔案 ⇒ 新建專案,並填寫所有必需的詳細資訊以建立新專案。
步驟 2 - 將以下程式碼新增到 res/layout/activity_main.xml 中。
<?xml version="1.0" encoding="utf-8"?>
<LinearLayout xmlns:android="http://schemas.android.com/apk/res/android"
   xmlns:tools="http://schemas.android.com/tools"
   android:layout_width="match_parent"
   android:layout_height="match_parent"
   tools:context=".MainActivity"
   android:orientation="vertical">
   <EditText
      android:id="@+id/name"
      android:layout_width="match_parent"
      android:hint="Enter Name"
      android:layout_height="wrap_content" />
   <EditText
      android:id="@+id/salary"
      android:layout_width="match_parent"
      android:inputType="numberDecimal"
      android:hint="Enter Salary"
      android:layout_height="wrap_content" />
   <LinearLayout
      android:layout_width="wrap_content"
      android:layout_height="wrap_content"><Button
      android:id="@+id/save"
      android:text="Save"
      android:layout_width="wrap_content"
      android:layout_height="wrap_content" />
      <Button
         android:id="@+id/refresh"
         android:text="Refresh"
         android:layout_width="wrap_content"
         android:layout_height="wrap_content" />
   </LinearLayout>

   <ListView
      android:id="@+id/listView"
      android:layout_width="match_parent"
      android:layout_height="wrap_content">
   </ListView>
</LinearLayout>
在上面的程式碼中,我們使用了姓名和工資作為 EditText,當用戶點選儲存按鈕時,它會將資料儲存到 sqlite 資料庫中。插入值後,點選重新整理按鈕以使用 BETWEEN 和 AND 運算子從遊標更新 ListView。
步驟 3 - 將以下程式碼新增到 src/MainActivity.java 中
package com.example.andy.myapplication;

import android.os.Bundle;
import android.support.v7.app.AppCompatActivity;
import android.view.View;
import android.widget.ArrayAdapter;
import android.widget.Button;
import android.widget.EditText;
import android.widget.ListView;
import android.widget.Toast;

import java.util.ArrayList;

public class MainActivity extends AppCompatActivity {
   Button save, refresh;
   EditText name, salary;
   private ListView listView;

   @Override
   protected void onCreate(Bundle readdInstanceState) {
      super.onCreate(readdInstanceState);
      setContentView(R.layout.activity_main);
      final DatabaseHelper helper = new DatabaseHelper(this);
      final ArrayList array_list = helper.getAllCotacts();
      name = findViewById(R.id.name);
      salary = findViewById(R.id.salary);
      listView = findViewById(R.id.listView);
      final ArrayAdapter arrayAdapter = new ArrayAdapter(MainActivity.this, android.R.layout.simple_list_item_1, array_list);
      listView.setAdapter(arrayAdapter);
      findViewById(R.id.refresh).setOnClickListener(new View.OnClickListener() {
         @Override
         public void onClick(View v) {
            array_list.clear();
            array_list.addAll(helper.getAllCotacts());
            arrayAdapter.notifyDataSetChanged();
            listView.invalidateViews();
            listView.refreshDrawableState();
         }
      });

      findViewById(R.id.save).setOnClickListener(new View.OnClickListener() {
         @Override
         public void onClick(View v) {
            if (!name.getText().toString().isEmpty() && !salary.getText().toString().isEmpty()) {
               if (helper.insert(name.getText().toString(), salary.getText().toString())) {
                  Toast.makeText(MainActivity.this, "Inserted", Toast.LENGTH_LONG).show();
               } else {
                  Toast.makeText(MainActivity.this, "NOT Inserted", Toast.LENGTH_LONG).show();
               }
            } else {
               name.setError("Enter NAME");
               salary.setError("Enter Salary");
            }
         }
      });
   }
}
步驟 4 - 將以下程式碼新增到 src/ DatabaseHelper.java 中
package com.example.andy.myapplication;

import android.content.ContentValues;
import android.content.Context;
import android.database.Cursor;
import android.database.sqlite.SQLiteDatabase;
import android.database.sqlite.SQLiteException;
import android.database.sqlite.SQLiteOpenHelper;

import java.io.IOException;
import java.util.ArrayList;

class DatabaseHelper extends SQLiteOpenHelper {
   public static final String DATABASE_NAME = "salaryDatabase3";
   public static final String CONTACTS_TABLE_NAME = "SalaryDetails";
   public DatabaseHelper(Context context) {
      super(context,DATABASE_NAME,null,1);
   }

   @Override
   public void onCreate(SQLiteDatabase db) {
      try {
         db.execSQL(
            "create table "+ CONTACTS_TABLE_NAME +"(id INTEGER PRIMARY KEY, name text,salary text )"
         );
      } catch (SQLiteException e) {
         try {
            throw new IOException(e);
         } catch (IOException e1) {
            e1.printStackTrace();
         }
      }
   }

   @Override
   public void onUpgrade(SQLiteDatabase db, int oldVersion, int newVersion) {
      db.execSQL("DROP TABLE IF EXISTS "+CONTACTS_TABLE_NAME);
      onCreate(db);
   }

   public boolean insert(String s, String s1) {
      SQLiteDatabase db = this.getWritableDatabase();

      ContentValues contentValues = new ContentValues();
      contentValues.put("name", s);
      contentValues.put("salary", s1);
      db.insert(CONTACTS_TABLE_NAME, null, contentValues);
      return true;
   }

   public ArrayList getAllCotacts() {
      SQLiteDatabase db = this.getReadableDatabase();
      ArrayList<String> array_list = new ArrayList<String>();
      Cursor res = db.rawQuery( "select * from "+CONTACTS_TABLE_NAME+" WHERE salary BETWEEN '10' AND '10000' ", null );
      res.moveToFirst();

      while(res.isAfterLast() == false) {
         array_list.add(res.getString(res.getColumnIndex("name")));
         res.moveToNext();
      }
      return array_list;
   }
}
讓我們嘗試執行您的應用程式。我假設您已將您的實際 Android 移動裝置連線到您的計算機。要從 Android Studio 執行應用程式,請開啟您的一個專案活動檔案,然後點選工具欄中的執行 ![]() 圖示。選擇您的移動裝置作為選項,然後檢查您的移動裝置,它將顯示您的預設螢幕 -
圖示。選擇您的移動裝置作為選項,然後檢查您的移動裝置,它將顯示您的預設螢幕 -
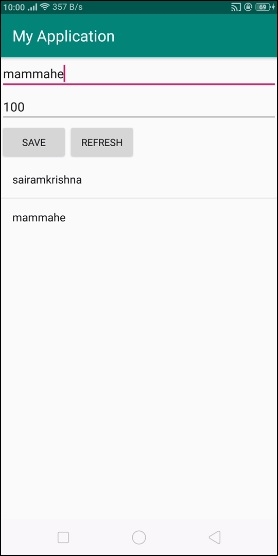
在以上結果中,它在列表檢視中顯示了工資不在 10 和 10000 之間的姓名。
點選此處下載專案程式碼

更新於: 2019-07-30
224 次檢視

廣告