
 資料結構
資料結構 網路
網路 關係資料庫管理系統 (RDBMS)
 作業系統
作業系統 Java
Java iOS
iOS HTML
HTML CSS
CSS Android
 Python
 C語言程式設計
 C++
C++ C#
C# MongoDB
 MySQL
MySQL Javascript
 PHP
PHP自編碼器的工作原理?
自編碼器是一種高效的神經網路類別,用於無監督學習和降維。它們能夠透過將輸入資料編碼到低維潛在空間,然後解碼以恢復原始輸入來學習輸入資料的緊湊表示。本文深入探討了Python中自編碼器的工作原理,特別是使用Keras庫,以提供對其功能的全面理解。
什麼是自編碼器?
自編碼器是一種專門設計用於重構輸入資料的神經網路。它由兩部分組成:解碼器網路,負責從壓縮表示中重新建立原始輸入;編碼器網路,負責將輸入壓縮成低維表示。自編碼器擅長識別重要的資料特徵和模式,並且經過訓練以最大限度地減少重建過程中的誤差。其應用包括降維、異常檢測和模型生成。
資料壓縮、異常檢測、影像合成和去噪只是自編碼器發揮重要作用的幾個應用。當輸入資料沒有明確的標籤,或者我們想要在不依賴標記示例的情況下從資料中提取有意義的特徵時,它們特別有用。
自編碼器如何工作?
自編碼器透過獲取輸入資料的緊湊有效表示來工作。為了捕捉基本特徵,自編碼器使用編碼器網路將輸入壓縮到低維潛在空間。隨後,解碼器網路從這種壓縮表示中重建原始輸入。在整個訓練過程中,自編碼器力求最小化輸入和重建輸出之間的差異。這使得自編碼器能夠學習資料的編碼和解碼。透過迫使網路忠實地重建輸入,自編碼器能夠獲得有意義的表示並提取有價值的特徵。因此,它們在降維、異常檢測和模型生成等任務中非常有價值。
以下是我們將遵循的步驟,以瞭解自編碼器如何透過程式示例工作:
載入並預處理MNIST資料集。
使用編碼器和解碼器層定義自編碼器模型。
建立單獨的編碼器和解碼器模型以隔離其功能。
在訓練資料上編譯和訓練自編碼器。
在完成模型訓練後,使用編碼器對輸入測試資料進行編碼,並使用解碼器將編碼後的資料解碼回原始輸入空間。
使用Matplotlib視覺化原始影像和重建影像。
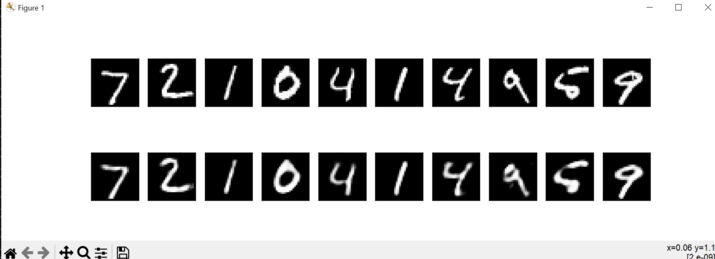
下面的程式將顯示一個包含10行的圖形,每行包含一個原始影像及其重建的對應影像。我們還可以嘗試不同的超引數,並觀察它們如何影響重建影像的質量。
示例
import numpy as npp
import matplotlib.pyplot as pltt
from keras.datasets import mnist
from keras.layers import Input, Dense
from keras.models import Model

# Load the MNIST dataset
(x_train_m, _), (x_test_m, _) = mnist.load_data()

# Normalize the pixel values between 0 and 1
x_train_m = x_train_m.astype('float32') / 255.
x_test_m = x_test_m.astype('float32') / 255.

# Reshape the input images
x_train = x_train_m.reshape((len(x_train_m), npp.prod(x_train_m.shape[1:])))
x_test = x_test_m.reshape((len(x_test_m), npp.prod(x_test_m.shape[1:])))

# Define the size of the latent space
latent_dim = 32

# Define the input layer
input_img = Input(shape=(784,))

# Define the encoder layers
encoded1 = Dense(128, activation='relu')(input_img)
encoded2 = Dense(latent_dim, activation='relu')(encoded1)

# Define the decoder layers
decoded1 = Dense(128, activation='relu')(encoded2)
decoded2 = Dense(784, activation='sigmoid')(decoded1)

# Create the autoencoder model
autoencoder = Model(input_img, decoded2)

# Create separate encoder and decoder models
encoder = Model(input_img, encoded2)

# Define the decoder input
latent_input_m = Input(shape=(latent_dim,))
decoder_layer_m = autoencoder.layers[-2](latent_input_m)
decoder_layer_m = autoencoder.layers[-1](decoder_layer_m)
decoder = Model(latent_input_m, decoder_layer_m)

# Compile the autoencoder
autoencoder.compile(optimizer='adam', loss='binary_crossentropy')

# Train the autoencoder
autoencoder.fit(x_train, x_train,
   epochs=50,
   batch_size=256,
   shuffle=True,
   validation_data=(x_test, x_test))

# Encode and decode the input test data
encoded_imgs = encoder.predict(x_test)
decoded_imgs = decoder.predict(encoded_imgs)

# Display the original and reconstructed images
n = 10
pltt.figure(figsize=(20, 4))
for i in range(n):
   # Original image
   ax = pltt.subplot(2, n, i+1)
   pltt.imshow(x_test[i].reshape(28, 28))
   pltt.gray()
   ax.get_xaxis().set_visible(False)
   ax.get_yaxis().set_visible(False)

   # Reconstructed image
   ax = pltt.subplot(2, n, i+n+1)
   pltt.imshow(decoded_imgs[i].reshape(28, 28))
   pltt.gray()
   ax.get_xaxis().set_visible(False)
   ax.get_yaxis().set_visible(False)
pltt.show()
輸出
結論
總之,自編碼器提供了一個強大的框架,用於學習輸入資料的壓縮表示。透過採用編碼器-解碼器架構,它們可以有效地捕捉資料中的重要特徵和模式。自編碼器廣泛用於異常檢測、降維和生成式建模等任務。透過訓練過程,它們最佳化重建誤差,使它們能夠學習有意義的表示並從複雜的資料集中提取有價值的見解。憑藉其編碼和解碼資料的能力,自編碼器為各種機器學習應用提供了靈活而有效的工具。

瀏覽量:110
