
 資料結構
資料結構 網路
網路 關係型資料庫管理系統 (RDBMS)
 作業系統
作業系統 Java
Java iOS
iOS HTML
HTML CSS
CSS Android
 Python
 C 程式設計
 C++
C++ C#
C# MongoDB
 MySQL
MySQL Javascript
 PHP
PHPDjango 中的 Google 身份驗證
在許多開發者網站上,我們都能看到 Google 社交身份驗證,這非常方便。在本文中,我們將瞭解如何建立一個 Django Google 登入專案。
首先,訪問 https://console.cloud.google.com/apis/dashboard並建立一個專案。
轉到 OAuth 同意螢幕並建立一個螢幕,然後儲存並繼續。
轉到憑據,點選“建立憑據”,然後點選“OAuth 客戶端 ID”。
然後,選擇 Web 應用程式,並新增以下兩個 URL:
- http://127.0.0.1:8000/
- http://127.0.0.1:8000/accounts/github/login/callback/
現在,您將獲得一個客戶端 ID 和一個金鑰,請將它們安全地儲存在您的檔案中。
示例
建立一個 Django 專案和一個應用程式。
在 **settings.py** 中:
SITE_ID = 1
LOGIN_REDIRECT_URL = "/"

INSTALLED_APPS = [
   'django.contrib.admin',
   'django.contrib.auth',
   'django.contrib.contenttypes',
   'django.contrib.sessions',
   'django.contrib.messages',
   'django.contrib.staticfiles',
   "django.contrib.sites", # <--
   "allauth", # <--
   "allauth.account", # <--
   "allauth.socialaccount", # <--
   "allauth.socialaccount.providers.google",
   "googleauthentication" #this is my app name ,you can name your app anything you want
]
SOCIALACCOUNT_PROVIDERS = {
   'google': {
      'SCOPE': [
         'profile',
         'email',
      ],
      'AUTH_PARAMS': {
         'access_type': 'online',
      }
   }
}

#add this in the end of file
AUTHENTICATION_BACKENDS = (
   "django.contrib.auth.backends.ModelBackend",
   "allauth.account.auth_backends.AuthenticationBackend",
)
在這裡,我們定義了一個重定向 URL。在 INSTALLED_APPS 中,我們定義了我們將用於身份驗證的重要後端。然後,我們定義了社交賬戶提供商,它將告訴我們應該使用什麼進行登入(這裡我們使用 Google)。我們還定義了它應該儲存使用者的哪些資料。
現在,在專案的 **urls.py** 中,新增以下內容:
from django.contrib import admin
from django.urls import path,include

urlpatterns = [
   path('admin/', admin.site.urls),
   path("accounts/", include("allauth.urls")), #most important
   path('',include("googleauthentication.urls")) #my app urls
]
在這裡,我們添加了需要新增的預設路徑;它是 allauth 庫路徑,用於啟用 Google 登入。第二個是我們建立的應用程式路徑。
在應用程式的 **urls.py** 中:
from django.urls import path
from . import views
urlpatterns = [
   path('',views.home),
]
在這裡,我們設定了我們的 **urls** 並將我們的檢視渲染到主頁 url 上。
在 **views.py** 中:
from django.shortcuts import render

# Create your views here.
def home(request):
   return render(request,'home.html')
我們只是在這裡渲染了前端。
在應用程式的主目錄中建立一個 **templates** 資料夾,並新增一個名為 **home.html** 的檔案,內容如下:
<!DOCTYPE html>
<html>
<head>
<title>Google Registration</title>
</head>
<body>
{% load socialaccount %}
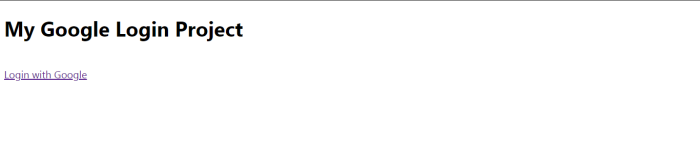
<h1>My Google Login Project</h1>
<a href="{% provider_login_url 'google'%}?next=/">Login with Google</a>
</body>
</html>在這裡,我們渲染了 JS 並載入了 **allauth** 庫到前端。在 **<a>** 中,我們提供了 Google 登入頁面,在該頁面上我們設定了我們的預設 Google 登入頁面。
現在,在終端上執行以下命令:
python manage.py makemigrations
python manage.py migrate
接下來,建立一個 **超級使用者**。
python manage.py createsuperuser
然後,啟動伺服器並轉到管理面板。轉到站點並新增一個具有 url 名稱和顯示名稱的站點:http://127.0.0.1:8000
轉到社交應用程式並新增應用程式。選擇您之前新增的站點:
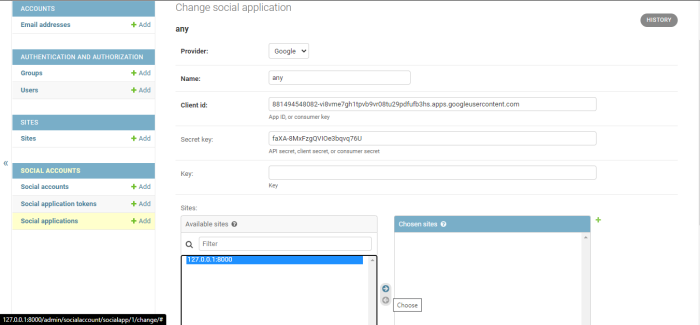
這將在您的 Django 專案中註冊 Google 作為身份驗證後端。一切設定就緒,現在您可以繼續檢查輸出。
輸出

2K+ 閱讀量
