
 資料結構
資料結構 網路
網路 關係資料庫管理系統
 作業系統
作業系統 Java
Java iOS
iOS HTML
HTML CSS
CSS Android
 Python
 C 程式設計
 C++
C++ C#
C# MongoDB
 MySQL
MySQL Javascript
 PHP
PHP使用本地儲存構建帶有 JavaScript 的網站書籤應用程式
在本教程中,我們將使用 JavaScript、CSS 和 HTML 來構建一個網站書籤應用程式。透過使用瀏覽器的本地儲存,我們將能夠儲存我們最喜歡的網站的連結,而無需使用任何資料庫。
由於本地儲存(也稱為 Web 儲存 API),我們可以在客戶端儲存資料。本地儲存中的資料以字串形式表示,即使會話關閉後也仍然存在。資料只能由使用者手動刪除。由於所有資料都儲存在客戶端,因此對資料長度存在明顯的限制。根據我們使用的瀏覽器,當前可以儲存的資料大小從 2 MB 到 10 MB 不等。
策略 - 我們正在建立的書籤應用程式可以執行以下功能 -
將使用者輸入的名稱和網站連結新增到一個新的書籤中。
能夠訪問網頁
刪除書籤
儲存書籤時,將所有書籤永久儲存到 LocalStorage 中。
以下是檔案結構和檔名 -
index.html
style.css
main.js
網頁的結構或佈局將使用 HTML 進行設計。這包括以下部分 -
標題 - 這包含我們網站的標題。“使用 JavaScript 和本地儲存構建網站書籤應用程式 - TutorialsPoint”是此處的標題。
容器 - 包括表單和書籤部分。
表單 - 它有兩個輸入框,用於連結和站點名稱。還提供了一個“儲存”按鈕用於提交表單。
書籤 - 此區域將儲存我們所有儲存的書籤,該區域將根據輸入動態變化。
示例
<!DOCTYPE html>
<html>
<title>Build a Site Bookmark App with JavaScript by using Local Storage - TutorialsPoint</title>
<head>
   <meta charset="UTF-8">
   <meta http-equiv="X-UA-Compatible" content="IE=edge">
   <meta name="viewport" content="width=device-width, initial-scale=1.0">

   <!-- link the CSS file here -->
   <link rel="stylesheet" type="text/css" href="style.css">
</head>
<body>
   <h1>App for Bookmarking Sites on Tutorialspoint!</h1>
   <div class="container">

      <!-- form for entering site information -->
      <form class="form" action="#">
         <div class="input-field">
            <label for="site_name">Site Name</label>
            <input name="site_name" type="text" placeholder="name">
         </div>
         <div class="input-field">
            <label for="url">Site URL</label>
            <input name="url" type="text" placeholder="https://www.mysite.com">
         </div>
         <button class="save_button">Save</button>
      </form>

      <!-- the area in which bookmarks will be shown -->
      <h2>Saved Bookmarks</h2>
      <div class="view_bookmarks"></div>
   </div>

   <!-- link the JavaScript file here -->
   <script src="./main.js"></script>
</body>
</html>
樣式 CSS - 使用 CSS 對各個元件進行樣式設定並使其更具視覺吸引力。
使用 flex 佈局顯示包含表單和 view_bookmarks 的部分。
每個書籤將根據當前情況動態新增或刪除。
*{
   box-sizing: border-box;
   font-family: sans-serif;
}
body{
   margin: 0;
   padding: 0;
   background-color: #979090;
}
a{
   text-decoration: none;
   color: #fff;
}

/*Title style*/
h1{
   width: 100%;
   height: 85px;
   text-align: center;
   line-height: 85px;
   margin: 0;
   padding: 0;
   background-color: #37abbb;
   letter-spacing: 2px;
   word-spacing: 8px;
   color: #fff;
}
h2{
   color: #fff;
   padding-left: 30px;
}
.container{
   width: 620px;
   min-height: 160px;
   background-color: #464040;
   margin: 0 auto;
}

/*form section style*/
.form{
   width: 100%;
   height: auto;
   background-color: #37abbb;
   padding: 38px 48px;
   margin: 20px 0;
}
.input-field{
   display: flex;
   flex-direction: column;
   align-items: center;
   margin-bottom: 15px;
}
.input-field input[type="text"]{
   width: 245px;
   height: 26px;
   outline: none;
   border: none;
   background-color: #fff;
   border-bottom: 2px solid #fff;
   padding-left: 10px;
   color: #000000;
}
.input-field label{
   color: #fff;
   font-weight: bold;
   margin-bottom: 5px;
}
.save_button{
   display: block;
   margin: 0 auto;
   border: none;
   width: 69px;
   height: 26px;
   background-color: #fff;
   color: #000;
   cursor: pointer;
   outline: none;
   font-weight: 500;
}

/*Bookmarks section style*/
.view_bookmarks{
   width: 100%;
   background-color: #37abbb;
   padding: 20px;
}
.btn_bookmark{
   display: flex;
   align-items: center;
   width: 305px;
   height: 42px;
   padding: 5px 20px;
   background-color: #37abbb;
   margin-bottom: 10px;
   background-color: #464040;
}
.btn_bookmark span{
   flex: 1;
   font-weight: bold;
   letter-spacing: 1.5px;
   color: #fff;
}
.btn_bookmark .visit{
   width: 52px;
   height: 26px;
   line-height: 25px;
   text-align: center;
   background-color: #37abbb;
   color: #fff;
   border-radius: 5px;
   margin: 0 5px;
   font-weight: 500;
}
.btn_bookmark .delete{
   width: 62px;
   height: 26px;
   line-height: 25px;
   text-align: center;
   background-color: #e91e63;
   border-radius: 5px;
   font-weight: 500;
}
功能 - JavaScript 用於實現應用程式的主要邏輯。應用程式具有一些相互關聯的功能。
階段 1(選擇每個元件並定義變數) -
我們首先需要獲取我們從 DOM 需要的所有內容的引用。querySelector() 方法用於選擇必要的 HTML 佈局元素。
這將從 DOM 中獲取諸如“mySiteName”和“url”、“.view_bookmarks”和“.save 按鈕”之類的輸入欄位,並將它們儲存在相關的變數中。
它們被賦予變數名,以便可以方便地訪問和修改它們。
為我們的本地儲存定義書籤物件,它將儲存所有書籤。
// choosing the save button
let button = document.querySelector(".save_button");

// Choose the input field.
let siteName = document.querySelector("[name='mySiteName']");
let url = document.querySelector("[name='url']");

// Choose the div with the "bookmarks" class.
let view_bookmarksSection = document.querySelector(".view_bookmarks");

// Keeping bookmarked pages in local storage
if(typeof(localStorage.btn_bookmark) == "undefined"){
   localStorage.btn_bookmark = "";
}
階段 2(獲取值併為表單中的事件提交配置驗證) -
對於儲存按鈕,我們有一個 EventListener 來監視表單點選事件。只要發生點選事件,函式就會開始工作。
每次提交表單時,頁面都會重新載入。因此,我們呼叫 e.preventDefault() 來阻止這種情況。
siteName.value 和 url.value 變數可分別用於檢索使用者輸入的名稱和 url。
為了確保我們不會重複儲存任何內容並且我們的表單不為空,包含了一些驗證。
在徹底驗證後,將使用者輸入的值傳遞給 addBookmark() 函式。
請記住 - setItem() 方法需要一個鍵和一個值,它允許我們在本地儲存中儲存專案。在這種情況下,正在使用“localStorage.bookmark”在我們的 localStorage 中自動構建一個書籤作為鍵。
// listener for the form to submit
button.addEventListener("click", function(e){
// Stop the page from refreshing after you submit the form.
   e.preventDefault();
   let patterURL = /https?:\/\/(www\.)?[-a-zA-Z0-9@:%._\+~#=]{2,256}\.[a-z]{2,6}\b([-a-zA-Z0-9@:%_\+.~#?&//=]*)?/gi;
   let arrayItems, check = false, adr, itemAdr;

   // this is Form and URL validation
   if(siteName.value === ""){
      alert("you must fill the siteName input");
   } else if(url.value === ""){
      alert("you must fill the url input");
   } else if(!patterURL.test(url.value)){
      alert("you must enter a valid url");
   } else{
      arrayItems = localStorage.btn_bookmark.split(";");
      adr = url.value;
      adr = adr.replace(/http:\/\/|https:\/\//i, "");
      arrayItems.length--;

      // See if the URL has already been bookmarked
      for(item of arrayItems){
         itemAdr = item.split(',')[1].replace(/http:\/\/|https:\/\//i,"");
         if(itemAdr == adr){
            check = true;
         }
      }
      if(check == true){
         alert("This website is already bookmarked");
      }
      else{

         // If everything is in order, add the bookmark to local storage
         localStorage.btn_bookmark += `${siteName.value},${url.value};`;
         addBookmark(siteName.value, url.value);
         siteName.value = "";
         url.value = "";
      }
   }
});
階段 3 在我們的網站上新增書籤 - 站點名稱和 url 將作為引數傳送到此 addBookmark() 函式。因此 -
建立一個新的書籤物件。
此物件具有 visit 和 delete 屬性,以及 name 和 URL 屬性。
之後,它將該物件包含到 HTML 頁面中的書籤區域。
然後將呼叫 fetchBookmark() 函式。此函式將每個專案呈現到螢幕上。
// Adding the bookmark functionality
function addBookmark(name, url){
   let dataLink = url;

   // Once a bookmark is retrieved, it is displayed in a
   // div with a button to visit the link or delete it
   if(!url.includes("http")){
      url = "//" + url;
   }
   let item = `<div class="btn_bookmark">
      <span>${name}</span>
      <a class="visit" href="${url}" target="_blank"
         data-link='${dataLink}'>Visit</a>
      <a onclick="removeBookmark(this)"
         class="delete" href="#">Delete</a>
   </div>`;
   view_bookmarksSection.innerHTML += item;
}
階段 4 現在我們可以新增書籤並將它們儲存在 localStorage 中,我們可以渲染儲存的書籤。但是,即使書籤儲存在 localStorage 中,當我們重新整理頁面或開始新會話時,它們都會從網站上消失。
這意味著我們必須使用 fetchBookmark() 函式從 localStorage 中檢索書籤才能保留它們。
首先,我們將確定定義的書籤鍵是否為空。當它不為空時 -
使用 split() 方法,我們將所有書籤編譯成一個數組。
之後,我們將遍歷所有專案。我們將檢索每個書籤的名稱和連結。
透過使用 addBookmark() 函式,我們將顯示這些專案。
// function to render the bookmarks you've stored
(function fetchBoookmark(){
   if(typeof(localStorage.btn_bookmark) != "undefined" && localStorage.btn_bookmark !== ""){
      let arrayItems = localStorage.btn_bookmark.split(";");
      arrayItems.length--;
      for(item of arrayItems){
         let itemSpli = item.split(',');
         addBookmark(itemSpli[0], itemSpli[1]);
      }
   }
})();
階段 5(刪除書籤) - 訪問連結很簡單;我們只需按照 URL 操作即可。但是,要刪除書籤,我們必須首先在我們的 localStorage 中找到特定的 URL,然後將其從物件中取出。
我們將建立 removeBookmark() 函式來執行此操作。
我們將首先從本地儲存中獲取每個書籤並將其放入陣列中。
使用 splice() 方法刪除陣列中的元素,然後返回修改後的專案(s)。
此外,要從書籤父節點中刪除子節點,我們可以使用 removeChild() 方法。
// Perform the bookmark removal function

function removeBookmark(thisItem){
   let arrayItems = [],
   index,
   item = thisItem.parentNode,
   itemURL = item.querySelector(".visit").dataset.link,
   itemName = item.querySelector("span").innerHTML;
   arrayItems = localStorage.btn_bookmark.split(";");
   for(i in arrayItems){
      if(arrayItems[i] == `${itemName},${itemURL}`){
         index = i;
         break;
      }
   }

   // localStorage should be updated
   index = arrayItems.indexOf(`${itemName},${itemURL}`);
   arrayItems.splice(index,1);
   localStorage.btn_bookmark = arrayItems.join(";");

   // bookmark Section should be updated
   view_bookmarksSection.removeChild(item);
}
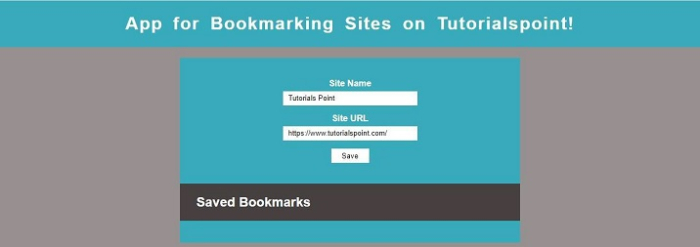
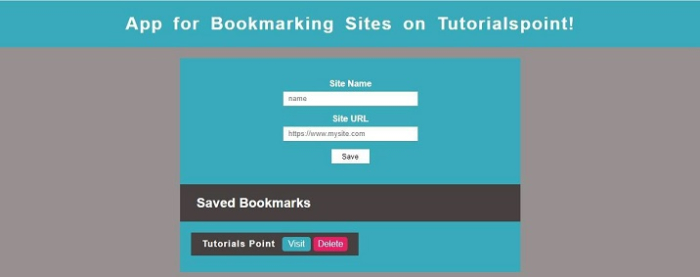
輸出
以上程式碼將給出以下輸出 -
如您在輸出中所見,網站書籤軟體現已準備就緒。此外,您可以檢視已儲存在 localStorage 中的書籤,如下所示 -
此應用程式為在 Tutorials Point 上書籤網站提供了基本功能,例如使用本地儲存新增、儲存和刪除。您可以發揮創意並提供編輯功能或使用巢狀列表建立集合來儲存書籤。
在書籤網站之前,如下所示 -
書籤網站後,如下所示 -

1K+ 次瀏覽
